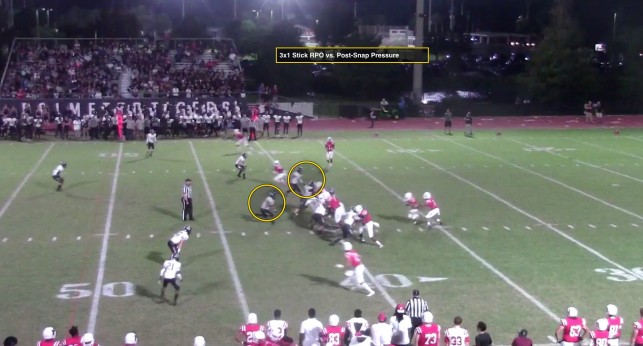
Pre-Snap and Post-Snap RPO Drill Work For QB’s

By Josh Lindke
Passing Game Coordinator/Quarterback’s Coach
Toledo Central Catholic High School (OH)
Twitter: @Coach_JLindke


When you are looking to improve your RPO game, the first area that you may want to look at above the scheme, defenders you want to conflict and tags you want to add, is the individual technique and fundamentals of your QB in the RPO aspect. I believe that it is easy for many coaches to make the mistake of incorporating RPO’s but forgetting to give their QB the tools to succeed in the RPO world. We usually don’t just tell a QB to take a drop when we want to throw the ball down the field. We as quarterback coaches almost always give him the tools to succeed within a series of different drops, whether it be a 3-step, 5-step, 7-step, or any type of quick game.

Well, the same can be said for the tools and techniques the quarterback needs to be successful in the RPO world. There are specific drills that can be utilized every day to not only improve your quarterback’s skills in the RPO world but take the RPO aspect of your offense to next level.  I am a big believer that making sure our QB’s feet are always in a good spot to throw. We use the phrase, “good feet-good throw,” because I think if your QB doesn’t have the biggest arm, then making sure he has good feet gives him a chance to be successful in the RPO/throw game. Another thing that we always want to keep in mind is that every throw is a big-time throw. Letting your QB know that, gives him the mindset that no matter what drill he is doing, it’s important to make every throw their best.


Where to start

There are 5 different drills that we utilize to improve our quarterback’s fundamentals and decision making within the RPO game. At Central Catholic, we utilize these drills every day because I am a big believer in drilling the RPO aspects of the game is not only a team setting but in individual drills, group settings, and then in the film room and on the whiteboard. I think that sometimes we as coaches just think it’s easy to tell a quarterback to ‘read and ride” and throw the RPO if the conflict player commits to the run or hand it off if that player plays the pass. It’s not as simple as that and these RPO throws aren’t as easy as we think.


What we believe

When we run RPO’s, we want to establish the downhill run. We don’t call RPO’s to throw the ball more, we utilize them to manipulate numbers in the box to ultimately give ourselves “light-boxes” to run the football. We drill this mentality into our QB from day 1 install. However, when he goes to throw that pre-snap or post-snap RPO, he has the tools and techniques to be successful and fluid.

We believe in a few different RPO QB drills. We utilize these drills in the off-season and in-season, but they never change. Sure, they can be manipulated to give certain looks week to week, but the core of the drills and the language utilized in the coaching points made to the QB never change. Many of these drills that we are going to go through are quick-release drills. We drill this because often, during an RPO, whether it be pre- or post-snap, the ball is coming out quickly. So, these drills can help your quarterback not only improve his RPO footwork but his release as well. 


Base Individual Drills


Easy/Way Hard Way Warm Up: (Feet Parallel- Easy Way- Hard Way)

Back Away (Easy Way-Hard Way)

Walk Away (Easy Way-Hard Way)
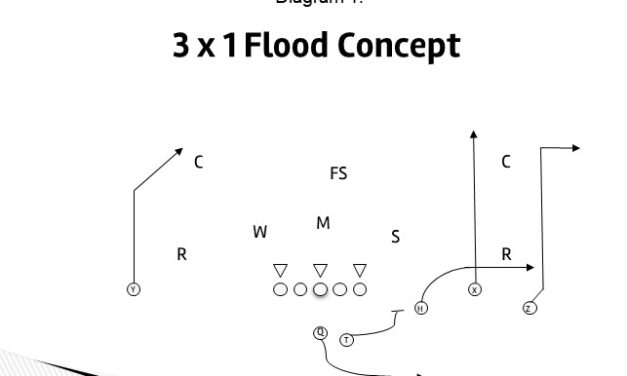
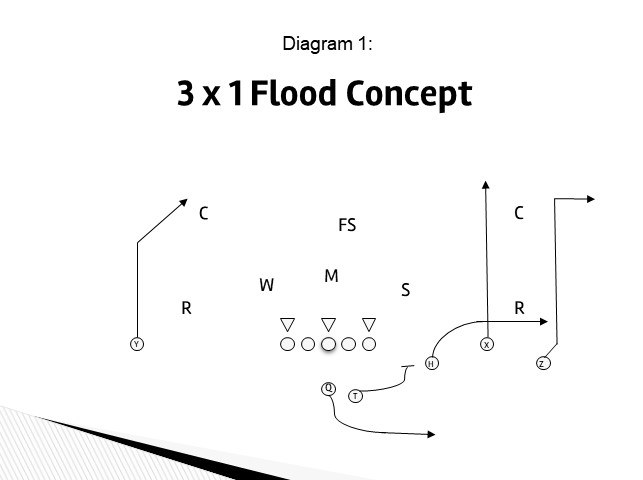
 

Pre Snap RPO

Turn 2/Clear 2 (Easy Way-Hard Way)

Quick Rip (No Laces)
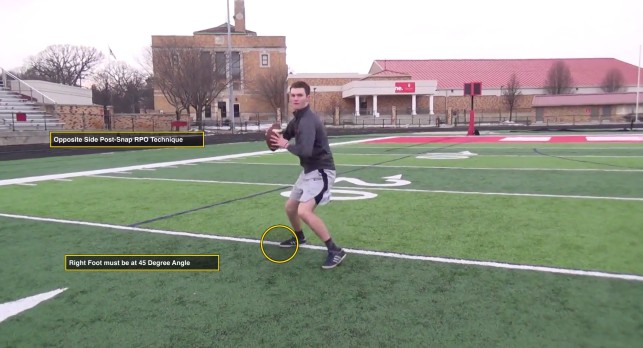
 

Post-Snap RPO

Read Ride Pop

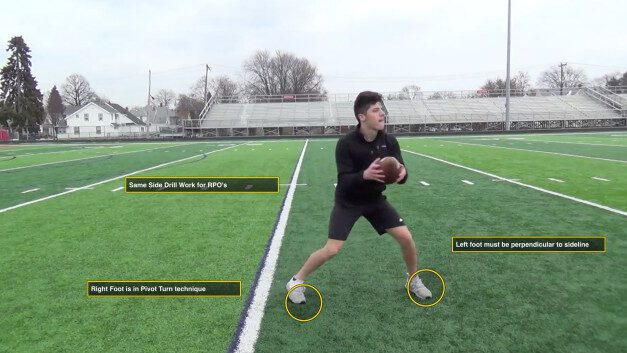
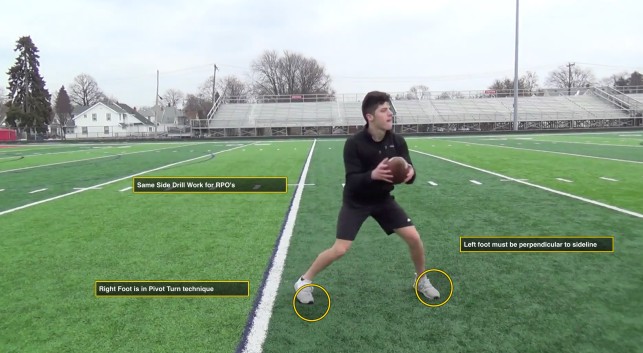
Same Side Mesh Ride= 90-degree footwork (Easy Way)

Opposite Side Mesh Ride= 45-degree footwork (Hard Way)


This is how we breakdown our Individual/Group RPO drill work. We have always found ways to steal time during practice to get this done. Whether it’s during Indy work, defensive time, special teams, pre- or post-practice, we carve out time to get these drills to our quarterback every day. Again, if you want to be good at RPO’s, it starts with the skill set, technique, and mindset of your quarterback in the RPO world.


Coaching Points:

Warm Up: (Feet Parallel- Easy Way- Hard Way)

Read More

The “Gung Ho” Kickoff Scheme

By William Lund
Special Teams Coordinator and Defensive Line Coach
Roosevelt University (IL)
Twitter: @lundsanity51


Gung Ho is a Chinese phrase that translates to “working together or working in harmony”. Kickoff operates in the same way with 11 players working together to create great starting field position for the defense. It also applies to develop harmony in practicing the variety of skills over the course of a practice week. I value developing skills at speed over practicing full schemes of return we are facing. There are several techniques needed to be successful in Kickoff Coverage. Finding harmony in developing an efficient way of balancing skills and techniques in execution with our opponent’s scheme in a tight time frame was my focus.


Philosophy

Our Kickoff scheme is set up like defensive fits in the run game would be designed. We attack our fits, our fits take us to the return. No lanes, run to your fit. Based on your keys we can play fast and precise.  We have two-fold players that act like Robber safeties running the alley. The scheme also incorporates a spill and over the top player, as linebackers would execute in the run game. It allows us to play fast and effectively.


Positions

The positions are mirrored left and right. The 5’s are the Spill and Over the Top Players(OTT). The OTT player acts as a bonus ball guy. Linebacker types or bigger body safeties that have some speed work well here.  Our 4’s are TE/DE/MLB types who are punch and press guys, physical and disciplined. The 3’s also act as punch and press players and often need to set an edge or “Chase the Puller”. OLB/Safeties/Bigger RB’s fit well in these spots. The 2’s are contain players. Speed is crucial, but discipline is paramount. WR’s/RB’s/CB’s work well in this position. Contain players stay outside of everything on a return to them or they are players who “trim the fat” at ball depth as they squeeze any return away. The key players for this unit are the 1’s or Fold players. They are essentially ball guys. If the ball comes to them, they fill, any return away they fold and find an alley. The fold players need to have instincts and speed. Great instincts will help some players play faster in this position if they don’t have great “timed” speed.


Zones of Attack 

We have three zones of attack. The Fly Zone is from the -35 yard line to the +35 Yard line (Picture shows 20, Changed with new KO rules). We want to FLY in the Fly Zone. We want to beat blocks with speed or working backdoor. We do not want contact with any front-line blockers unless they retreat into the Strike Zone.

Strike Zone is from the +35 to the +25. This is where the majority of contact takes place. We must play physical and smart working to our fits as we attack blocks. Because we are fit oriented we need to defeat blocks to the side of our fit. We want to be heavy-handed, punching, and escaping blocks quickly.

The Big Play Zone is inside the +25 yard-line. This is where we must be great finishers. We want to secure tackles and have as many bodies attacking the returner to create momentum and field position for the defense. We want to swarm and create opportunities to get on top of any loose balls created by our physical play.

We will use a variety of kicks to help our unit be unpredictable and use it as a weapon for our team to potentially gain a possession. Deep Kicks, Sky Kicks, Pop Over, and Surprise Onside Kicks will be ways we will take advantage of spaces in the return unit. It also gives us ways to adapt to weather as the seasons change. Philosophically, I am a middle of the field kicker with some adjustment between goalposts. I know a few teams like to kick on a hash and to condense the field and have the cover units only cover 2/3rds of the field. As a return unit, I have taken advantage of this scheme several times with returns to the field. The condensed area, in my opinion, makes blocking like shooting fish in a barrel and we run to daylight.

Diagram 1


Kickoff Keys and Fits

We look at the offensive return team as trying to execute a play versus the defensive kickoff team. We will all have a FIT responsibility within the scheme. We have a force/contain player along with alley players that are expected to make the tackle. Executing a proper kickoff is more than running down to knock someone down   Kickoff is quite simple, it is a defensive play, and execution must be precise. Get to your fit, find the ball, tackle it, and get it back to the offense.

5s – Spill (Player to the side of the Kick Direction) player fits inside the number of the FB. The OTT player (Opposite of the kick) Scrapes tight off Spill Player and takes the best path to the ball. The pre-kick key is the Center/ Guard + FB triangle.

4s – Fit outside of FB – Punch, and Press, escape to your fit side. Pre-Kick Keys Center/Guard + triangle is your key.

3s – Fit outside the TE, Punch, and Press escape to your fit side. If TE works across the formation, chase the puller. Pre-Kick Key T/G/TE triangle.

2s – Contain – Set the edge of the defense, outside of everything. Everything stays inside. Return away, trim the fat at ball depth, looking for reverse or cutback against the grain.

1s – Fold or Fill to the ball. If the backside of the kick, fold.  If the kick is to, then fill inside the 2 or 3 based on block scheme. Take the best path, make the play. The key is the kick direction and returner.


Pre-Kick Keys

Diagram 2


Read More

4 Essentials For Proper Strike Points in Block Destruction

By Dan Owen
Former Defensive Coordinator/Special Teams Coordinator
Keiser University (FL)
Twitter: @Coachowen561


Your hands are your weapons in football, and you must be willing to use them. When we talk about using your hands here at Keiser, we call it “Striking” and everyone in our program must know how to strike.  Player safety is the number one goal for all of us and that is why we have adopted this block destruction technique. “Head to Head” or “Face to Face” collisions can have as much as an impact on your head as a tackle.  These old habits of banging facemask to facemask are engraved in young player’s minds just like tackling with the head is. We do understand that is not always possible to keep your head out of certain tackles or blocks, but here at Keiser we put maximum effort into breaking old habits.

Diagram 1


Just a humorous way of communicating to use your hands. We say would you rather have an ugly face and not remember anything or just some ugly fingers.


Read More

Underneath Coverage Techniques to Train LB’s vs. Crossers

By Keith J. McMaster
Defensive Coordinator
Crete-Monee High School (IL)
Twitter: @keithmcmaster


Today’s version of football has become very restrictive when it comes to what a defense can or cannot do. The rules have trended towards more scoring and higher offensive output making the life of a defensive coordinator more and more complex. The physicality and violent plays are becoming obsolete. Therefore, the defense must use every available method to disrupt, intimidate and attack the opposing team. One of the physical aspects that our team constantly teaches is the physical re-route of receivers, especially from the linebacker position.

This oft-forgotten technique has huge benefits for our defense. A direct result of our physical play has been the decrease of passing yards per game and completion percentage while the sacks, interceptions, and pick-sixes have risen. This puts extreme pressure on an opposing offense when the receivers constantly need to alter routes and make the quarterback work harder and take longer for a single completion. Whether in press man or zone coverage, the main focus of our linebackers is physical re-routes to take away the middle of the field.

Re-Route: Footwork

Before a linebacker can even think about re-routing a receiver, coaches must ensure his footwork is correct. Most teams work linebacker drops; however, this drill focuses on what happens when the linebacker meets the receiver in his zone after his drop. The linebacker’s footwork must be in the proper position to strike and disrupt a defender.

To start the drill, begin with a linebacker and a receiver in close vicinity, if the linebacker has already read his keys, read the pass, and has dropped into his coverage. For setup, start with a receiver that is in a position to work through the linebacker zone. The linebacker begins on a 45-degree angle as if he’s working a hook to curl drop. However, to guarantee the defender is using his feet correctly, have him place both hands behind his back in an athletic position. This forces him to work on body positioning to control the direction of the receiver.

You can work two different routes with the receiver: a vertical route and an underneath route. On go, the receiver will attempt one of the two routes. For the vertical route, the linebacker works on maneuvering his outside hip to the receiver’s inside hip. The inside foot then walls off the inside, forcing the receiver outside. For an underneath route, the inside hip matches the outside hip of the receiver. It is followed by the linebackers outside foot stepping forward. Many times, this technique alone will cause contact and disruption with the receiver. Once the footwork has been accomplished, the strike and punch will follow.

Read More

3×1 Stick RPO

By Ty Stoldt
Offensive Coordinator/QB Coach
Palmetto High School (FL)
Twitter: @CoachTyStoldt


As we all know, RPO’s have revolutionized the way offenses operate at all levels of football. As an OC, a main goal of mine is to make the defense cover all 53 1/3rd.  Using this simple 3×1 RPO, we have had success against multiple fronts and coverages. Not only does this RPO provide possibility of distribution for every skill player on the field but it also empowers our QB to make cerebral decisions based off our pre and post snap reads.

Pre-Snap

As we approach the line of scrimmage, the first thing we do is identify our safeties to look for our indicators. Pressed man gives us our answers early, soft zone initiates our reads.  The first thing we look for is our “Freebie” with the backside receiver. In this 3×1 set, our backside receiver has a hi and a low option each week.  Pressed coverage converts to our hi route, soft corner (8+ yards) converts to our low route. If we are getting one and one coverage, we MUST utilize that matchup.  Once the defense begins to play 2 over 1 backside, we begin to work our post snap read.

Post-Snap

With backside dead, the QB begins to identify is post-snap read.  In this RPO, we key the #2 backer in the box. As the QB receives the snap, his eyes are on that backer during the mesh.  If the back fits, we pull and pop. If the backer drops, we give.  Once we decide to pull, the QB knows to read the concept inside/out. Our first option will be the #3 receiver on the spot route.  Teams often fit the down safety over the #2 receiver giving the #3 receiver a free release. If teams screw down over #3, our QB knows to work to our #2 receiver who is running the bubble. Our #1 receiver play side has two options.  If man coverage, they know to outside release and go win. If soft coverage, they become blockers for the bubble and identifies the most dangerous man. If we get 2 over 1 backside and 3 over 3 frontside with a 1 hi safety, this leaves us with a 5-man box, which is what we want for our inside zone scheme.  Due to the fact this is a second level RPO and we are reading this backside LB- this tells our backside tackle to base block the DE rather than sift to the second level as in a traditional IZR play.  Essentially this blocking scheme follows the principles of a “Big on Big” protection. Below you will find diagrams of how our rules shape up against multiple fronts.

Coaching Points:

Backside Receiver- Top or bottom of the numbers based on route concept. Very important that they push vertical every snap and threaten that CB to open their hips. Lazy routes play in favor of the CB and reduce the big play capability. 

#1 Play-side: Bottom of the numbers. Identify Corner (Pressed=Fade Soft=Stalk MDM)

#2 Play-side: Wide split, show chest to QB and Backpedal to the #’s, stay flat, catch and get vertical

#3 Play-side: Identify Key, Push to green, Snap head around

RB: Identify Key, IZ Track, if pull, find work (engage fitting LB)

QB: Be definitive, Eyes on read, take what the defense gives you

Variations

Backside:

Each week we will identify what our hi/low routes are for our ISO receiver based off the defensive coverage/leverage/technique.

Hi Routes-Fade, Glance, Corner

Low Routes-Hitch, Slant, Quick

Play side:

One variation that we apply is flopping the rules for the #2 and #3 receiver. When done, #3 would then run the bubble and #2 would run the spot. This is a great way of taking advantage of an aggressive flat defender who does a good job of blowing up the bubble routes.

Read More

Four-Day Install Plan for a Multiple Front Defense

By Nick Davis
Defensive Coordinator/LB Coach
Rose-Hulman Institute of Technology (IN)
Twitter: @Spread_Defense


This past season we installed three, four, five, and six down fronts in four days.  We spent a day on each of the four different types of front structures.  We use a category system for our fronts, in which the first letter of the word and the type of word will tell you how to align. The three down fronts are all different types of birds.  Our four down fronts are all different types of fishes. Five down fronts are all different types of mammals. Our six down fronts are different types of fruits. 

Before I dive into all the fronts, we are a 3-3-5 personnel, one gap defense that plays mostly one high man coverage.  We are a field/boundary defense, therefore our front strength does not have to match our coverage strength.  For each of our fronts, our defensive linemen and linebackers base rules are the same.  Each player in the box owns a different gap and has rules for what that gap or player in that gap does.  To eliminate a signal, we yell in our defensive fronts, then signal the movement and coverage each play.  Each week we have a default front so if there is no call they know what to line up with.  Once we make our game plan, we will look and see what the most popular alignment is for that week and that is what generally becomes the default front for that week.


Day 1 Install:

Day One we installed every 3 down front we planned on using for the whole season.  Owl is our base three down front. The “O” tells the Defensive Ends where to line up in regards to the tackles.  So in Owl we line up outside the tackles in a five technique.  Our Nose is a base 0 technique and our linebackers stack the tackles and center at five yards.  Ibis is our 4I front.  The ‘I” tells our DE’s to line up inside the tackles in 4I techniques and the outside stack linebackers line up at 3 yards and apex the tackle and the next extended player in the formation.  Our Falcon and Buzzard Fronts tell either the field or boundary Stack to make the 4I adjustment.  We can also align our fronts based on where the TE or TB are in the formation.  Eagle tells us to make the 4I adjustment away from the TB or what we call the “A”. We tell our DE’s we want the “End” to the A. The opposite of Eagle is Albatross. We put the 4I adjustment to the “A”. Hawk tells our DE’s to line up head up the tackle because of the “H”.  We can also set our front to the TE. The “T” in Tweety tells our Backers to make the 4I adjustment to the TE.  As the year goes on you can always add new fonts we just have to find a type of bird that makes sense.  With our 3 down fronts we also have adjustments we can make. We can shade our nose to the field, boundary, or to or away from the TB. We have tags to change linebackers depth or what direction to set the strength. So one example of a tag would be Ibis Flip. We will send our field players to the boundary and flip our strength.


Diagram 1

Diagram 2

Diagram 3

Read More

A Comprehensive Red Zone Plan for Practice and Game Day

By Jacob Knight
Offensive Line Coach/Co-Offensive Coordinator
Waverly High School (OH)
Twitter: @CoachKnight55


As an offense, we put great emphasis and stress on how we attack in the red zone. What we try to do each week is establish efficient, and effective concepts that we know we can attack with once entering the red zone. In our 4 years at Waverly, we have learned a lot about ourselves as a red zone team. We have shown considerable growth in this area over our 4 years at Waverly High School. in 2015 we were a 60% score and 53% touch down. In 2016 this number went to 79% TD, and score, and in 2017 we were 82% score and 79% TD. Our most efficient season came in 2018 we were 95% score and 87% TD.  I am firm believer our game planning, and practice process has lead to this. We changed this process prior to 2016, and it leads to a huge increase, and we have seen it slowly get better every season since.


General Philosophy

Once we enter the red zone the first thing that enters my mind is that we want to take a shot and try to score from the RZ/Fringe area. Once we enter the fringe area I am a huge fan of taking a shot. We are either going to throw some form of play action, or vertical shot so that we can score, prior to entering the 5 to GL area. This area for a spread team is extremely difficult, and the field becomes so compressed (we learned this the hard way in 2015). We also really like to establish our best runs once getting into the red zone, this has created running opportunities for us. We are a pretty run heavy Red Zone team (56% run) So when we game plan our runs we decide what is going to be our best weekly run, and this a run we try to run once getting in the red zone, this has worked very well for us the last two seasons, and has allowed us to dress these runs up with motion, or with unbalanced formations once entering the red zone.


Game Planning Process

Diagram 1


Above is the part of our game planning board that we use to game plan, and script our Red Zone Plays. This board has become extremely helpful to us over the last three seasons, it is a great way for us to collect our thoughts, and decide how we want to attack our opponent.


Creating Opportunities for the Split End

Within our game planning process, the number one thing we try to decide during our game plan meeting is whom can we attack once we enter the Red Zone. We also try to decide what runs we want to use, and how we want to attach RPOs to our run game to create mismatches. The first thing we always try to do in the game planning process is we try to create matchups for our receivers, and we do that a couple different ways, the first is we want to move our outside receivers around (X/Z). Typically, in our offense, the X plays to the left, and the Z to the right, so what we like to do is run formations that move our X, or our Z. Typically our Z is the “Dude” in our offense, so we want to game plan 2 to 3 ways to get this player open, as well as 2 to 3 ways to draw the defense to him to open other players up. This could be we move him to run a slot fade concept, or we may motion him to either open up a run concept or to open one of our other receivers up in the passing game. We also will use stacks in order to create rubs in short-yardage and goal-line situations. 

Read More

The Duo Concept: Power Without a Puller

By Michael Janak
Offensive Coordinator/Offensive Line Coach
Cy-Fair High School (TX)


At first glance, many people mistake Duo for Inside Zone. There are no pullers, it is a downhill run, and the running back seems to simply take his time waiting for a cut to open up. However, upon further study, you realize that it is something different altogether. Duo has much more of an emphasis on the vertical push at the line of scrimmage. The scheme of the play allows you to accomplish this because it provides two double teams at the point of attack. The offensive line can focus on establishing push because they are not chasing linebackers, the running back is reading the linebacker (Mike backer) and determining his cut off that read. I feel that the title of the article really sums up what this play is: Power without a puller. It is a physical, downhill run with little chance of a result of a negative play. At times, it can be much more of a dynamic play than power simply because it gives the ball carrier more options in terms of which gap the play can hit in. We started running this play at the end of the 2015 season and we have seen it for big plays all across the line of scrimmage.

We like this play against the basic fronts that are listed in the article. 4-2-5, 4-3, and 3-4. When opponents start bringing in extra defensive linemen, lining up in a Bear front, or doing some unconventional things in the box I don’t really like the play as much because you can lose your double teams. I’d much rather run power or outside zone at that point.

In terms of where exactly it fits in our offense, it is our third most called run play. Number one is Power, number two is Outside Zone, and number three is Duo.

We really don’t see teams game plan to stop Duo against us as much as they do Power simply because it is our third most common run. However, one thing I have seen teams try to send the weakside LB through the backside A gap or B gap on a delay. If it is an odd front the backer will go through the weakside A gap, hoping the center gets buried off in the double team on the Nose. If it is a four-down front, teams will send the weakside backer through the weakside B gap on a delay, hoping the guard is buried off in the double team. We try to make our linemen aware of this and make sure that they are keeping their eyes where they need to be.

Coaching Points:

QB: It is especially important that the QB comes straight back without pushing the RB off his landmark. If the QB forces the RB off his track, it is exceedingly difficult for the back to be able to make some of the backside cuts that may be available. The RB has to attack in the inside leg of the play side guard.

RB: Now, when I say that the running back is reading the Mike backer, that is exactly what I mean. If the Mike scrapes over the top of the double by the tackle and tight end, then the running back knows that the play now needs to hit B gap strong to B gap weak. If the Mike backer plugs or fills the B gap, the RB knows that he needs to bounce strong or cutback weak, avoiding the B Gap.

The RB will take a slide step with his play side foot, get downhill on the second step while taking the handoff, and attack the inside leg of the play side guard. One of the biggest coaching points for the RB is patience. We line up the RB at 8-8 ½ yards deep in the backfield when we run Duo. The reason for this is twofold. One, it allows the RB longer to read the Mike backer since he is getting the ball deeper. Two, it allows the offensive line to stay on their double team blocks longer and vertically push the line of scrimmage. The RB must be patient, trust his read, and get downhill with square shoulders.

OL: An important coaching point on the double teams is the use of the “Gallop” or “High Leg” technique. We started using this technique in 2016 and it has undoubtedly improved our double teams. The outside man on the double team (versus an odd front the play side guard and the play side TE) will “Gallop” into the double team. During the use of this technique, the inside foot will move inside and up the field, gaining as much ground as possible while still maintaining a good, athletic base. Next, the outside foot will move in the same direction to reestablish the base and basically put the lineman in what I call a “coil” position, ready to explode into the defender. When the base is reestablished, the lineman will explode into the defender using the “flipper” technique with their inside arm, attempting to launch the defender, while staying hip-to-hip with their inside teammate. From there, the inside foot must stay in front of the outside foot so the lineman can stay square. Once the lineman feels his teammate leaves the double team, he will transition into a “drive” block or “fit and finish.” The easiest thing I can compare this too is fencing. If you have ever watched fencing, very often they attack with one foot constantly remaining in front of the other. This allows the lineman to stay square on the double team and climb to the second level with square shoulders as well.

Duo Concept vs 3-4 Spacing:

Diagram 1

Versus the Odd, the two double teams occur with the tight end and right tackle doubling the defensive tackle to the Mike backer, who is the read against the odd front. The playside tackle is looking for a fill or scrape from the Mike. Should the Mike scrape over the top of the double team, the tackle will press into the defensive linemen with his outside arm and stay on the double team. Should the Mike backer fill into the B gap, the tackle will slip off with square shoulders and pick up the Mike. If the defensive tackle slants inside to the B gap, the offensive tackle will pick him up and the TE will climb to the Mike backer.  The second double team occurs with playside guard and center doubling the Nose to the weakside linebacker or will. If the Nose slants weak, the center will pick him up and the guard will climb to the will backer. If the Nose works strong or is shaded strong, the guard will stay on the Nose and the center will climb to the backer. The backside guard and tackle will handle the defensive tackle and outside linebacker by fanning out. The two backside offensive linemen should be able to handle any games or movement by those two backside defenders. Now, there must be someone to account for the playside outside linebacker, and this can be handled in a variety of different ways. It can be done with a fullback from the eye or offset.

Diagram 2

It can be done with an H-Back or second tight end in motion. It can also be accomplished by using a wing or hip player that is lined up 1 yard away and 1 yard back from the inline tight end. There are a variety of ways to get a blocker to that defender.

Diagram 3

To study game film of this concept, click on the video below:

Read More

Using a Dual Player Pre-Snap Check System

By Cameron Andersen
Head Coach/Offensive Coordinator
Gooding High School (ID)
Twitter: @SenatorCoach

Introduction:

First of all, just like all successful coaches, this stuff comes from the concepts of great football minds and we adjust them to fit our scheme, philosophy, and athletes. That being said, our “win” concept, was one of the more effective tools we had to combat a variety of situations. It helped us against adjustments to our top wide receivers, a loaded box, a blitz happy team, and most importantly, matchups where we felt we had better athletes.

In the end, we found this concept more than acquitted itself on the field. This season we had enjoyed a 2nd place state finish. In the playoffs we averaged just over 40 points per game, and in the game where we used this concept the most, we scored 87 points. The “win” concept never resulted in negative yards, and scored a touchdown in all but 2 of our 11 games.

The win concept is based on getting the ball to your guys as quickly as possible in a check situation. It is never an original call, it is an audible to defensive adjustments on the fly. First, I must say that this works better with tempo, especially fast tempo, because you can catch defenses in a predictable repeat look. To master the concept, you must rep it every day in practice; the quarterback and his receiving options have to be on the same page with what they see in front of them.

When to Use “WIN”:

This being a concept that is used as an audible and not an organized play, the only people on the field aware of it happening is the QB and whatever receiver he or I have signaled. In time, the running back and receivers in the area will hear the call and even adjust or check to blocking the MDM, but we tell them to stick to the play called unless they see the ball in flight to the “win.” We can use either a verbal call, literally yelling out “Y win” or give a hand signal that we have predetermined for each game.

We call it a “win” because we want to rapidly defeat all space and man-to-man situations where we feel we have a superior athlete. We first look for uncovered defenders, we then look toward the slot defender’s alignment (usually the SS or OLB) and last we check the alignment of the FS. These factors help us determine when to use this audible, and are outlined below. As seen in Diagram 1, the Y is in a position where he is uncovered, being walled by the linebacker and checked deep by the safety. We tell him in that situation to treat it like a “hot” off a blitz look. Show hands immediately and move toward space.

Slide1

Read More

12 Pre-Season OL Vs. DL Compete Drills

By Justin Iske
Offensive Line Coach / Co-Offensive Coordinator
Southwest Oklahoma State University
Twitter: @justiniske

Introduction

Being efficient with practice time is one of the most important aspects of being successful on game day. Individual time is critical in terms of installing plays and working technique, but it is a struggle to get good looks most of the time. Full 11-on-11 live (or thud) work is very productive, but it increases the risk of injury. We have found that working o-line versus d-line as much as possible helps make both sides better and is more efficient than trying to get back-up offensive linemen or scout team defensive linemen to give us a good look during individual.

In terms of practice time, any practice where we have at least half pads, we will dedicate the last 10-15 minutes of individual to working run pods vs. the defensive line. Depending on the time of year and what our needs are, this could be done in one of four ways (one-on-one, two-on-one, half-line or full line). We will also spend 15-20 minutes, depending on how long we are running pass skeleton/seven-on-seven, with some combination of three pass protection drills against the defensive line (one-on-one pass rush, full line, or blitz pick-up). We work one-on-one pass rush no matter the dress for practice and will work full line and/or blitz pickup when we have half pads or full gear.

One-On-One Run Pod

The first type of run pod we do is one-on-one. We will line up the first string offensive line with about five foot splits on a yard line and align a defensive lineman across from each one. Starting with one of the tackles (or a tight end), we will execute a base block, reach block, down block or cutoff against the defender while he works his technique to recognize and defeat the block. We will then work down the line to the next player in rapid succession to get as many reps as possible. While we will get some coaching done “on the run,” filming this session is critical so that we can get a maximum number of reps and still be able to go back later and review each rep.

Slide1

To study film of this drill, click on the video below:

Read More

8 Rationales to Defend Jet Motion

By Jason Brown
Defensive Coordinator
Dutchtown High School (LA)

Introduction:

Jet motion is becoming more and more prevalent within offensive schemes today. This concept presents a multitude of problems that are not solved by the typical motion adjustments most defenses employ in their basic defensive schemes. We feel that it is important to have multiple ways to defend an offensive attack. Our rationale is simple: if an offense can determine how you adjust, they can force that adjustment and exploit its inherent weaknesses. We believe that it is important to move the stress points around in your defense so the offense cannot determine where to attack.

At Dutchtown High, we know we don’t have all the answers but we do have answers in which we really believe. Furthermore, we are always looking for more and more answers to try and improve our defense. That said, It is my intention, to show you the ways that we have defended the Jet concept and hopefully stimulate thought for you to develop even more and better ways to defend this concept.

Jet Motion Problems

The Jet Motion Concept has been around for a long time within the Spread offense. Offenses are starting to build more and more plays into the concept to make it even more effective. It has a lot of similarities to Flexbone motion, and Wing T motion (End-Over formations with two backs in the backfield is a totally different animal for us that we treat differently). The problems we see with defending Jet motion are as follows:

  1. The Speed Sweep gets on the perimeter very quickly.
  2. The Trio passing game is created from the 2×2 set.
  3. Doubles passing game is created from the 3×1 set.
  4. Front side and Backside internal run plays come off the Jet action
  5. Play action exists on the Front side and Backside of the Jet motion.
  6. Vertical shots are prevalent within the Jet concept.
  7. There are a lot of similarities with the Wildcat offense if run with a good running QB.

Defending the Jet Motion

We believe the ways you pick to defend Jet Motion must have the previous points in mind. It is also important to note that you will have a tradeoff in every way that you choose to defend Jet motion. Therefore, make your choices of defensive concepts understanding each one has a weakness.

The multiple ways that we defend Jet motion are listed as follows:

  1. Bump the backers and stick with your Split Safety or MOF coverage.
  • Rationale: Simple answer if you can hold up versus speed and the trio passing game.
  1. Rotation of the Secondary from a Split Safety look to a MOF look with the Safety or the Corner being Primary Force.
  • Rationale: Good answer to speed portion of the series and the trio passing game. Safety rotation allows you to respond to multiple motions and yo-yo motions. Corner rotation gives great leverage versus the speed play.
  1. Rotation of the MOF concept to a Trap side with Man on the Backside of the coverage.
  • Rationale:  If MOF coverage is called in the huddle and we can’t handle the Jet motion plays by just bumping the backers.
  1. “Ghost rule” the backside of Jet motion to keep the Split Safety zone structure to the direction of the Jet.
  • Rationale: Benefits of Trap coverage with the ability to disguise coverage on the slot receiver versus the RPO game.
  1. Pressure the strong side or field side of the set exclusively.
  • Rationale: Setting pressure exactly where you want it.
  1. “Indy” concept a MOF or Split Safety call to the Jet direction.
  • Rationale: Gives pressure in the face of the Jet motion.
  1. “Slingshot” the pressure if the Jet is going away from the pressure.
  • Rationale:  Helps guard against the dilemma of getting pressure away from the Jet motion.
  1. “Wildcat” or “Run over” man coverage to keep leverage on the run/pass threats
  • Rationale: Allows us to play man coverage and still be sound versus the perimeter plays and switch routes that happen inside in the passing

Read More

Drilling Mid-Point Technique For 3-Deep and 2-Deep Zone Defenders

By Mark Theophel
Defensive Coordinator
Hartwick College (NY)


Zone concepts like cover 2 and cover 3 allow DBs the freedom to read the QB and make lots of plays on the football, although they also present the challenge of having to defend multiple receiving threats in an area of the field. This happens most often for us when a defender in an underneath zone is “high-lowed” or when a defender in a deep zone is stretched vertically by multiple receivers. To better position our DBs to defend these concepts, we teach “midpoint” principles in zone coverage, which allow defenders to play in-between multiple receiving threats in their zone and react to the throw.

theophel 063020


Zone Coverage vs. Man Coverage:

It’s important that we first educate our players on the distinction between zone coverage and man coverage. This may seem obvious, but it will help our players to better understand their teaching and why we are doing what we are doing. Man coverage for us is not necessarily going to be just straight man-to-man. Some coverages like quarters will still fall into the “man” category for us because of the key reads for the DB’s. Simply put, if a DB has a “man key” at the snap, then it is a man concept coverage. By contrast, when we play zone coverage, DBs will key the backfield action/QB rather than focusing on a specific WR at the snap.


Features of Man Concept Coverage:

DBs have a “Man Key.”

Eyes are on a WR at the snap.

Man Key will define both our run and pass responsibility.

DBs cover a specific WR on the play.


Features of Zone Concept Coverage:

DBs key the QB/ball.

the initial read will indicate either outside run or pass.

Any ball off the line (of scrimmage) action such as an inside run or drop-back = PASS to deep zone defenders.

DBs cover an area of the field and do not lock on to one WR.

Again, these distinctions may seem somewhat obvious, but it helps our DBs to differentiate between man and zone concepts, especially with their key reads. While man coverage is usually considered much more physically difficult than zone, it is also much simpler in concept. Zone coverage requires DBs to make reads on the QB, recognize different route concepts, and anticipate throws. One of the challenges to playing zone is defenders being stressed by multiple threats to their zone in some route concepts. How we handle this depends on the coverage but the unilateral principle we will use is to “midpoint” the zone.


Midpoint Technique in Cover 2:


Corner Midpoint Technique:

In Cover 2, the midpoint technique comes into play for the corner most often vs. the “smash” concept, with the corner being “high-lowed” by an outside vertical and a short route/hitch to their side. The corner is technically an underneath defender in cover 2, responsible for the flat, and the smash route poses a challenge for him. If he is too aggressive on the hitch, he leaves us vulnerable to the ball being completed behind him in the cover 2 “hole”, before the safety can get there. If he gets too deep to prevent that throw, the hitch will be completed with ease. Teaching him to midpoint these routes can help position him well to defend both throws, while also creating indecision on the part of the QB.

Diagram 1

Diagram 2


It is important to note that while we do often use landmarks in zone coverage, and those landmarks will come into play later when discussing midpoint technique for deep zone defenders, we do not use landmarks for the cover 2 corner vs. smash. The main reason for this is because the ideal positioning for this route depends on several factors that can vary from opponent to opponent. Instead, we focus on specific coaching points to put the corner in the best position.


Midpoint Technique Coaching Points For Cover 2 Corner vs. Smash:

Bait and Drive.

Bait the corner route with body positioning then drive the hitch.

Read the front shoulder of the QB for the throw.

Depth and Width vary based on several factors.

  1. Spacing of the routes.
  2. QB’s abilities/arm strength.
  3.  abilities (know yourself).


Read More

3 Concepts to Manipulate Apex Defenders in Odd Robber Defense

By Adam Schiermyer
Offensive Coordinator/Wide Receivers
Eastmark High School (AZ)
Twitter: @aschiermyer


This was the first time as an offensive staff we saw a defensive with a “3-high” robber look, and what made it even more exotic was how far the rovers were playing inside the outside receivers.  Once we dug into the film breakdown of the opponent we were facing, we thought that there was potential with a few concepts.  Deep outs to our outside receivers, vertical routes out of empty, and RPO’s out of 2×2. 


Flood Concept:

Diagram 1


In our flood concept, we will always have a receiver occupying the flat, a deep out, and a vertical.  We can tag whom we want to run what route based on what we see on film.  Here we have our H running a 3-5-yard speed out, knowing that the rover will sink and trap as he is reading 2 to 3.  The X receiver is running a vertical route to hold the free safety as he is reading 3 to 2 and has to carry 2, vertical.  Our Z receiver is running a deep out and breaking it off at 15 yards, the corner has 1 vertical.  Our tailback will set the edge to the side that we are sprinting to.  We tell the Quarterback to “take a peek” at the vertical route, then read the flat defender.  If the flat defender sinks under the deep out, throw the speed out.  If the flat defender traps the speed out throw the deep out.


To study game film of this concept, click on the video below:

Read More

Split Mid-Zone with Formation and Motion Variations

By Adam Hovorka
Managing Editor
X&O Labs

with Jason Eck
Offensive Coordinator/Offensive Line Coach
South Dakota State University
Twitter: @Coach_Eck


To compete in the Missouri Valley Conference in the late fall you must be able to run the ball and run it with physicality.  South Dakota State University believes in this philosophy wholeheartedly and they major in both inside and mid-zone concepts. Offensive coordinator/offensive line coach Jason Eck has been utilizing the concept of split-zone runs in the SDSU run game.  Coach Eck is using the split concept (he calls this Swipe) with his Mid-Zone and not just with the Inside Zone action that many teams are running throughout the country at every level.  Mid Zone is similar to the outside zone scheme, but with tighter aiming points. Coach Eck explains the term Mid-Zone as an alternative to Outside Zone as a way to remind the back that he is not just trying to get to the sideline but is trying to give the illusion of a wide play and then cut it back to the inside.  The “split” part of the concept comes from when a player will line up to the call but come across the formation and block the C gap defender, who is usually being unblocked or read in zone runs. 

Mid-Zone is a staple run play for many teams across the country and at various levels of football.  The play starts with offensive linemen working in combination trying to take over down lineman by reaching them or stretching them horizontally to the sideline.  The ball carrier will read these blocks and either run it to the sideline or see the defensive lineman being washed down the line and cut it up the field getting vertically right now.  Part of why the mid-zone is so popular is how many different formations and personnel grouping the play can be successfully run from.   Offenses can read the backside end and have all the secondary manipulations that go along with reading the run game. Offenses can also go heavy personnel and overwhelm defenses at the point of attack with the mid-zone.  

Coach Eck and the staff at South Dakota State found that meshing its mid-zone concept with the swipe principle provided solutions to the following four problems:

  1. Back-gapping by second level defenders off divide action
  2. “Spill” defensive ends coming underneath swipe blocks
  3. “Lag” technique defensive lineman who played underneath reach blocks
  4. “Rock Back” 2i technique defenders that were used to eliminate cutbacks


Answer to “Back Gapping” LB’s:

Defenses are taught to “back gap” spilt zone schemes. This means that second level defenders play behind blocks to account for the extra gap created by the H or fullback coming across the formation. While this may work against the tight zone aiming point of the inside zone (inside leg of the play side Guard) that most programs run swipe action with, the mid-zone hits wider. This can promote the potential of the ball staying front side. Coach Eck likes this split action on the Mid-Zone because of the misdirection it provides while running a play that attacks wider than Inside Zone.  Coach Eck also says the moment of hesitation it creates in 2nd and 3rd-level players can be very advantageous to the running back in the Mid-Zone allowing for potential big plays.  Second level linebackers who habitually are taught to “rock back” vs. divide zone action, cannot for fear of the ball hitting front side.

Remember that Coach Eck is calling this Split-Action, Swipe.  The Swipe Action is great against man to man defenses because that play side Backer has his eyes on the H-Back who is going across the formation away from the play. That action causes the Backer to hesitate for a split second.   Man teams are accounting for that Swipe player going to the flat and must insert a defender that way.    This simple swipe action often leads to mis-fitting by the defense.  Coach Eck feels its easier for one of the defenders to be wrong than all the guys on offense to execute correctly every play.


The clip below best illustrates this coaching point:

Read More

The Outside Linebacker Training Manual in the 3-4

By David Pitman
Defensive Coordinator
Sachem North High School (NY)
Twitter: @coachdip


I recently wrote a sort of manifesto, putting the defensive system that I have adapted and evolved over the course of my almost 20-year coaching career into words.  I want to share part of the introduction:

“I have read many articles promoting the value of playing multiple fronts and although I understand this value, I believe that it also promotes the ‘Jack of all trades, master of none’ mentality. In our system, we talk about playing a singular front with multiple coverage checks and adjustments. Our players are given visual keys and taught that action leads to reaction. If they can master this action and reaction, I believe that we can compete. In high school, we have to coach the players that show up and at times those players will not be the most talented players on the field, but by concentrating on a singular front we create mastery, it is this mastery that defines ‘What We Do.’”

In my original article, I spoke, in a general way, about a 3-4 defense built around a “box” that rarely changes. We play a 0 and two 4is with two ILBs aligned at 5 yards over the guards almost 100% of the time. By consistently, “Closing the Box” we can through automatic coverage checks be prepared to play against a multitude of different offenses. We believe that this consistency allows us to be a sound high school defense year in and year out.

If we can trust that the box will be closed, we can now focus on the “shell”. The shell consists of two OLBs, two corners, and two safeties. We will align them pre-snap in a two-high look and move according to the coverage check made by the players on the field. The beauty of the 3-4 is we can manipulate who the force player is by changing the coverage call, while not changing the alignments or assignments for the box players. The difference between our philosophy and others is we believe that maintaining the stability of the box is essential to being consistently successful. The flexibility of the shell allows us to do this. It is because of this that we put a focus on training our OLBs and Safeties. They are the key to this scheme and where you will put your best players. They are true “Hybrids.” Cody Alexander states in his book Hybrids: The Making of a Modern Defense, “The beauty within football is the constant cat and mouse game between offense and defense. As the modern game moves forward defenses are constantly being challenged to adjust to the way the modern offensive game is played.” It is the OLBs and Safeties in this system that allows for those adjustments. They also allow you to be competitive with lesser ability players at the other positions who have, again, mastered their limited and repetitive alignments and assignments. This is why as the defensive coordinator I coach the safeties and often drill the OLBs and safeties together. They must be an extension of the coach on the field.


Notice in the above diagrams the box remains intact vs a number of different offensive formations.


In the above diagrams, we will adjust the shell to align to different formations and play different coverages.

The purpose of this article is to detail how we teach the OLB.


The Shell: OLBs

We play with two stand up OLBs. Their alignment is determined by the coverage check made by the safety. For example, if the safety checks the coverage to cover 2 scheme then he will align in the apex between the #2 receiver and the EMLOS. If the safety calls for a cover 3 scheme he will either become an on the ball defensive end (if the safety has taken force) or a 4×4 off the EMLOS in a traditional 4-4 OLB position prepared to be the force player to his side. The OLB must be able to play on the line of scrimmage, in the apex, and over a #2 receiver. This is challenging and we have traditionally flipped these players strong and weak to highlight the things each player does well. These players need to be able to edge rush the quarterback and drop into a number of coverage schemes. This diversity requires a great commitment from the player and the coaching staff. The OLBs are given the EMLOS as their visual key. Their reactions to the actions of this player will in a sense, set the edge. Depending on the coverage and force call the OLB will be responsible to either force the run back inside or spill the ball carrier to a defensive back who has been established as the force player. Because the OLBs reactions are connected to the actions of the EMLOS we can introduce it in the spring and summer. As was stated earlier, the EMLOS can only do a few things. The EMLOS can reach, scoop, pull to/away, block down, or pass set. Each of these actions has a complementary reaction. I feel the urge to apologize for being repetitive, but that is the underlying theme of our defense. It is this repetitive nature that gives us the confidence, that gives us an edge as we face multiple offenses throughout the season.

Read More