Utilizing the Back in a Triangle Read (3×1 Spacing/2×2 Mesh)

By Nate Zitnik
Offensive Coordinator
Otto-Eldred High School (PA)
Twitter: @nzshuttlesworth


“Only three things can happen when you pass the football, and two of them are bad!” 

You can make any excuse you want to not throw the football but, in the end, that’s all it is – an excuse.  The game of football is changing and evolving.  Regardless of where you coach, what level you coach, or what offense you run; the pass game is something that needs to be integrated into your repertoire.  With that being said… How do you do that?  And more so… how do you do that easily and effectively?

The Triangle Concept provides a framework for your pass game and can be adapted to defeat pressure using the running back (F) in a rush progression.

“Our quarterback can’t throw the ball 20 yards and couldn’t hit water if he fell from a boat!” 

Most of the throws in the Triangle Concepts are short to intermediate high percentage throws.  However, these throws need to be practiced and more importantly practiced within the circumstances of the progression. 

“We’ve got kids that couldn’t pour water out of a boot with instructions on the heel.”

Drilling these throws and following a drill progression is paramount to the success of these concepts.  Athletes, especially quarterbacks, appear incapable often because they don’t understand the reads and progressions of the plays they’ve been asked to execute.  With, efficient and meaningful drills scaffolded within consistent practice plans over the course of the season can turn even the most improbable player into a functional and effective passing threat.
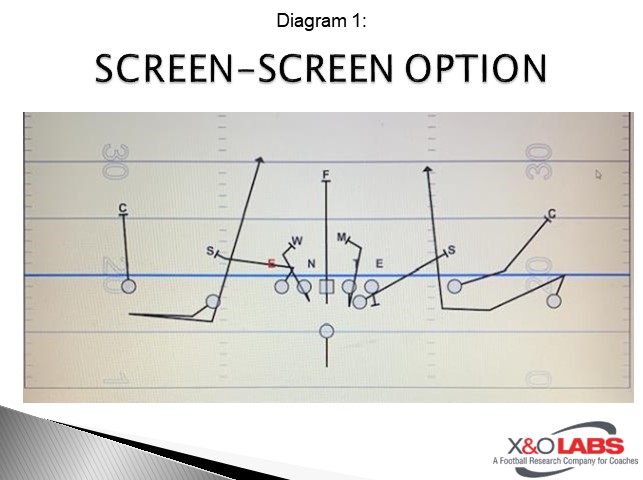
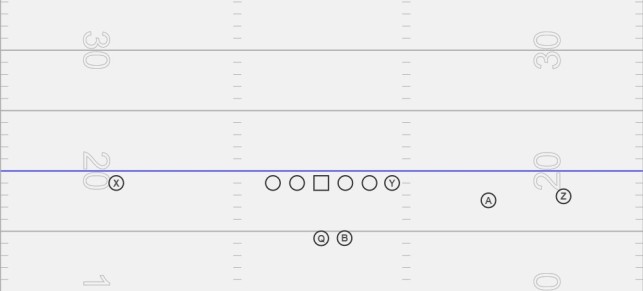
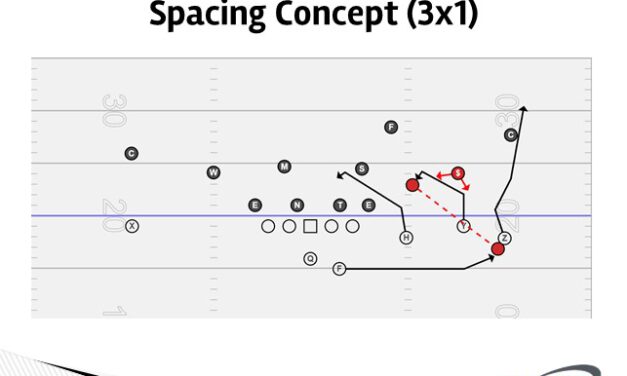
Spacing Concept

The Spacing Concept uses fast-developing routes of three or four receivers versus two or three defenders respectively.  This in conjunction with short/intermediate high percentage throws makes the Spacing Concept an ideal pass play for any offense.

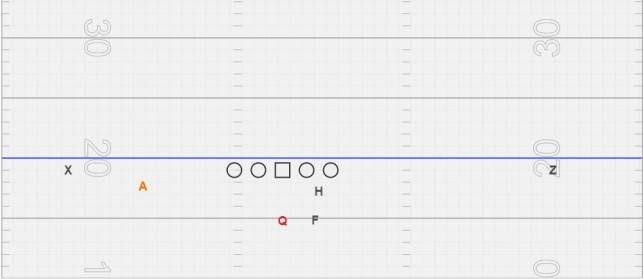
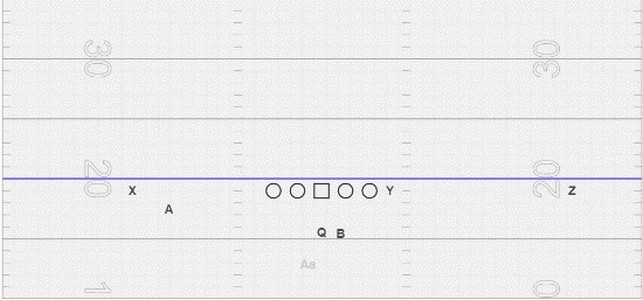
There are variations to this play, but the triangle of the concept remains constant.  The Spacing Concept to the three-receiver side is favorable for any team that Inserts some sort of zone coverage to the Trips formation.  The receivers and the back releasing to the concept side create both a horizontal and vertical stretch of the defense. 

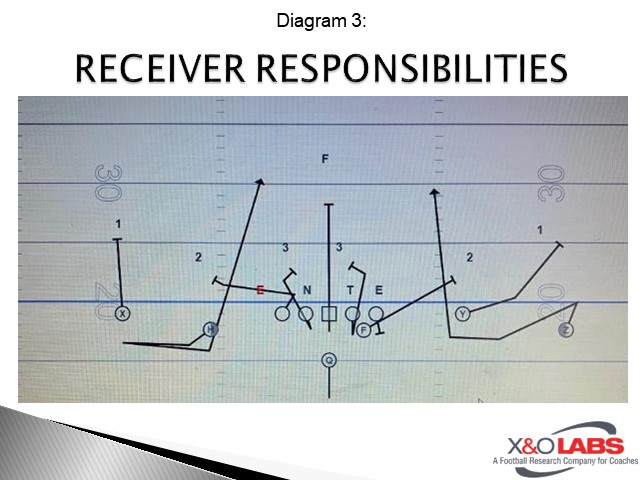
The horizontal stretch of the defense is achieved with the back (F) swinging out to the numbers and the middle receiver (Y) receiver running a six back to five-yard snag route.  The flat defender is then faced with the decision of running inside with the snag route by the Y receiver or taking an outside angle towards the numbers to intercept the F out of the backfield. 

Diagram 1

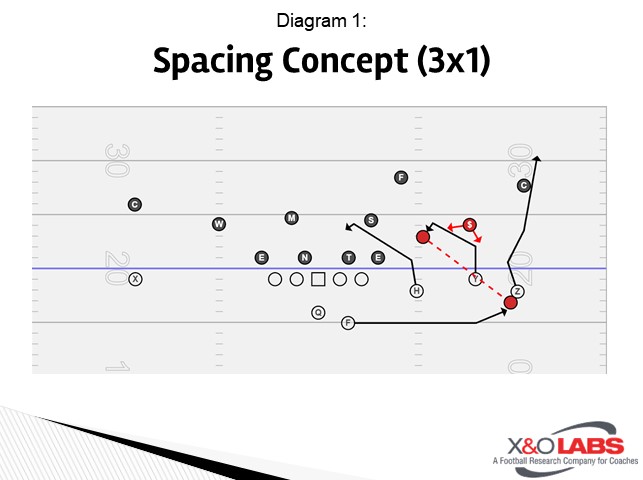
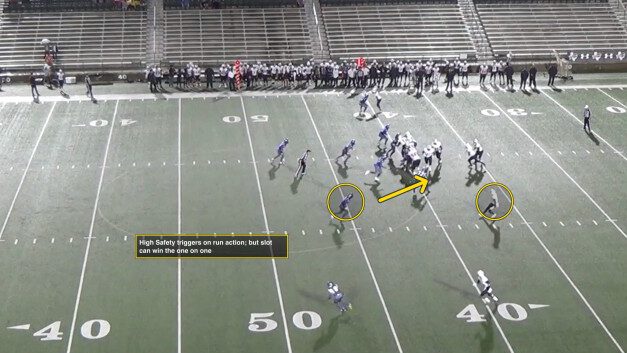
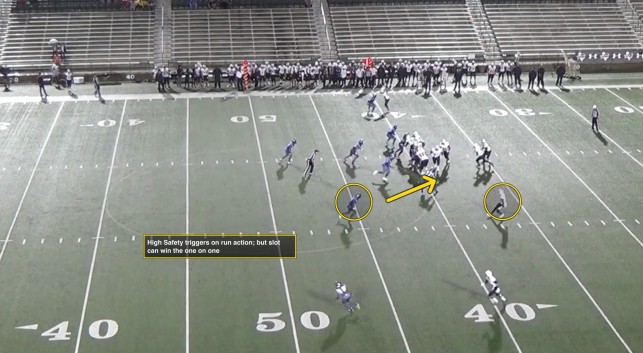
The vertical stretch of the defense is accomplished by the outermost (Z) receiver running a fade route.  The fade route will prevent the defenders playing over top of the hard deck (approximately 7 yds from the LOS) from attacking that downhill space being attacked by the snag and swing routes.  This completes the triangle and illustrates the three-receiver vs the two-defender read concept. 

Diagram 2

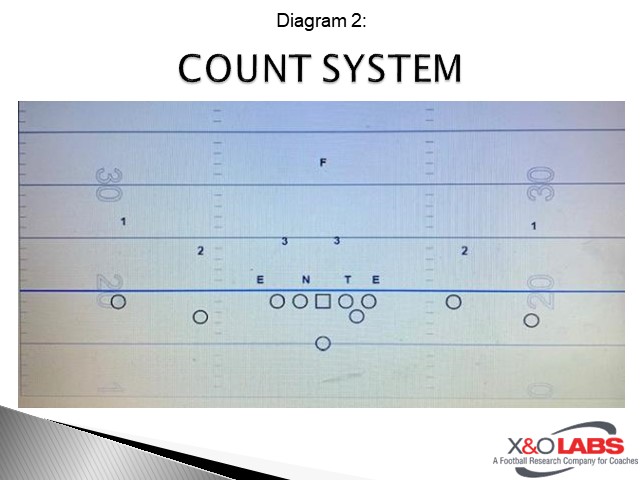
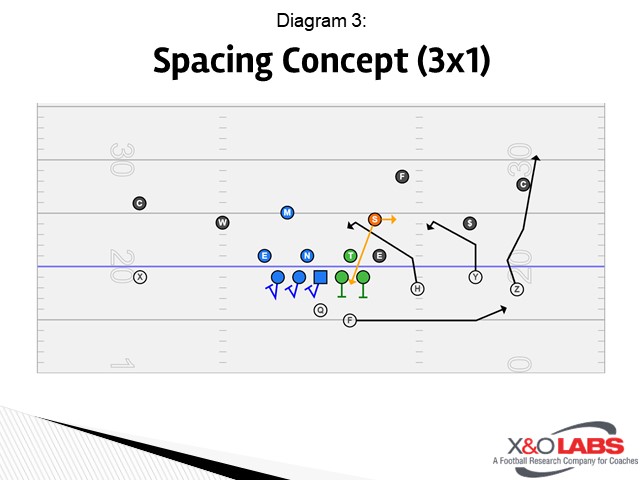
The final aspect of the routes within the Spacing Concept is the inside receiver (H) in the Trips formation running a six to five-yard snag route as well.  This route takes advantage of the inside linebacker (S) attacking the snag, following the back (F) out of the backfield, or bringing pressure.  Because the back (F) must be a free release player in this concept, you must employ a five-man protection.  I prefer and use a half slide/half man protection.  The zone side is always called away from the concept.  The left tackle, guard, and center (Blue) must account for the three backside defenders (Also Blue).  The man side is to the concept.  The right guard and right tackle (Green) must account for the nose and defensive end (Also Green).  The sixth defender (S) must be accounted for by the quarterback. 

Diagram 3

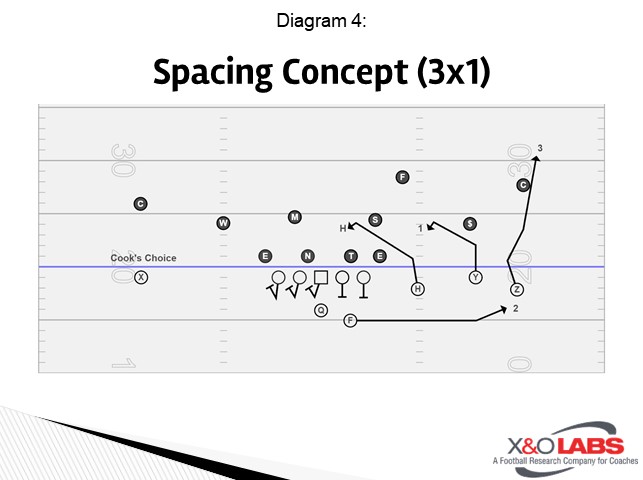
The progression of the routes is (Hot vs Rush) Y Snag, to F Swing, to Z Go.  The backside single (X) receiver can be given essentially any route.  The route should effectively attack the most anticipated coverage of your opponent, be something your receiver runs well and is an everyday throw for the quarterback.  A PSR man beating option route is ideal if it fits within the framework of your offense.

Diagram 4

Overall Coaching Points: 

The free release/concept side should coincide with the man side of the pass protection as it protects the quarterback’s blindside and provides a built-in rush progression. 

Aside from the ability to include the F in the triangle with a free release, it also incentivizes the quarterback to take an interest and ownership in protections.

Trust the process.  Do not allow players to force or lobby for the ball.  The defense dictates the quarterback’s decision as to where to deliver the football.

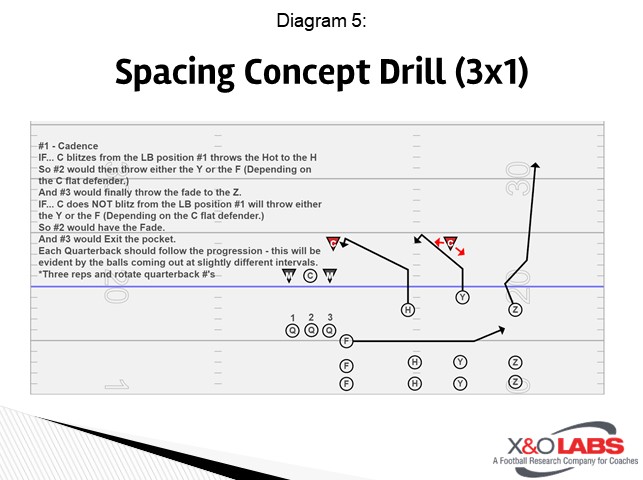
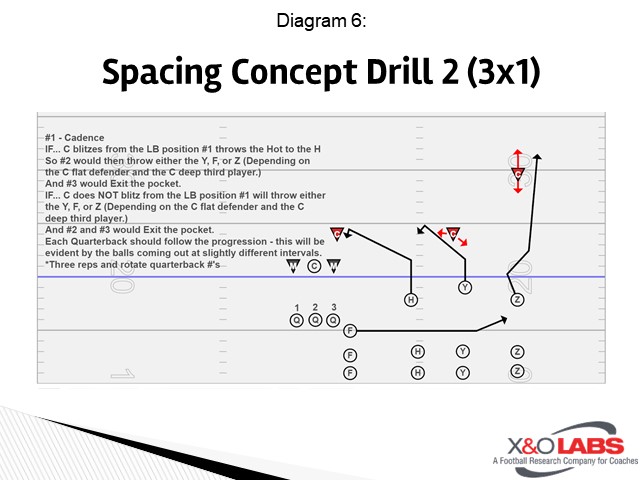
Spacing Concept Drill Work:

There is no return without investment.  The Triangle Concept requires a significant amount of time to install and consistent practice repetitions over the course of the season.  Drilling each aspect of the concept is a non-negotiable.  Start separately at first and progress as your quarterbacks and receivers become comfortable within the concept regardless of the defensive scheme or progression. The progressions listed on the slides provide a starting point for the drills.  Creating a rush progression to utilize in certain situations or as the defense adjusts will develop consistency and confidence in the reads. 

Diagram 5

Diagram 6

QB Coaching Points:

This is a

Read More

“Choke” and “Hammer” Tags to Adjust Play Side Blocking in Counter G/T

By Chris Norton
Head Coach
Perryville High School (AR)
Twitter: @Coach_Norton


Over the past eight years, our offense has evolved from being zone heavy to entirely gap scheme in the run game.  Using the quarterback, heavily, in the run game was part of that evolution.  I love the ability to get an extra man involved in the box using the quarterback and the stress it puts on second-level defenders.  Offensive football is about creating grass and winning leverage – QB run helps us do this.

Quarterback GT

GT has become our bread and butter run game concept. Our quarterback position accounted for 987 yards rushing and 15 TDs with, specifically, quarterback GT producing 481 yards of that total and averaging 8.29 yards per play!  We called quarterback GT 58 times this fall.

Most of our snaps, 21%, this season were run from Early (trips right), which is the base formation used in the diagrams below.  In my opinion, the use of the quarterback is critical when running GT from anyone back set as it helps hold backside defenders.  Our base rules for GT, like virtually everyone else’s, are as follows:

10 Personnel Quarterback GT vs. 4-2

PST:  B Gap to BSLB

PSG: A Gap to BSLB

C: Backside A Gap

BSG: Kick C Gap

BST: Wrap to PSLB off G

F: Fill Backside Pursuit

A major tenant of our offensive philosophy is to run as tight to A gap as possible.  This is especially true with our GT game – we want to hit it as tight as possible by collapsing the playside defenders.  If A gap is cloudy, we teach our kids to work gap over, gap over as needed. This is a difference from most spread teams, who either do not or cannot test A gap effectively in the running game.  It is a goal of ours and on most of our explosive runs this fall, we hit tight to A gap downhill.

To study game film of this concept, click on the video below:

Read More

Play Action Progressions from Power Read

By Matt Kelly
Offensive Coordinator/QBs
Worcester Polytechnic Institute (MA)
Twitter: @CoachMKellyWPI


Every play action concept is understood to take advantage of the defense, focusing on the run action; being able to attack voids left by those displaced defenders.  For us at Worcester Polytechnic Institute (WPI) we run a majority of Power Read and Buck Sweep (same backfield action, different blocking scheme).  WPI installed a play action pass that essentially becomes a flood concept with an inside stem vertical; a wheel and a trail wheel to attack the support players in each defense that we see.  This is not a common action, resulting in naming this “Power Read Pass” to simplify for our student-athletes, instead of naming each route individually. 


Concept:

The passing concept is similar to a flood type concept.  Instead of the routes breaking out, they will all continue vertical.  Although you may not think of it as a “flood”, plotting the points, where the routes end for a flood concept would result in the same end points in this concept. 

Diagram 1


QB Reads:

At WPI, we have changed the reading pattern, making it as simple as possible for our quarter back.  His progression is to read top down, but at WPI we instruct to read defenders.  For this concept, we begin with the Corner, (Safety should not matter with how tight we run the #1 WR route) moving to the Overhand/flat player to the hook/curl player.  Our focus is to hit the tight seam route on a line first, and then the wheel, with the trail wheel being a check down.


Protection:

At WPI, we are mainly a gap scheme rushing attack, with our most called run plays being Power (Power Read)/Counter and Buck Sweep.  Our main play action pass protection is based off the power (counter) scheme; the backside guard pulling and being responsible for the front side C gap player. Our Tailback receives the fake running in front of the QB and continuing outside the puller to account for the play side D gap.  This specific play, we free release the TB and leave the D Gap player for the QB to take care of with a hot throw.  With this look, we show “power” to the defense and get the conflict defenders to trigger on the run action.  The inside stem by the WR gives the illusion of a crack block they have when we run Buck Sweep, forcing the secondary to execute their crack replace rules.

An adjustment we make and utilize the most with this concept, is to put our sniffer back on the backside of the protection.  We insert him in the backside B gap and let the tackle fan for C gap.   This now makes it so that we would not have to throw “Hot” off three rushers weak.


Coaching Points:

WR Rules:

We give the #1 WR very specific rules when running his route.  There was never a given name for the route, as it mimics a seam route run from the outside.  The WR is told to align on the bottom of the numbers (normal alignment for WPI) where he should take two inside stem steps, (get to the top of the numbers), concluding with taking three vertical steps before he looks for the ball.  The vertical steps are necessary due to the following reasons:  Everyone loves to drift and we do not want the safety to be able to have involvement on this route, where his skinny stem should keep him away from the safety when we would be throwing him the ball.  The inside stem sells a crack block forcing the secondary to utilize their crack force rules, resulting in the action we are trying to create.  Thirdly, we inform him to be inside the corner, as his vision to be to want to protect the throw if the QB decides to throw him the ball against a bail corner. 


RB Route Rules:

Wheel routes are run differently within our offense depending on the alignment of the back.  If he is in any position near the line of scrimmage, we teach the wheel as an arrow initially, with the RB getting width over depth and turning up once he hits the bottom of the numbers.  When he is aligned in the backfield, we tell him to go right now, aiming for the bottom of the numbers.  Once on the vertical part of the route, fade rules apply, no further towards the sideline than ½ way between the numbers and the sideline, to give the QB room to throw away from defenders.

Read More

Disguising 3 Deep, Two Under Coverage Pressures from Odd Stack Looks

By Mason Hughes
Head Coach
Central Valley Christian High School (CA)
Twitter: @mason_hughes


At Central Valley Christian, we employ a 3-3 stack defense with quarter’s coverage. We believe that the best way to defend the modern high school offense is to base out of a 2-high safety look. However, modern offenses are too good at making adjustments if the defense only runs one scheme. In order to combat the offense, we believe that we must blitz. We use 4, 5, 6, and 7-man pressures to disrupt the offense and cause chaos. In each of those pressure schemes, we incorporate a different type of coverage behind the pressure (pattern matching zone with 4 and 5-man pressures, true man-to-man with 7-man pressures, and spot dropping with 6-man pressures).

One of our most successful pressures has been our 6-man pressure scheme with true spot dropping zone principles. When these pressures with spot dropping zones coverages are coupled with our other pattern match and man-to-man coverages in our defensive game plan, it allows for our defense to create chaos to the offense and keeps the offense on edge. We believe that the spot dropping zone coverage allows for the defenders in coverage to make plays on poorly thrown, or rushed passes by the quarterback, and often results in interceptions and big plays from our defense. Since the coverage defenders are spot dropping with their eyes on the quarterback, we believe that this pressure scheme is also effective against run plays and screens. These pressures and coverages made up 10% of our defensive calls this past season, yet yielded over 30% of our forced turnovers and sacks.


The Basics

We employ 3 defensive linemen, 3 linebackers, 3 safeties, and 2 corners in our defense. Two of our safeties (Bandit and Will) can play low as a linebacker or high as a true 2-high safety. Our Free safety will always be a true 2-high safety player. This allows for many different blitzes, but we have found that there are two pressure paths that attack the types of run plays and pass protections that we see the most.

We like to think of our pressures as “plays” or patterns for the defense. The two 6-man pressure patterns that we run are in diagrams 1 and 2 below.

Diagram 1

Diagram 2


We can blitz any of the 11 players on the field based on calls, but the paths are all broken down into these two basic patterns.


Coaching Points:

Below are the coaching points for each type of player in our 6-man pressures.


Slanting defensive linemen:

  1. Attack the slant side shoulder of the offensive lineman in front of you
  2. Hands before feet
  3. Eyes below his chin
  4. In pass situations, you can use pass rush moves immediately
  5. In run situations, you must remain square to the line of scrimmage and use stimulus-response (down=squeeze, reach=press, and mirror, base=extend)


Long sticking defensive linemen:

  1. Attack the inside shoulder of the guard you are sticking to
  2. Feet before hands
  3. Eyes below his chin
  4. In pass situations, you can use pass rush moves immediately
  5. In run situations, you must remain square to the line of scrimmage and use stimulus response on the guard (down=squeeze, reach=press, and mirror, base=extend)


Blitzers:

  1. In run situations, the pre-snap movement must be minimal
  2. In pass situations, the pre-snap movement must occur
    1. Learn the snap count, bluff early, get momentum if you can
  3. Use your hands, not shoulders
    1. In run situations react to blocks as you would on non-blitzing plays, just do it on the move
    2. In pass situations use chop and rip moves on the blocker, finish the play – hitting the quarterback is always better than jumping to deflect his pass


Hash Droppers:

  1. Play the run first, if run you are responsible for forcing the ball back inside
  2. If pass, drop/move to a landmark of 10 yards deep and just outside the hash mark on your side
    1. Eyes must be on the quarterback let his face move you laterally
    2. You must feel receivers in your area
    3. Use pedal, turn/run or shuffle technique to get to your drop
  3. Once the quarterback takes his front hand off the football to throw break in the direction he is throwing – looks to intercept the ball
  4. Make sure to not get too wide, we want to defend curls and rally to passes in the flats


Read More

Defending 20/11 Y-Off Runs Personnel with Multiple Fronts

By Spencer Leno
Co-Defensive Coordinator/ ILB Coach
Massillon Washington High School (OH)
Twitter: @SpencerLeno


More offenses are incorporating a hybrid fullback and tight-end type of player into their offensive scheme. With this hybrid player, teams can align in 11, 20, and sometimes even 10 personnel without subbing anyone in or out. As coordinators, it is harder to distinguish when an offense may align in a specific formation that correlates with the personnel grouping they have on the field. For this reason, our defense wants to have the ability to attack an offense using multiple fronts, while still maintaining our rules and fits.

One of Massillon’s top defensive goals is to stop the run. We believe that if we can win the rushing war, we will win the game. We are a base 3-4 defense that can align in multiple fronts. Throughout a game, we will present both odd and even looks to an offense. Our defense also values the importance of using these multiple fronts while still being able to keep the same personnel on the field. It is crucial that when utilizing different looks, we can keep our reads and rules the same for every position. At Massillon, we are predominantly a spill defense, but depending on our game plan, we can box the ball inside as well. We ultimately want the ball to go lateral to allow our athletes to run to the ball and make tackles. We’ve taken on the mindset of “building a wall” and being gap sound in everything we do. Two of the fronts we utilize are our Under and Okie fronts.

Key Terms:

Our players and coaches all must use the same universal terms that apply to all of our position groups. The scheme must be simple along with our communication, reads, and fits. Before we drill any team sessions, we make sure that our position groups practice these techniques and aiming points throughout individual, half-line, and inside run. These terms can be applied to all of the fronts we use.

The main terms we use when introducing our run fits are below and will be explained throughout the article.

-Spill
-Press
-Secondary support (Corners)
-Box
-Cutback
-Inside point of QB
-Scrape
-Alley
-Outside point of QB

20/11 Personnel vs. Under

The use of an H forces the defense to account for an extra gap. As coordinators, we have to decide how we’re going to attack and align with the extra gap. The extra gap can be created through the offensive play call or by their initial alignment. When the H is on the ball, a defense must decide on how to play the C gap based on what an offense wants to do. Since the H can move when he is aligned off the line of scrimmage, we want to be multiple in our fronts and alignments. We don’t want to have too many checks and do not want a formation to dictate which front or coverage we run. This past season, we saw a mixture of gap and zone schemes out of these personnel groupings.

Diagram 1

Diagram 2

5 Techniques

In our Under front, the E and OB’s are aligned in 5-techniques and are C gap players. Even versus a three-man surface (H on the line of scrimmage), the E and OB will still align in a 5-technique to keep their rules consistent in our Under front. They read the “V of the neck” and are responsible for squeezing any down block by their tackle and wrong arming any kick out forcing the ball to spill outside. When wrong arming, we teach our players to take their outside arm and strike through the inside leg of the kick out. After they strike, they need to get vertical immediately to knock off any second puller. Versus any zone read or split zone arch, the 5-technique to the read side is responsible for what we label as the inside point of the QB. He needs to squeeze down and attack inside out on the QB, aiming for his inside hip. Any base or reach block read, the 5-technique must maintain control of the C gap.

Interior DL (N/ T)

The N and the T are taught to read the “V of the neck” of either the OC or OG. We teach these players to attack half of a man, work to heels depth of the OL, and to control their gap. Versus a down or back block, they must not get washed down the line of scrimmage to create vertical seams. If at any point during a double team or combo block, the OL releases up to the ILBs, they need to disengage and make the play if the color shows in their gap. We also preach to them the importance of not running up the field versus a back block because of the risk of creating a vertical seam. For example, when their key pulls away from them, they cannot chase up the field. When a back block occurs from the C, they need to fight the pressure and be ready to disengage if the RB were to cut it back to their gap. If at any time the T gets trapped or whammed, he is expected to wrong arm and spill the block. We want the 3-technique and the shade to fight pressure and maintain their gap at all costs.

Inside Linebackers

Inside linebackers are expected to master three basic reads and fits. If an ILB gets an open window read or flow towards their gap they need to press and fill it. When they read a closed window, they are taught to scrape tight to the wrong arm of the 5-technique and if necessary, spill any puller or kick out that climbs to them. Versus gap scheme and pullers, the ILB whose guard is pulling away from him must press over top reading cloudy to clear. If the run-through is clear, they take it. If it’s cloudy, they are responsible for pressing overtop. Although we have the ability in our defense to gap exchange zone read with the 5-techniques, this article only covers our ILBs attacking the dive versus any zone or split zone. They attack the dive by pressing their gap.

Sam Linebacker

The S reads the EMOLS to RB flow. His two primary run reads are an on-block and a down block. Versus 20 and 11 personnel formations, once the S reads the OT or TE block down, he condenses down to play the D gap. If the offense attempts to kick him out, he is taught to box the ball back inside. When the S boxes, he works no further than heels depth of the line of scrimmage and his aiming point should be the outside shoulder of the kick out. The S must not allow his shoulders to get turned when he boxes. If the S reads flow away, we teach him to shuffle into the cutback, keeping his shoulders square to the line of scrimmage. Against zone, the S has two reads. If it’s zone away from him, he needs to condense down and be in a position to play the outside point of the QB. Sometimes 20 personnel teams will run split zone arch and instead of kicking the 5-technique, th

Read More

OL Count System in Double Screen Options from Empty Formation

By Jamie Scruggs
Offensive Coordinator
Brookwood High School (AL)
Twitter: @JamieScruggs


In the Spread to Run offense, we are dedicated to methods of efficiently attacking the perimeter. The screen-screen option below is one of the primary methods we utilize. We base the play out of the empty formation with a sniffer back.  The empty formation with a sniffer is a portion of a bigger picture that provides the offense with a 7-man run game box while still being able to 6-man protect the drop back game and attack the perimeter with linemen in the screen game.

Diagram 1


Offensive Line Play

Proper identification of second level defenders is of utmost importance to ensure that all defenders are blocked. We employ a count screen count system to minimize mistakes and help the line play fast.

Diagram 2


PST: The play side tackle’s job is to inside release and kick out the #2 defender. His aiming point is the near hip of the defender. After his release, his path to kick out must be flat down the line of scrimmage. If his path is too far up field, he risks the defender beating him to the point of attack.

PSG: The play side guard’s job is to pass set for a 2 count, punch the down lineman, and block the #3 defender. He will over set, or under set a defensive lineman depending on his technique to create an easier path to get to the next level defender. He must also release flat to keep the defender inside the tackle box.

C: The center’s job is to pass set for a 2 count and block the middle linebacker to the free safety. Like the play side guard, he will pass set to create an easier path to get to the next level after the 2 count and punch.

BSG: The back-side guard has the exact same job as the play side guard. 

BST: The back-side tackle’s job is to quick set the defensive end. He will quickset to stop any up-field penetration that may interfere with the tunnel screen to the wide receiver to his side.


Receiver Play

Diagram 3

Read More

Dime Package Coverage for the 4-2-5 Defense

By Mike Nahum
Associate Head Coach/Safeties
Marvin Ridge High School (NC)
Twitter: @coachnahum60


As a base 4-2-5 defense, we utilize 4 down linemen, 2 linebackers, 3 safeties and 2 cornerbacks and base out of quarters coverage. Our front six is set separately from our back five. Since the ball is on the hash at least 80% of the time or more in high school, we focus on teaching from the hash the majority of the time. Our defense is field/boundary based since we declare passing strength to the field most of the time.


These 3 players line up to the Boundary/away from the passing strength.

BC: Boundary Corner

Buck: Boundary Inside Linebacker

BS: Boundary Safety


These 4 players line up to the field/to the passing strength.

FC: Field Corner

Mike: Field Inside Linebacker

Rover: Field Low Safety

FS: Field High Safety


Our Dime (D) package is a personnel grouping where we take our NT (A gap defender) out and replace him with a Dime. We then simply slide our DT (B gap defender) to a head up Nose (0 Technique). This simply puts us in a 3-2-6. Nothing more.

This allows all our players to play in normal alignment keeping their reads and keys same as. In high school, in my opinion, this is the cornerstone to having success.


There are four reasons we needed to have this change up in our arsenal and they are:

1) Provide the ability to play man coverage and drop 8 using a DB rather than a LB on their receivers. 

2) Provide you the ability to stay in immediate safety force (Rover/Dime) while staying 2-high.

3) Provide multiple looks with Buccaneer front, while matching skill on skill with our Dime-preventing a LB from having to play in space. 

4) Eliminates having a skill player on the sideline while having a static 4-man front vs. the spread or on passing downs. 


In addition, I will discuss this package vs. 10P 2×2 and 10P 3×1.

Our Dime (D) is generally our second-best Rover (Low Safety). The Dime (D) will generally play to the boundary unless coverage dictates something different.

First call will be Bronco. Bronco is a 3-man rush and dropping 8 defenders. We will play 2 coverages from Bronco.


Bronco Blue:

This will be called in our Dime Package to drop 8 defenders and rushing 3 playing Cover 4 (Blue) behind it.


Versus 2×2

  • DE’s 5-techniques
  • DT: 0-technique (Rush Opposite of Center Turn)
  • Mike/Buck are vertical/hook defenders
  • Rover plays flats to field/Dime plays flats to boundary
  • FC Match Vertical (MV) #1 player to field
  • FS Match Vertical 2 player to field
  • BS Match Vertical #1 player to boundary
  • BC Match Vertical #2 player to boundary


Versus 3×1

  • DE’s 5-techniques
  • DT: 0-technique (Rush Opposite of Center Turn)
  • Mike/Buck bump to trips and are vertical/hook defenders
  • Rover plays flats to field/Dime plays flats to boundary
  • FC Match Vertical #1 player to field
  • FS Match Vertical #2 player to field
  • BS Match Vertical #3 player to Field
  • BC Match Vertical #1 player to boundary


Read More

5 Essential Principles of Pin and Pull Run Concepts

By Steve Monninger
Head Coach
Norfolk Academy Head Coach (VA)


For the duration of the 2019 football season, our Pin and Pull scheme was the number one offensive run play on our call sheet.  We had a lot of confidence in the play and we used it in almost every situation.  As part of our balanced attack, we ran pin and pull 80 times for 453 yards (5.67 yards per carry) and scored six touchdowns over 9 games.  I am excited to share with you five essential principles of the Pin and Pull play and explain why the play worked effectively for us.   


What is Pin and Pull?

Our version of the Pin and Pull is a middle zone run concept that utilizes down blocks (pin) and wrapping lineman (pull).  It is a bit different than a true middle zone that uses all zone blocks and it is different from a buck sweep that pulls both guards.  It is a versatile running play that can take advantage of the horizontal “stretch” of the defense.  The ball can hit anywhere from inside the tight end to the far sideline.   


Essential #1 – Simple Blocking Scheme with Concrete Rules

When I learned this play nearly 20 years ago, I used lots of combination calls (“TED”, “POP”, “GAC”) that reminded our offensive linemen how to block the play based on the defensive front that we faced.  Years later, I found it easier to use a simple “if / then” statement for our frontside offensive lineman.  Here are the base blocking rules:

Playside TE – Always block the Defensive End (the 1st person on or outside our tackle).  Depending on the alignment, it could be a down block, a base block or a Reach Drive block. 

Playside Tackle – If I have a down block then down block.  If I do not have a down block, then wrap to the (outside) LB

Playside Guard – If I have a down block then down block.   If I do not have a down block, then wrap to the (playside) LB

Center – Reach and climb playside gap or if guard down blocks, then wrap for (playside) LB

Backside Guard – Reach and climb playside gap

Backside Tackle – Reach and climb playside gap

Backside TE – Reach and climb playside gap


Down block:

On our down block, the offensive lineman will take a 4-6-inch step with his near foot pointed directly at the defender.  The second step is with the trailing foot that will time up with punch (elbows in, thumbs up) on the cylinder of the defender.  The head placement of the offensive lineman is not a rule, it is a read.  If the defender is a hard charger we will quickly put our head across to stop the penetration.  If the defender tends to sit and read, we will keep our head in the playside gap to prevent the defender from crossing our face and spilling over into the play.  Film study and scouting can help us understand the types of defensive lineman we are facing that week.  In either case, once we are engaged, we want to stay locked on with our hands in tight and use good demeanor as we get a push on a 45-degree angle. 


Wrap Block:

We use a “skip pull” technique for two main reasons.  First, the skip pull will give our lineman good depth so he can clear the down block that is next to him.  Second, we feel that the skip pull assures square shoulders, which is vital for our lineman in terms of vision and approach on the LB in space. When our lineman run in space, they will pump their arms, keep a low center of gravity and avoid drifting to the outside.  Our lineman will take a good inside-out approach on the defender.  We do not automatically “hook” or “reach” or defenders because there is no guarantee that the ball will travel outside.  Wrapping lineman will punch the inside number of the defender while putting their head in front.  If the defender “peeks” inside, the lineman will execute a reach block.  If the defender fights for outside leverage, the lineman will lock out his inside arm and press the defender toward the sideline.  It is the RB’s job to read these blocks.            

When offensive lineman wraps to linebackers, they must take the best path to match the linebacker.  If the LB flows over the top, it is typical for a lineman to wrap around a down block and meet him in space.  If a LB gets downhill quickly, it is typical for the lineman to take a tight path to match that flow.  If there are LBs walked up into the LOS with a blitzing demeanor in the frontside gaps, the lineman must honor their down block rules.

Diagram 1

Diagram 2

Diagram 3

Read More

Acceleration of RPOs using Triplets: Packaging Offensive Plays in Three’s

By Kyle McKenna
Assistant Head Coach/Offensive Coordinator
Mercer Island High School (WA)
Twitter: @CoachMcKenna


Many up-tempo offenses have moved to one-word calls to package plays and move as fast as possible.  One-word calls allow an offense to combine all aspects of a play into one trigger word but can also limit the versatility of an offense.  To keep the speed of the one-word call but expand the versatility, we created a system of “triplets” that contained a run, play-action and a tagged RPO.  Each triplet contained up to seven play options for the offense at a very high tempo.


Evolution of the Triplets

The concepts that I will talk about here were developed over about three years with the members of the Brooklyn Tech High School coaching staff.  I have a tremendous amount of gratitude for the collaboration and these concepts were a group effort.  The installation was a tiered approach that involved implementing one aspect at a time over several seasons.  There were basic concepts that had to be mastered first. However, some aspects can be implemented quite quickly and effectively and expanded later. Now at Mercer Island High School, we are in a similar setup where we are looking to implement the aspects as we master them.

At Brooklyn Tech, we had always been a multiple offense that was heavy in formation options but used limited concepts within those formations. We wanted to find a way to create mismatches, put our players in good situations, and highlight the skill sets of our most talented players. Our goal was to create an offense that could vary tempo, implement RPO’s and use them to create favorable matchups.

We always focused a great deal on keeping verbiage and concepts simple and easy to remember.  Early on, we transitioned from numbers-based calls to concept-based calls in order to make it easier to go without a huddle.  Word groupings replaced numbered sequences in both the run and pass game.  We wanted to create high percentage throws for our QB and began to implement Run-Pass options around 2012.  We started very basic and built upon that foundation, always keeping in mind who our best athletes were and how we could best get them into space.     Like option football, RPOs give you multiple places to go with the ball and they take advantage of numbers, leverage and conflict players.  In 2012, we were about 20% RPO and by 2017 we were up to about 80%.  

This increase started first with tagged RPOs that were schemed from week to week in the game plan. For example, we could tag a pop pass for the Y with our inside zone or power runs if we saw that the Y wasn’t being accounted for. We also tagged a backside slant by the Slot with one back power.  These early RPOs worked well for us and our players became comfortable with the decision-making process of reading the conflict player.

Diagram 1


Y Pop Pass:

For our Y pop RPO the quarterback is reading either the Back side ILB (in a 2 LB box) or the back side OLB (three LB box).  While performing the mesh with the running back, if the read stays put, the QB will give the ball to the running back.  If the read inserts on the run, the QB will throw to the Y on the pop pass.  Pop pass cannot be run too deep and should go in the area that the read vacated. We are trying to manipulate where open space will be and take advantage of it. Over the years, we have run this play from different movements and formations. It easily attaches itself to most of our base run concepts.

To study game film of this concept, click on the video below:

Read More

Formationing the Jet Sweep to Exploit Numbers

By Pete DeWeese
Featuring: Sam Parker
Offensive Line Coach
Ferris State University (MI)
Twitter: @CoachParker


The Ferris State Bulldogs, led by Head Coach Tony Annese, is coming off of a landmark 2018 season.  The Bulldogs fell just two points shy of a Division II National Championship.  Ferris State was paced by an explosive offense averaged just under 500 yards while scoring 39 points per game.  The Bulldog offense featured a rushing attack that averages just over 270 yards per contest (4,354 rushing yards) over the course of a 16 game season. Offensive Line coach Sam Parker oversaw a veteran position group that paved the way for 52 rushing touchdowns.  One of the more explosive components of the Ferris State rushing attack was their Jet Sweep package.

Ferris State believes in using motion as a big part of their offense.  Coach Parker acknowledges that his Head Coach (Anesse) has a background in the flexbone offense.  The flexbone, like so many other offenses, relies heavily on the use of motion to gain a man advantage or gain a flank, on the defense.  Over the years Coach Anesse brought many of the flexbone principles with him as he transitioned first to the pistol and then to a 10P spread team that often bases out of 2×2 formations.  During their run to the National Championship game in 2018, the Ferris State offense employed a myriad of personnel groupings and formations to attack defenses.  This is evident in their Jet Sweep package.

Coach Parker goes in-depth on the Ferris State game-planning process and explained to X & O Labs what the staff looks for when building the Jet Sweep package into a game plan.


Why Jet Sweep?

Like many spread teams, Ferris State wants to use its tempo to stress the defense.  Additionally, Coach Parker and the rest of the Bulldog offensive staff want to force the defense to defend the entire field.  The Jet Sweep package is one way to accomplish both of these things.  Coach Parker also acknowledged other key factors that make Jet Sweep an important piece of their explosive offense:

  • Gets playmakers the ball. Jet Sweep is a versatile play that can utilize the skill set of any dynamic player in your offense. With the right formation and motion, you can get the ball to any outside receiver, slot, or running back in your offense.  
  • Motion manipulates defenses. Using motion, sweeps or otherwise opens up your offense & often simplifies the defense.   Sweep action often forces a base check.  For some, that means rotating safeties.  For other teams, it may trigger the overhang.  Either way, you typically get a picture of how they want to defend the sweep action.  This same picture also shows you how to attack the defense. “Take what you see and take advantage.”
  • Jet Sweep helps create natural packages in the game plan that can counter the defense’s reaction to the sweep action. Once you get a read for how they plan to defend the Jet, you find your counters off of the play. Depending upon the reaction of the defense, the Offensive Coordinator will find compliments off of the sweep action. Power strong, Counter weak, and variations of Vertical route stems often serve as great responses to rotating defenses


Blocking the Jet Sweep:

Another element to consider when setting your game plan is how you intend to block the Jet Sweep.  Many teams borrow their blocking scheme from the traditional Flex Bone Rocket Toss where the offensive line will work towards the Sweep action.  Other spread teams have the offensive line work away from the Sweep action.  Coach Parker acknowledges that either way, “You are not blocking one end.  Pick which, front-side or backside and block freaks,” he said.  The reaction of the play-side end can determine which action that Ferris State chooses to employ.  A defensive end that is going to work hard up-field after the snap is better handled if you block him.  If he continues to work hard up-field and disrupt the play, then Coach Parker reminds you “call another play.”  That reaction, as well as fast flow from linebackers, is what makes the Sweep package so vital.  An aggressive up-field defensive end is likely ripe to have power or power Read run right at him.  If the offense is having success running the Jet package and the defensive end starts to get upfield, then the natural constraint play from the offense would be to show the same action and run power underneath the defensive end as he flies upfield.  The Ferris State offense also uses power read as a complement to their Jet package.  If the defensive end wants to get upfield to disrupt the Jet, the offense can take advantage of his aggressive play and read him.  On the flip side of that, if the play-side defensive end wants to squeeze down blocks hard, the offense can often find success by zoning away and outrunning the end.

For teams that choose to zone towards the Sweep action, it is important that you capture the edge with your blocks.  One point of emphasis for Coach Parker and his offensive line has been a move away from “traditional” terminology.  Experience offensive line coaches know that unless Outside Zone is your primary run scheme, and thus the primary focus of your practice, that asking a player to “reach” a defender often results in the lineman over-running the defender.  Coach Parker has moved away from asking his players to “reach” anyone.  Instead, Coach Parker tells his offensive lineman that “this is a drive block, and then turn your hips.”  The same players that struggled to reach a defender found more success.  “If you can win play-side,” he says, “turn your hips.” 

Read More

Trap and Stubbie Coverage to Defend Dual Threat QBs

By Jesse Turner (Secondary Coach) and Lee Gibson (Head Coach)
Leeds High School (AL)
Twitter: @LeedsCoachT and @LeedsCoachG


As the dual threat athlete has become more and more a part of our game, so has the sprint game which helps utilize the dual threat weapon that is a running quarterback. In years past, the sprint pass has been used by offenses to cut down half the field, simplify throws, and get your quarterback out of the pocket. However, now it is used to maximize the threat that is the athletic quarterback. Defenses now not only have to defend the passing game, but also contain the quarterback and the threat he presents carrying the football. Our general philosophy regarding not only sprint passes, but passes in general, is controlling where the offense is able to throw the ball and who they are able to throw it to while maintaining containment on the quarterback. We believe forcing the offense to throw it to the place or player they do not want to, we will have success. Throughout this post, we will look particularly at the sprint pass and how to maximize and differentiate the different looks we give while keeping it very simple for our players. 


Game Planning and Approach

As a staff, the first step we take in attempting to successfully defend the sprint pass is understanding what routes they like the most. We understand, as a smaller high school with two-way players, that we must be simple in what we teach, and we must put an emphasis on stopping what they the offense does best and most frequently. Week to week, we have a detailed understanding of what sprint concept(s) our opponent is running, who they are trying to get the ball to, and when they look to execute their sprint game. Based off this understanding, we try to use our coverages to dictate where and to whom the ball goes to (taking away what they do best). Today, we will look at the way we approached some of the most popular sprint pass concepts we saw this year and how we approached stopping these concepts.


Trap Corner (“Clip” Corner)

Our bread and butter approach to covering one back, 2×2 formations is to play a 3-4 and match coverage where our secondary is reading the #2 receiver and we are matching coverage based off his release. Our guys understand that the #2 receiver can do one of three things — he can go out, in, or vertical.

Diagram 1


However, we also will play a version of Cover 3 that we call “Clip” to combat the sprint pass. This provides us a different look and takes the thinking out of it for our guys. We had a lot of success with “Clip” in combating sprint passes that tried to attack us with a quick and easy completion to the flat. Specifically, we used this coverage to stop a team that loved to throw the curl flat combo off their sprint game.

Diagram 2


“Clip” is a simple, late rotation, trap corner Cover 3 but works, as stated above, to provide a simple and diverse look that also takes away the thinking for our guys. The assignments in “Clip” are as follows:

Read More

The Read Based Route Running System

By DJ Marrs
Head Football Coach
Quitman High School (AR)
Twitter: @Coach_Marrs

and Trenton Corley
WR Coach
Quitman High School (AR)
Twitter: @TrentonCorley


Before I came to Quitman, I was the OC at a school that arguably year in and year out had the best athletes in the state. In my 4 years as OC, we had 24 kids sign to play college ball, 8 of them FBS and 5 went to Power 5 schools. So, the question of “How do we get kids open” was not an issue. We played fast and kept it simple. However, when I took the HC job at Quitman, we did not have fast kids or a lot of athletes in the school. It was a new program and we needed numbers, so the Dead T or Wing T wasn’t the answer, we had to be flashy, but how do we get these slower, less athletic receivers open? Solving this problem is how the concept was born. Our passing game is built on our WR’s being responsible for beating a defender, even against a zone, they are responsible for a defender and they have a read just like a QB does to get “open”.  Every route we run has a variety of options that they are to use to beat that defender based on how the receiver reads the defender. We do not use typical progressions or rely on timing at all for our QB’s so if you are a traditionalist with your quarterback play, this might not be for you. This article is about the WR position so I will be glad to visit or give any insight on QB Play if you reach out to me.  

My favorite part of this method is that it also gives us an easy answer to “What is Open?”. Our WR’s and QB’s can all answer this question and use the same answers when watching film. We name our routes using traditional names (i.e. stop, post, wheel, snag) but our kids know that the route isn’t a couple of straight lines with perfect angles and arrows, but instead its a “Cluster” of routes that they will run to “run where the defense isn’t”.  We do not use steps, or yards, or destinations when teaching, we simply teach releases and how to read a defender.  The rest of the adjustments they will make on the fly during the game.  It involves a lot of teaching on the front end, however once they are comfortable with their options, they get a better “feel” for where they should go and it makes us tough to scout because it appears that we have a ton of concepts, but that is not the case at all. We use the same concepts versus man and zone because we are working away from defenders and treating the zone as a man-to-man type coverage, forcing defenses to cover every area of their zone and with the QB Read, we have all defenders accounted for.


TEACHING PROGRESSION AND BASICS

The first thing we teach is releases.  We start with man releases because that is the best way to understand LEVERAGE, which is huge for understanding what we are trying to do.  We use a 3-move release and a Diamond release vs press coverage.  After that, we then work route stems and continue to teach leverage and stacking defenders. Where what we do gets a little different is in the next step.  We then teach them to read defenders on the move, and change their route based on that read to be open. Regardless of speed, if they make the right read and get into the route based off that, they are “Open with leverage”. We see a lot of bracketed and read-type coverages.  Sometimes that can be hard on QB’s to recognize and see while moving in the pocket and trying to maintain timing.  So, we let the WR’s take care of that, because they are not having to worry about getting sacked.  We teach them to read a zone defender we use the 3 H’s. 

  1. Hips-Does he flip them or keep them square? Force him to flip them more than once and win the route.  If he refuses to flip and give ground, he is a deep defender and we work an underneath option. 
  2. Hands-Are they up to collision or down to run? If he has them down, he is trying to get somewhere, if he has them up, he is where he is supposed to be and on the hunt for a WR to collision.
  3. Head-Where is he looking? If his eyes are inside or on the inside WR, he is probably in a form of cover 2 or bracket coverage. Is the backside safety eyeing the inside WR against trips, or the safety eyeing the tackle more than the inside WR? All things we want our kids to pick up on within the first few steps of their route. 


THE ROUTES AND COACHING CUES

The first route we usually start with is the Stop.  It is not a 5-yard or 7-step stop, It is just a “Stop”.  If you ask one of our outside WRs what a stop is, they will tell you “inside release, and I push vertical until he flips his hips, once that happens, I drive, drop, and snap around. If he never flips his hips, I continue and push vertical and look over the top.” 

It is a lot more than “go five and turn around”, but it allows our players to understand HOW to get open and what it takes.  Regardless of the coverage, their whole focus is on the corner and how to beat him to get open. We give them the tools; they get a blank canvas and work their defender according to their skill set.

Read More

Altering Gap Blocking Rules to Maximize Efficiency vs. Four Down Fronts

By Mark Holcomb
Head Football Coach/Offensive Line Coach
Grove High School (NC)
Twitter: @FootballHolcomb and @OakGroveGrizzFB


Maintaining a physical downhill run game is important now more than ever on every level from Little League to High School to the NFL. At Oak Grove High School, we want to be known as a physical downhill running football team first and foremost.  Running power out of multiple formations and motions allows us to have that physical downhill running play that we desire; however, we prefer to establish our Power play with the use of an H Back set out of 11 personnel.  We can run variations and dress up the play but want to ensure this is our “bread and butter.” The power play is run out of our 11 personnel packages.


Formation Options

Any formation from your 11 Personnel package can be used to run Power but for the sake of this article, we will use our 11 Personnel Hulk formation with an H back trips look.  We get to this formation by using motion from a 2×2 alignment, trips alignment, two back alignments, etc. to gain any advantage we can vs the defensive pre-snap alignment.  No matter how you get to it, this formation is our base way to run Power with 11 Personnel. 

Diagram 1


Frontside Blocking Rules (Playside-Right)

Our base frontside blocking rule for all players is Gap, Down, Backer.  Like many teams, we will use as many double teams as we can in this scheme, but we also look every week to see how the defensive linemen react to down blocks.  If we play a team that aligns in a 3 technique and will squeeze a down block by the guard, we will inside release the guard to the backside backer which will speed him up and make the down block easier on the playside tackle.

Diagram 2


If the 3 technique does not squeeze, then we will gap double with the playside guard and tackle to the backside backer. 

Diagram 3


The job of the center is to help build a wall by blocking back on any A or B gap technique away from playside.  He should take a flat step with his backside foot to allow for a clear pull for the backside guard while not allowing any penetration into the A or B gap. 

Diagram 4


Blocking back on a 4i is one of the most difficult blocks so we will evaluate the film every week to see if we need to block back or if we can cut off with the backside tackle.  


H Back Blocking Rules (Playside-Right)

The H back has quite possibly the most difficult block and must work daily in practice to perfect his steps and leverage.  He must be able to deal with a quick Defensive End who is trying to get up the field as quickly as possible to set an edge one snap.  The next snap will face a Defensive End who is squeezing and trying to wrong arm the kick out and make the play bounce to the force defender.  Film work can help the H back see which type of technique he will most likely face every week, but he must be ready for both on any given play.  Coaches can help the H back out by calling different schemes such as “kick” against a quick up the field defender and “bounce” against a player who likes to squeeze and wrong arm.  (This will affect the pulling guard and running back also).  To “kick” a defensive end the H back MUST step with his backside foot up to the line of scrimmage to get as close to the tackle as possible.  This allows for an inside out angle and will allow him to attack the kick out with his playside shoulder to gain leverage and provide the needed angle to kick the defensive end out of the run fit. 

Read More

Five Quarters Coverage Variations to Defend Modern Day Offenses

By Jason Brown
Linebackers Coach
St. Charles Catholic High School (LA)


It is truly an honor to once again write an article for X and O Labs and to represent St. Charles Catholic and our entire staff. As I was thinking about topics I kept coming back to using Quarters coverage and its adjustments to defend today’s offenses. Diversity in offensive systems dictates defenses to have a lead coverage system that can address variability for you throughout the year. I know we have all heard that Quarters coverage is too multiple and has too many adjustments. Most detractors say Quarters creates complexity and indecision therefore effectively meaning you really have “no answers at all.” Don’t believe that kind of thinking. It has been my experience in 28 years of coaching that kids can learn anything that YOU can teach. As with any article that I write this one comes with the same disclaimer. I am not trying to sell you on anything. I am only sharing with you my thoughts and the thoughts of our staff in implementing this very effective coverage scheme.

One of the questions that defensive coordinators have been trying to answer is “how do I get enough people in the box without giving up a ton of stuff in the passing game?” The next big question is how I take the run/pass conflict off enough people so that we can effectively defend the RPO games of today without just hoping that the Quarterback just misreads it or misses the guy. It is my contention that the closeness of the Safeties alignment to the interior of the formation, the adjustments that the coverage inherently has, and the natural disguise and multiplicity of the split safety look makes it the best option to answer these questions.


“Mix” Coverage:

When we start teaching Quarters coverage the first adjustment, we teach our players is “Mix.” We like “Mix” as a basic adjustment to our Quarters coverage concept. Also, like it to two normally spaced twin receivers. We really like it more to the boundary because it guarantees us the spacing from the #1 and #2 receivers can’t get too wide.

Diagram 1


This puts the triangle (Safety, Linebacker, Corner) on a number two read. The alignment rules for the corner is one yard outside and five yards deep off a normal spaced number one receiver. The Safety is aligned two yards inside and ten yards deep on a normal spaced (for today’s offenses) number two receiver and two yards outside and ten yards deep on a tightly spaced number two receiver. The outside linebacker is in an apex alignment (between number two and the ball) on the number two receiver. The outside linebacker (inside rotator) is a normal progression read curl player on the “Mix” side. If the number two receiver runs an out route in the first 5 yards of the route the Corner will collision the outside shoulder of the number one receiver then look to break on the out route of number two. The Safety will see the out of number two and drive to an inside and on top position on the number one receiver to this side. If number two goes vertical the Safety will buy the route man to man and the Corner will take all of number one deep. If the number two drags under the backers, the Safety will squeeze for 3 steps then sink off and read the QB because he is extra now. The Corner will take all of number one deep again.   We like this concept to two normally spaced twin receivers. Careful when you are playing “Mix” to the field because that can turn in to too much space for the Safety to cover.

To study game film of this concept, click on the video below:

Read More

Universal RPO Design From Multiple Formations

By William Clay
Offensive Coordinator
Halsom High School (TX)
Twitter: @brandonclay88


The Run Pass Option, RPO, has been a staple in many high school and college offenses for a while and it’s made its way to the professional level. You will hear many defensive coordinators with tongue in cheek, call it “cheating”.  If you were to query defensive coordinators what drives them crazy and most of them will say, “multiple formations” add on top of that not changing personnel and you get an added element of surprise and deception that makes it difficult for opposing defenses to pick up tendencies as you are not shuffling in players to change formations.  Therefore, changing formation without changing personnel and using RPO’s can create a frustrating offensive game-plan for the opposing defense regardless of your level of play.


At Haltom High, over the last two seasons, we use multiple formations and focus on using a TE/HB player that allows us to manipulate defensive fronts. The main formations we use for this are:

“Black”: Twins with a sniffer or H-back

“White”: Pro Twins with a TE

“Blue” TE Trips


“Black”


“White”


“Blue”


For this article, we will focus on RPO’s that we run regardless of the formation and can be tagged on many different run plays.  They are:

  1. Crawfish: WR Bubble Screen
  2. Lobster: Bubble/Slant combination. To a single WR it just a slant. 
  3. Flat: an arrow route.


In terms of general mechanics, we are a signal/one-word team.  Our coaches signal formation and play to the skill kids, and the QB uses one for the OL. We require our TE/HB to know the signals.  We do not give specific alignment signals when are in an H-Back formation.  He lines up based on the play. Any checks or audible are always signaled in by coaches on the sideline.  We also are a no-huddle team and play with multiple tempos in order to keep the defense on their toes. 


QB Read: 

In order to simplify the reads, our QB will look from High safety to the Flat/Backside defender.  This decision “flow chart” is consistent throughout all our reads.   The default is to always give the ball to the RB if you are ever unsure. 

  1. Is the Safety 9 yards or deeper? If yes, then read the flat defender on the snap. If no, give the ball.
  2. Does the flat defender play the run on the snap? If yes, then throw the RPO. If no, give the ball.
  3. Are you unsure? If yes, ALWAYS give the ball. You can never go wrong by handing the ball off. 


Crawfish: WR Bubble

We like to tag Crawfish to the play side of Counter. We run regular counter (GT) and counter stay (GH) depending on formation and RPO. The QB will go through his RPO progression read. When we are scouting film, we will always note where the flat defender aligns between twins and trips, where his eyes are and how fast he usually decides on run or pass.  Remember, we want to run the ball so if he plays pass quickly, that is always a plus for us.    The key to this RPO is putting the OLB or flat defender in conflict.  


Black Formation: (Twins with H-Back)

Out of our Black formation, our TE/H-Back aligns away from the play, we usually run GH with him, and he seals on the playside backer. 


Here you can see the OLB aligns tight to the box and the safety is deep enough that the QB will proceed with this RPO read.  However, based on the OLB alignment, the QB can pre-snap note that he is probably playing run.

Read More