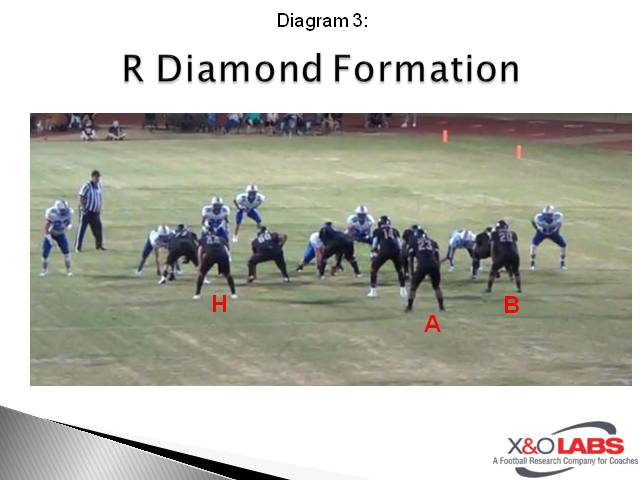
How to Utilize a Defensive Wristband System

By Ryan Desrochers
Linebacker Coach
Liberty High School (AZ)
Twitter: @CoachRDes


Communication is vital to the success of any good football team. On defense, it can be the difference between a sack or turnover and a big play giving up points. While there are numerous ways to communicate to your team on the field, from hand signals to large display boards, one that I have used with great success in the past is a color-coded wristband system coupled with a matching call sheet. The system is flexible enough so that your best players can always be on the field, even at a position that they may have no necessarily practiced much at during the week.


Where to Begin:

The first thing that needs to be considered when developing your wristband is how individualized do you want to make them. You can make them custom to the team you are playing each week or have your system on the wristband for yearlong use. I chose the latter and printed the wristband, cut them out, laminated them, and they last for weeks, if not the whole season, of daily use. We put our entire front and pressure package on one wristband. If we wanted to run a stunt out of our 4-man front, we would signal in the four-man front, Under or Over, then the call from the wristband. For example, Under Pirate would be Under, then Navy-5.

The next piece that went into the design of our wristband was the placement of items within the wristband. We tried our best to put all our line movements and 1 backer pressures on the top level of the card, on the bottom we would put our five- and six-man pressures and our 4-man line stunts. Because we used the same wristband throughout the season, we allowed the players to keep them in their locker and study them, so they could become familiar with calls and their locations. There were calls that our players knew by heart and would not need to look at the wristband.    

Read More

Flexbone Formations: Perimeter Run Concepts

By Ian Gardner
Quarterbacks Coach
Desert Edge High School (AZ)
Twitter: @igardner33


Introduction

 D814992 2One key to success for any offense is forcing the defense to cover as much of the field as possible. When running condensed formations in the shotgun Flexbone, this can become more difficult. Often times teams will attempt to play a loaded box to stop the inside run. This past year, we regularly saw an 8-man box and even a 9-man box. To address this concern we worked hard on developing a solid outside run game to complement our inside run and triple option game.

Our perimeter run game was all built around the idea that we wanted to protect our inside run game, which consists of the Belly and the Veer. Therefore, the looks we gave for our perimeter run game were the same for inside run and triple option. In our opinion, the more the defense had to worry about the better for us. Our perimeter run schemes helped us do that and were a huge part of our offense as we completed our state championship run this past season.

Flexbone Basics

Before we get into the concepts, here is a quick review of how we personnel this offense. This is important because it drives how we build off of our main concepts.

  • OL – Athletic and mean, size is a bonus
  • QB –Smartest player on the field. Great decision maker. Athletic with decent running ability and ball security is a must. Leader.
  • A Back – Typical “dive” back. Inside the tackle runner. Willing blocker. Speed is a bonus.
  • B Back – Quicker and more explosive of the backs. Great for perimeter run game. Willing blocker. Needs the ability to play WR and align in the slot.
  • H Back – Most versatile player on the field. Must be the 2nd smartest player on the field. Must understand all formation alignment tags, blocking schemes, and at times catch and carry the football.
  • X and Y – Most important thing is effort and desire to block. Strength and physicality is a plus. Pass catching and play-making ability is an added bonus and makes the offense even better.

When we call a play, we always go in order of “Strength – Formation – Alignment Tags – Motions/Shifts – Play Call & Direction”. For example, “R Diamond Sling Ozzy Right”. At times, our plays can get to be a bit long when you include all the tags and motions. Thus, we huddle and utilize a QB wrister for our play calling.

In our offense, the play call determines how the A Back aligns. In the example above, “Ozzy Right” the A Back would align off-set gun to the left of the QB, slightly in front of the QB, splitting the inside leg of the tackle. In “Belly Right” (inside zone read), the back getting the ball would align 6 yards deep, splitting the outside leg of the guard to the left side. Different play calls determine if the A Back aligns off-set gun or in pistol.

Base Formations – Diamond & Navy

For the most part, we ran our perimeter run plays out of Diamond and Navy formations. In our shotgun Flexbone offense, the QB has his heels at 4.5 yards. In Diamond, the B and H Back both align even with QB, splitting the inside leg of the tackle. The B is to the strength, and the H is opposite. The A Back aligns based on the play call. The receivers align on the numbers as the Y goes to the strength of formation, the X goes opposite.

Note : All these diagrams are in “Right” formation strength.

Slide1Slide2Slide3

Read More

WR Stem Drills To Access Leverage

By Justin Zimmerman
Wide Receiver Coach
Maryville College
Twitter: @coachJZimmerman

Introduction

The one thing that all the great wide outs have in common is their ability to run great routes. There are so many things that go into great route running, but the ability to manipulate the defender by stemming their route. In simple terms, the stem of the route is the line the wide out takes getting to his breakpoint. Manipulating the stem of the route in order to gain advantageous leverage on the defender is key to putting the wide out in a position to win. I have always thought playing defensive back is one of the most difficult positions to play on the field simple because of the “unknown” factor. For that reason, using the stem of the route to create or keep leverage is paramount. At the end of the day, playing wide out is about getting from point A to point B as fast and efficient as possible and using the stem of the route to create leverage allows us to do this.

Leverage Identification

For us, everything begins in the meeting room. Ultimately a wide out’s success is determined by his ability to know and understand his job within the overall scheme of the offense and of any individual play. I can have the fastest and most athletic player in the world playing for me; but if that player does not know where to go and how to get there he is useless. It is important for a WR to identify the leverage necessary in their route to get to the breakpoint as efficient as possible and able to win. Once they have identified the necessary leverage, they can stem the route. Here is how we define inside leverage and outside leverage: 

Inside Leverage

We define inside leverage as being between the defender and the football on the defender’s side that is closest to the football. Slants, digs, hard post, and crossing routes are examples of routes in which a WR would want to get inside leverage on the defender. For example, if the receiver gets inside leverage off his release he then maintains his leverage through the stem of his route. 

Outside Leverage

We define outside leverage as being between the defender and the football on the defender’s side that is farthest away from the football. Outs, comebacks, and corner routes are examples of routes in which a WR would want to get outside leverage on the defender.

Now that we have established the concept of leverage, we can begin to cover using the stem of the route to achieve the leverage the receiver needs to win the route. Again, at the end of the day, playing receiver is all about getting from point A to point B as fast and efficiently as possible. 

Coaching the Stem

The stem of the route is the line the WR takes getting to his break point. That line could look very different play to play based on the route and the defense. We talk about the stem of the route as a mechanism to achieve the leverage needed to win a route. 

There are so many variables that go in to determining what type of stem a WR will need for a specific route. An easy rule of thumb is simply get your body in a position to be between the defender and the football. There are a couple things to keep in mind when teaching the types of stems needed for routes.

Teaching Points:

Read More

Adding an Extra Defender vs. 3×1 Runs

By Joe Ginn
Defensive Front Coordinator
Choctaw High School (OK)
Twitter: @CoachGinn


Introduction

choctawEach game plan is different, but there is something about defending one-back trips teams that makes things especially nuanced. Over the past few years, we have found that our swap and vegas calls are a perfect solution to attack these schemes. Here is a bit of the background.

A few years ago, we were playing a very dominant run team. They had 5 outstanding linemen, highlighted by a right tackle who just committed to play at Nebraska. They were also forced by injury to move a third tackle to tight end, giving them six outstanding linemen up front. They came into the game averaging 45 points a game and 271 yards a game rushing on 41 runs a game. We knew going in we would had to stop the run to give our kids a chance to win the ballgame.

We knew we had to find a different way to get an extra hat in the box against their one back offense, which almost always had a tight end in the game. We also wanted to ensure that our extra hat was to their trips side, which was most of the time where they ran. They ran two different types of trips sets, strong and weak trips which I’ll diagram later. This game was probably one of the biggest games in our program’s history. A win would give us a chance to host a playoff game, and our school hadn’t even been in the playoffs in 30 years.

Swap vs. Strong Trips

Our secondary had a pretty simple week, as we knew playing cover number three to the trips side. This would give us a safety dropped down on the number two receiver and another safety aligned inside the number three receiver. The result is that we can keep our three linebackers in the box, giving us seven in the box to stop the run. They didn’t normally pass to the #1 receiver, so we felt like we could keep a corner matched up on the back side one on one.

The largest adjustment with our swap call against strong trips was only our front (Diagram 1). All “Swap” did was change the alignment/responsibility of our Strong side End and Sam LB. Instead of the End being in a 7-technique and Sam playing a 90- technique, Swap moved Sam to a 70-technique and the strong side end out to a 9 technique.

Read More

Creating the Punt Block Mentality

By Brian Mahan
Defensive Coordinator/Punt & FG Block Unit
Woodruff High School (SC)
Twitter: @CoachBMahan


Here is the worst kept secret in football, blocking kicks is fun! Coaches and players alike get excited by blocking kicks, it’s a definite momentum shift in a game and brings a team’s energy level up a couple of notches when it occurs. First and foremost, I do not know all there is to know about blocking kicks and I never will have all the answers for it. As we all know as coaches it’s not about the X’s & O’s, it’s about the “Johnny & Joes”, as Bobby Bowden always liked to say, and we were fortunate enough to have these types of players that could execute our block schemes. In 2018 we had two young men that had this ability, Nigel Cochran and Brian Hunter, that were responsible for all 10 blocked kicks. Nigel and Brian both had the desire to block kicks and it helped they were great athletes!

We do our best to identify 3-4 guys we believe could go and block these kicks and try to put them in a position to be successful at it. During the 2018 season, our team blocked more kicks (10), than any team I have coached before and returned two of them for scores. Blocking kicks is an art form in a sense, I learned from a former boss of mine at Georgetown High School in Georgetown, SC, Coach Barry Avant, who firmly believed in trying to block every punt and kick attempted in a game. Over the years I’ve been able to base our current block schemes off what I learned from Coach Avant. Currently, our Head Coach, Bradley Adams, believes in going after these types of opportunities at the right times and it’s our job as a block unit to take advantage of those opportunities when presented and give our team a lift or change the momentum of the game. In this report, I will show and discuss our schemes for blocking punts and field goal/extra point attempts and hopefully give you some ideas to use with your block units.


Alignment:

The first thing we always teach to our block unit is our base alignment and the stances we want them in. Players will “crowd” the line of scrimmage in a “bunched” stance. Their hand will be even with their front foot, with their face behind their hand. We number our rushers inside-out from 5 on the inside to 1 on the outside. Now there will be times we want to disguise a return and a block and have everyone in two-point stances. This really just depends on our scheme for the week as well. There are also those instances, like this past season, our kick blockers feel more comfortable in a two-point stance rather than the three-point stance.

  • 5’s – Alignment is on the shoulders of the long snapper
  • 4’s – Alignment is head up to slightly inside the eye of the guard
  • 3’s – Alignment is head up to slightly inside eye of the tackle
  • 2’s – Alignment is head up to slightly inside eye of the end
  • 1’s – Alignment is outside should of the end


Diagram 1


Punt Protection Schemes:

Next, we believe it is a must to teach the players the types of blocking schemes that are used in punt and field goal protections by our opponents. This is key in determining our punt block scheme for the upcoming game. The two most common types we see are inside and outside zone.

  • Versus Outside Zone Structure, players will have their outside foot back.
  • Versus Inside Zone Structure, players will have their inside foot back. (5’s will always have their inside foot back).


Diagram 2

Diagram 3


Proper Angles and Block Points

Our next teaching point is how to take the proper angles and block points. This an absolute must and cannot be overlooked and is essential to teaching the players how to avoid the roughing calls from improper techniques. We teach all our angles and block points from our base alignment. It is also important to note that we do not always bring both sides at the same time. We do this to avoid running into one another and causing injuries. Our teaching progression is as follows:

  • Players will “key the ball” when the ball moves, we move.
  • Players will step into the crotch of the blocker upon whom they are aligned on their first step.
  • With their second step, players will straddle the blocker and turn their backs into pressure.
  • When players come free, they will attack the inside number of personal protectors. If the personal protector steps out of their way, they will continue on the same path to block the kick.
  • To block the kick, players will dive “up and out” with their hands below their eyes in what we call the “Superman” position. If you have the resources, I advise purchasing a crash pad like the one used in track for the high jump or just ask to borrow the pad from the track team as we will often do.
  • If they are too far away to dive, we tell them to run through their block point with your hands down in the “Superman” position.


Read More

4-3 Pattern Read Coverages: Play Any Zone Coverage While Simplifying LB Rules

By Erik Kruppe
Head Football Coach
Farmington High School (MO)
Twitter: @KnightsFBFHS

Introduction:

At Farmington High School, our linebackers spend much of their time working on keys, reads, proper run fits, block destruction, and tackling. When it comes to defending the pass, we try to keep it simple for them. We want our linebackers to know exactly what is expected of them versus the pass, regardless of the coverage called.

Base Concept

Everything we do defensively is based out of a 4-3, Cover 4 concept. From our Cover 4 look, we have the ability to get in and out of different coverages. We want our linebacker’s pass defense rules to be consistent, regardless of what coverage is called.

To do this, our linebackers (Sam, Mike, and Will) are taught a count system. The Sam and Will understand their pass responsibility is based off the #2 receiver to their side, while Mike’s responsibility is based off #3 strong. Our linebackers understand they will either drop off their number, or play man on their number. For instance, the Sam will either drop off #2 (any zone concept) or play man on #2 (any man concept). We determine zone or man coverages by numbers and colors. Numbers indicate zone coverages, while colors indicate man coverages. For the remainder of this report, we will discuss how our linebackers pattern read (i.e. drop off) receivers in our zone coverages.     

Pattern Read Concept

Our Linebackers will drop off, or pattern read, their assigned receiver in any zone coverage. One of the first things our linebackers are taught is that their receiver can really only do one of three things: he can release inside, outside, or vertically. While each of those releases can encompass many routes, our linebackers need to understand the initial direction of the receiver’s release.  

Sam/Will’s Pattern Read Drops

Our Sam and Will drop off #2 to their side. If #2 is a split receiver, our linebacker will “Walk,” apexing the #2 receiver (#2) and the end man on the line of scrimmage (EMOL). If #2 is a tight end or a running back, our linebacker will remain in the box. 

Against a vertical release, our linebacker is taught to drop inside-out, making sure he does not expand past #2.  He is to get his hands on and collision #2, settling underneath the route. As #2 continues to run vertically, the linebacker will get his head on a swivel and look up #1. If he sees the #1 receiver (#1), he will expand to the hip, allowing our cornerback to sink underneath the smash concept.  If he does not see #1, our linebacker will square up and break on the ball when thrown.

Our Sam/Will is taught to let an inside release of #2 go, and look up #1 instead. This is one of the most difficult things to get linebackers (young ones in particular) to do correctly, as their natural instinct is to chase the route. We like to run double crossers when teaching our pattern read concepts in practice, because it allows the linebacker to see what it feels like when they chase a shallow cross, only to have the cross from the other side enter a vacated zone. We would rather have them learn from failure in a practice instead of a game.

Versus an outside release, our Sam/Will is taught to expand with the route, staying higher and wider than it. By staying higher and wider than the route, it allows us to drive the up-field shoulder versus the arrow route, and smoothly work to the hip pocket of a wheel route (which our linebackers are expected to run with). Once recognizing an outside release, our linebacker must get on his horse, because he is naturally out-leveraged by alignment.

Read More

Research Report: WR Separation Off Press Coverage

By Sam Nichols
X&O Labs Managing Editor
Former Wide Receiver Coach
Hope College (MI)
Twitter: @SNicholsXOLabs

Introduction:

One of the top drill and technique requests in our annual survey was wide receiver release techniques against press coverage. We reached out to some of the offensive coordinators and receiver coaches around the country and compiled a set of drills from 8 coaches. It is important to note that each of these coaches felt it was important to group the press release concepts with basic footwork at the line of scrimmage as well as secondary release techniques. Many of these drill tapes will include those concepts as well.

The coaches who participated in this report are as follows (in alphabetical order):

Jared Ambrose: Offensive Coordinator, Towson University (MD), @CoachJambrose

Marlon Barnett: Wide Receivers Coach, LA Harbor CC, @iamcoachB

Ossie Buchannon: Wide Receiver Coach, Berry College (GA)

Brian Scott: Offensive Coordinator, Old Dominion University (VA), @ODUOC

Brad Spencer: Assistant Head Coach/Offensive Coordinator, North Central College (IL), @CoachSpence_NCC

Eric Treske: Co-Offensive Coordinator, Lakeland College (WI), @LCCoachTreske

Denver Williams: Wide Receiver, Trinity College (CT), @_coachdwilliams

Stan Zweifel: Head Football Coach, University of Dubuque (IA), @StanZweifel

Brian Scott: Offensive Coordinator, Old Dominion University (VA), @ODUOC


Speed Release Drill

Equipment

  • 2-3 Shields / Coaches to hold Shields
  • 1 Football

Process / Coaching Points

  • Off at snap of the ball
  • Press to get vertical
  • On the rip, get as skinny as possible. Don’t give surface area to defender
  • Stack back on the line

Slide1

Read More

Defending the Y-Off Formation With the 4-2-5

By Mike Kuchar
Senior Research Manager
X&O Labs
Twitter: @MikekKuchar

Editor’s Note: The following research was part of X&O Labs special report on “Linebacker Fits in the 4-2-5 Defense.” Scroll down to see how you can get a free copy of X&O Labs’ best-selling book, “The 4-2-5 Defense Study”, mailed directly to your home or school.


Introduction:

bucknellBucknell University prides itself on stopping the run. In fact, they have been in the top ten in total defense at the FCS level the last four years in a row. Operating out of a 4-2-5 structure, the Bison rely on the pre and post snap movement of the Y to dictate where its linebacker fit in run game. Mike Kuchar sat down with Linebacker Coach Brad Fordyce to talk about how he fits common one back run concepts such a Zone Read and Power Read.

Read More

Training Overhang Defenders to Diagnose and React vs. Run and Pass

By Mark Theophel
Defensive Coordinator
Hartwick College (NY)


Overhang defenders have a critical role in perimeter run force as well as in underneath coverage vs. the pass. In our defense, the term “overhang” is referring to a drop outside linebacker or low safety in a rotated coverage. It is essential that we train these players to effectively read run/pass at the snap and react to multiple different types of plays. Having a thorough understanding of proper alignments, key reads and technique is crucial to our defensive success. Overhang players that are able to do this well should make a significant impact on defensive production. Ideally, we want our overhang defenders to be among the most versatile athletes on the defense.


Overhang Alignments

As with most things in football, when it comes to successful defense on the perimeter, it all starts with alignment. Our alignment rules are simple and uniform so that our players can easily understand where to line up and why. Most formations that we see will be spread formations with at least one slot receiver. Overhang defenders are taught to split the difference between the end man on the line of scrimmage and an open #2 WR. We call this a “walk” alignment.

Walk Alignment Rules:

  • Split the difference between the EMOL and the #2 WR
    • OR #2 and #3 vs. any Trips Formation
  • Approximately 5 yds depth
  • Eyes on the OG for run/pass read
    • Trips = Eyes on #3 WR


Diagram 1

Diagram 2


The walk alignment is designed to position us wide enough so that we can be a factor on the perimeter and in coverage, but also to leverage us inside of #2 so that we can avoid being cut-off when folding for inside run. This is “Day 1” teaching for outside linebackers, and when we start to involve the safeties in our rotated coverages, we will use the same language so the teaching is uniform.

If we are in a coverage that requires our overhang to defend #2 outside the hash, we will make simple adjustments to our standard walk alignment. This is most applicable in our 3-Deep coverages that require our overhang to defend #2 in the seam or in the flat. For these alignments we will use terms like “backer” or “star” in reference to the support calls that we make in those coverages. “Backer” is obviously backer support and “star” is safety support.

Backer/Star Alignment Rules:

  • Align wide enough to maintain outside leverage on #2 post-snap
    • Slight outside, head-up or slight inside
      • Based on match-up/offensive scheme
    • Depth based on match-up and situation
      • At least 5 yds deep
      • Safety can disguise/show two-high
    • See through #2 to the OG for run/pass read
      • Or through #2 to #3 vs. Trips


Diagram 3

Diagram 4


Backer/Star alignments are wider than a typical walk alignment, though the exact width depends on how our overhang matches up with the #2 WR and which types of routes we expect to defend based on film study.

An outside linebacker to a single-width WR aligns in a “hip” alignment. This would occur on the backside of a two-back or trips formation. Our base alignment in this situation is outside of a “ghost” TE with our toes aligned as deep as the nearest defensive linemen’s heels. Depending on the game-plan, we may walk that alignment out as wide as the slant window of the #1 WR.

Diagram 5


Hip Alignment Rules:

  • OLB align outside a “ghost” TE at heel depth
    • Possible adjustment to walk inside of #1
      • Split the difference between EMOL and #1 WR
    • Key progression is the same as walk alignment
      • Eyes on OG for run/pass read


Read More

50 + Drills to Improve QB Pocket Presence

By Sam Nichols

Managing Editor

X&O Labs


Introduction

uclaqb
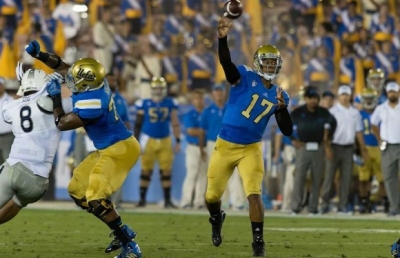
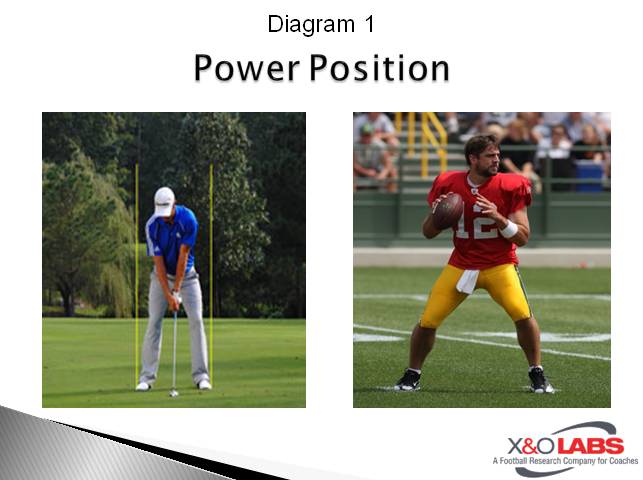
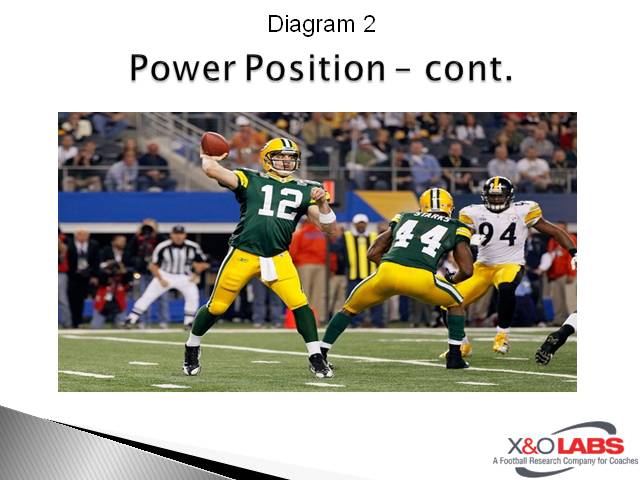
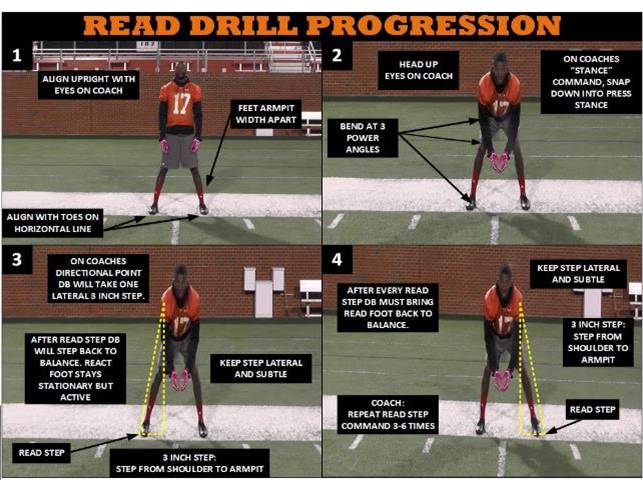
When we first began conducting research on Quarterback development, we cast our net wide.  We wanted to explore every component of the position:  exchanges, drops, read progressions, throwing mechanics, etc.  What we quickly found is that it be difficult to write volumes on this topic, much less a 10,000-word research report like XandOLabs.com is accustomed to doing.  So we decided to subscribe to the “addition by subtraction” methodology by simply honing in our research on what a QB does at the top of his drop.  How he gets there is one thing- now what does he do when chaos ensues, and whatever well organized scheme or plan flies by the waste side.  Many coaches have told us that the easier part of a QB’s footwork progression is the drop, the most difficult is teaching him to move with the ball post-snap. 

In many ways, the drop is the simplest part of the pass play from a fundamental standpoint.  The answers are straight forward.  While coaches may teach different drops, what a Quarterback does at the top of his drop is essential.  The variables that exist are all determined by the play call and the situation.  But that all changes the second the Quarterback plants his dominant foot and works toward the line of scrimmage to throw the football.  At that moment all of the variables that defenses bring come into play.  It is that moment where a QB’s ability to execute his footwork under pressure will determine his long-term success at the position.  In this case, we will look at how coaches are teaching proper footwork through their route progressions from the last step of their drop to the end of a scramble. 

Establishing a Base

Before we begin with the footwork mechanics, it all starts with a solid base, or what Tommy Zeigler, offensive coordinator, Scottsdale Community College, calls his power position.  This is what he told us below:

The Power Position: I relate the power position to a golf stance.  Feet are usually more than shoulder width apart, weight evenly distributed on the inside part of your feet, front foot/toe NEVER pointed at the target. 

We coach our QBs that every throw should be the same and that starts with the “power position” or their base.  The way we come to find the “power position” is by finding where their stride takes them.  I don’t teach a stride so where their body takes them is where we start.  Once we find the base we will use for each individual QB we take a ton of time becoming comfortable in that position.  We make every throw from the same position stressing the hip turn and follow through. 

Slide1


I teach it this way to cut out on wasted movement and erratic footwork.  Also, by having no stride in our throws we’re less likely to be inconsistent with when, where and how your front foot hits the ground…because it’s already there.  Lastly, by taking away the stride you are less likely to “over stride” point your toe and lock out the front knee thus negating your full hip potential.    

Slide2

One of the more prominent drills that Ziegler does to teach the power position is what he calls the “Manning Drill” which can is explained in his words below:

The emphasis is to keep our QBs in their power position.  Knees bent, elbows relaxed, eyes down field as they work the bags.  First time through is typically done without a throw.  After going once or twice each way I incorporate a throw.

As the QB navigates the bags in his power position I will then randomly clap at which time the QB will make a throw to a WR 10 yards down the field working within the framework of the bags.  The emphasis here is still eyes downfield, relaxed elbows and bent knees…incorporating the throw I talk to the QBs about less being more.  I want them keeping their feet active but close to the ground at all times, never on their toes, never feet close together.  By staying in the power position they can set their feet and make a throw will no time lost and with power and accuracy. 

Read More

Campbell University’s Press Technique Drills

By Bryan Butterworth
Defensive Backs Coach / Defensive Pass Game Coordinator
Campbell University (NC)
Twitter: @CoachButterCU

Introduction

Like most coaches, I feel the best way to teach anything is through a part to whole progression. To do this, we break down each individual step, create a drill, rep it and put it to use in practice so it will be effective on game day. This report will break down the base press man progression we use and teach at Campbell University. This is a four-drill progression that is designed to teach stance, eyes, footwork, posture, release and strike. We will focus on multiple techniques that will allow us to be physical with receivers, disrupt routes and make plays on the football.

Stance

In teaching our press man stance, the key is starting with a great foundation. We align players in an upright position with feet armpit width apart. Every player is different, taller guys might need to have a wider base, as will guys who don’t bend as well. Adjust each players’ base to their own comfort level without compromising your coaching.

Next, we teach the bend. I will give players a “stance” command and they will snap down into a press man position. To effectively get into a respectable press stance players must bend at their three power angles. Players must bend fluidly at the hips, knees, and ankles. At this time, you can measure ankle flexibility by noting whether the players’ heels are firmly on the turf.

With the base side, we move on to the upper body. We teach a nice flat back and relaxed chest with eyes up and on the coach. Any arched lower back or protruding chest will not be acceptable. If the player exhibits upper body stiffness tell them to stand up and “shake it out.” Before putting the player back in press stance, we make them aware that as they bend at their three power angles to “drop” their head and eyes and let their back flatten naturally. When they are comfortable and have a flat back, then we tell them to look up. Bring their eyes to a target while maintaining a flat back. The flat back will eliminate most chest stiffness as well. If there still is some chest protrusion, just remind the player to relax his chest.

Slide1

Stance Coaching Points:

  • Bend at 3 power angles (hips/knees/ankles).
  • Drop head and eyes, let back flatten naturally, relax chest.
  • Eyes up.

Drill #1:  Read Drill

Read drill is designed to teach the proper base and first reactionary step for defensive backs playing press man. Start the drill by aligning the defensive back(s) on a horizontal yard line in an upright position. Make sure that his toes are on the line. I like to use the edge of the sideline as my starting point. Use the line or lines as a visual reference to make sure DB is stepping properly.

If you are working with multiple DBs at a time, make sure that you stagger their alignments on different levels. On the coaches “stance” command DB will snap down into a press man stance with eyes on the coach.  The coach will give a directional point, left or right, and echo the command “read”. On coaches’ command, DB will take their read step with coaches’ directional point. On each “read” command the defensive back will take a 3-inch lateral read step. The step must be subtle and under control. The coach must make sure the step is within DBs cylinder.

Common mistakes by players are overstepping (long steps), stepping too fast, and stepping with both feet. To correct overstepping, we tell the player to step from armpit to shoulder with a read step. It will make the player aware of keeping his feet in his cylinder. Correct fast steppers by slowing the drill down and echoing words like “patient” and “subtle”. Finally, players who step with both feet, make them aware that the foot away from the read step is active but stationary. The foot must remain stationary because after coaches read command and read step by DB, the read foot must come back to balance in DB’s home position. Coaches repeat “read” command three to six times. Make sure player takes good tempo’d lateral 3-inch steps. Players must always finish in the home position. Once defensive back has completed the drill, the coach will give a “melt” command and they can come up out of their stance. 

Slide1

Read Drill Coaching Points:

  • Read step must be short (3 inches) and subtle. Step from armpit to shoulder.
  • Work read steps in both directions, mix it up.
  • Hip level should be the same with each read step.
  • Keep react foot stationary but active. DB’s must exhibit calm feet.
  • Be patient, don’t guess… react.

Drill 2: React Drill

Read More

Training the Eyes and Hands of Defenders to Promote Takeaways

By Anthony Kerr
Defensive Coordinator
Black Hills State University (SD)
Twitter: @tkerr12


Three years ago, we made the decision that we would be a defense built on taking the football away from our opponent. Our priority on game day is to gain two or more takeaways. We stress the importance of takeaways in all our meetings.  We start every practice with a takeaway drill.  Over the past three years, we have worked hard to develop a progression that puts our kids in the best situations to get takeaways. 

For us to reach our takeaway goals our scheme must allow our players to be in positions to make interceptions. Playing zone coverage majority of the time maximizes the opportunities that our players will have to make interceptions. Our zone coverage progression is zone eyes, lean vacate, vice and be alert.


Zone Eyes:

We define zone eyes as identifying the route of the receiver that starts the play in a position closest to the defender’s zone. The route will determine defenders first step. If the receiver is attacking the defender’s zone the defender must step towards the receiver taking the space away. Our defenders utilize a 45-degree step outside and back when guarding against an immediate threat to their zone. We label our underneath zones slant of 1, seam of 2, and hole. Our high zones are 1/3, 1/2 and canyon.

Diagram 1


If the receiver is not attacking the defender’s zone the defender does not need to step. The defender can be patient. After the defender reacts off the receiver the eyes of the defender will transfer to the QB and the defender will react off of QB intentions. Our DL will use zone eyes as well. The DL will read shoulder of QB and react to his intentions getting hands up attempting to tip balls up in the air.

Zone eyes- is a technique emphasized in our skelly drill. Drilling zone eyes in an individual period during practice requires a player lined up in the position that will be a most immediate threat to the zone being emphasized. That player is labeled player A.  If the zone being emphasized is the seam player A would be lined up as a slot receiver.  Player B will line up as the defender in the alignment required by the defensive scheme. The coach will start as the QB. Player A will start the drill by stepping towards or away from the seam.  Player B will react accordingly. If player A steps toward the seam, then player B will execute the proper step to close the space in the seam and then get eyes to the coach to read QB intentions. If player A steps away from the seam Player B will keep patient with his feet and get eyes to the QB front shoulder to read QB intentions.

Diagram 2


To study game film examples of this concept, click on the video below:

Read More

8 Closed Space Tackle Drills

By Mike Kuchar
Senior Research Manager
X&O Labs
Twitter: @MikekKuchar


Introduction

fautackleWe were surprised to find that these types of tackles had a 31 percent missed rate. Open field tackling is perpetually touted as one of the bigger challenges in defensive football, yet we’ve talked to numerous coaches who have worked hard on enforcing how to teach their defenders to make one on one in the hole tackles with limited space around them. While these types of missed tackles may not present the highest rate of big plays, they do present the risk of ball carriers lunging for extra yards on contact, which could result in drive sustainability. We found the following common errors as it pertains to open field tackling:

  • Not staying square on ball carrier
  • Not striking up and through ball carrier
  • Not running feet on contact

So we combed through our drill library to find the eight drills that best presented the most effective ways to fix these issues complete with coaching points and video. We classified them into which of these problem areas they alleviate.

Editor’s Note: The following drills are cataloged in our drill film library. Insiders members can gain access to our entire drill and game film library, which contain more drills done by these programs.

Issue: Not Staying Square on Ball Carrier

In a one on one tackle situation in closed space, the defender must know that he has the option of using either outside in or inside out leverage. But whichever leverage he chooses he must stay square or risk the ball carrier falling forward for extra yards after contact. Chris Ash, the defensive coordinator at Ohio State University talks about keeping the outside hip closed in order to stay square. These are the best drills we’ve found to reinforce this fundamental.

Read More

7 Every Day Drills to Teach Ball Security

By James Guest
Running Back Coach
University of Virginia – Wise
Twitter: @CoachJamesGuest

Introduction:

The topic of ball security is talked about heavily in our game and stats like interceptions, fumbles lost and turnover margin are often used to explain outcomes of games. With this being such a big part of our game, it is imperative that protecting the football is coached well if you want to win games and ultimately keeping your job. Around here, we say that “ball security = job security.”

There are two things I believe in when it comes to coaching ball security:

  1. Teach the fundamentals on how to carry/run with the football and drill it daily
  2. Train reactions that enable the athlete to protect the ball from being in jeopardy.

In the drills below, you will see how we were able to drive home the importance of ball security for our players. The results speak for themselves. Before getting to UT-Martin in 2013, they were last in the OVC in fumbles lost (21). My first year in 2014 we cut them in half (10) (523att) which ranked tied for 2nd in conference. In 2015 we continued the decline and improved to 8 fumbles.

Exchange/Ball Security Drills

Drill #1: “Two Line Exchange”

Drill Setup/Instructions

  • “Early eyes, early pocket”
  • Near elbow up
  • Top hand = thumb down against chest
  • Bottom hand = flat hand against belt
  • Roll over ball with top hand
  • Fake = roll over with top hand

Coaching Points

  • Eyes up
  • Perfect pockets
  • Roll over
  • Snap ball to high n’ tight (outside hand)

To study practice film of this drill, click on the link below:

Read More

Mirror Blocking Progression for Wide Receivers

By Dan Shula
Wide Receivers Coach
Florida Atlantic University
Twitter: @danshula14

Introduction:

The key to any elite offense is generating explosive plays. Generating big plays dramatically increases your team’s chances to score points. For example, here at Florida Atlantic during the 2015 season, 78% of our touchdown drives contained at least 1 explosive play. 

How can WRs help an offense generate more explosive plays? The obvious ways are by catching deep balls and generating yards after catch on shorter routes. However, the far less glamorous way to aid the offense is in the run game. Last season, on our runs of 20+ yards, a WR made a key block on 67% of those runs. It’s these important blocks that turn 7 yard runs into 40 yard TDs. It’s these important blocks that turn a drive that ends in a FG into a drive that ends in a touchdown.

Drill Objective:

This drill is designed for outside WRs that are attempting to block a defender downfield in space.  This type of block typically happens on an outside run or screen.  It is ideal for the WR to give the ball carrier a “2 way go,” meaning the ball carrier has the option to break either inside or outside of the WR. This makes the movements made by the defender much less predictable.  The WR must be able to adjust to the defender and which way he breaks.

The Mirror Progression is made up of 3 phases

  • Phase 1: Mirror (hands behind back)
  • Phase 2: Mirror (hands in front, punch)
  • Phase 3: Diamond drill

Phase 1: Mirror (Hands Behind Back)

Read More