Blue Coverage From the 4-2-5 Defense

By Mike Nahum 
Defensive Coordinator/LB Coach 
David W. Butler High School (NC) 
Twitter: @coachnahum60 


Introduction

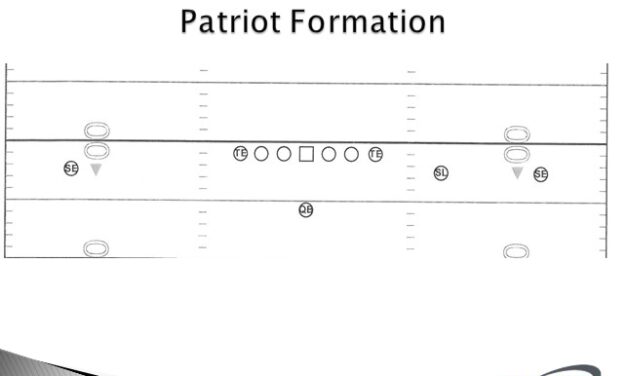
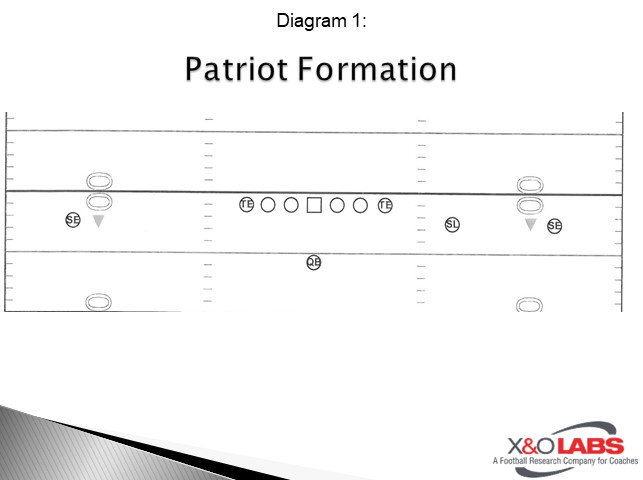
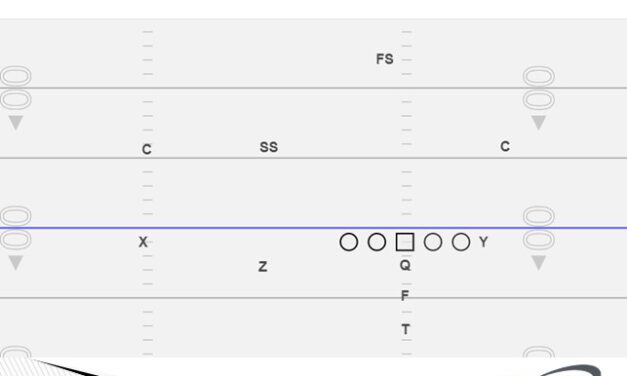
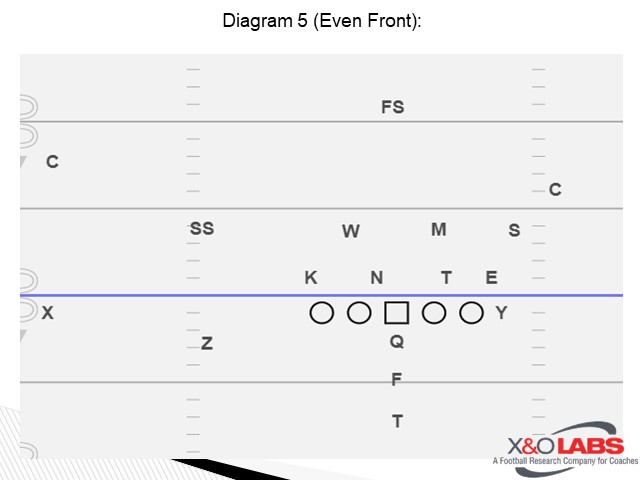
As a Base 4-2-5 defense, we utilize 4 down linemen, 2 linebackers, 3 safeties and 2 cornerbacks.  Our front six is set separately from our back five.  This simplifies the teaching to our players with the use of half-line drills. Since the ball is on the hash at least 80% of the time or more in high school, we focus on teaching from the hash the majority of the time. Our defense is field/boundary based since we declare passing strength to the field the majority of the time. 

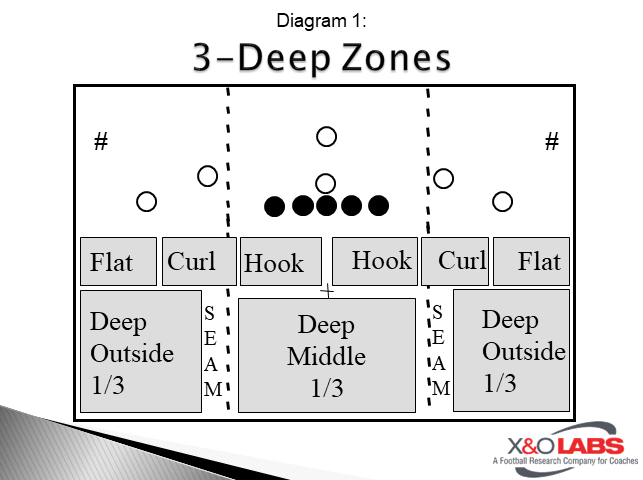
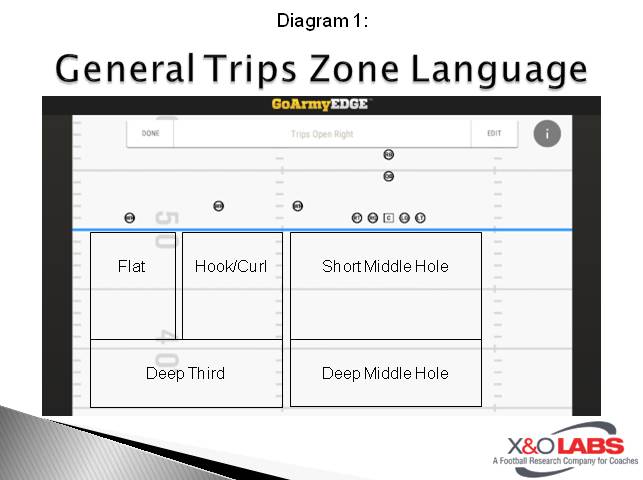
We base out of Blue coverage (Quarters concept) using split field principles. Blue coverage is a pattern match defense, which allows your players to play zone coverage with match man principles based on the route distributions. This coverage easily adjusts to handle multiple formations/motions. It allows us to handle 4 verticals and gets us in a 9-man front vs. 21P and an 8-man front vs. 20P.  It also allows us to stay in safety force concepts, which simplifies our teaching as well. 

For the purpose of this report, I will discuss our Blue coverage vs. 10P 2×2, 3×1 and 11P 2×2, 3×1. 

20P 2×1 and Empty 3×2. 

Terminology is the biggest obstacle to learning. I will simply explain our defensive terminology. 

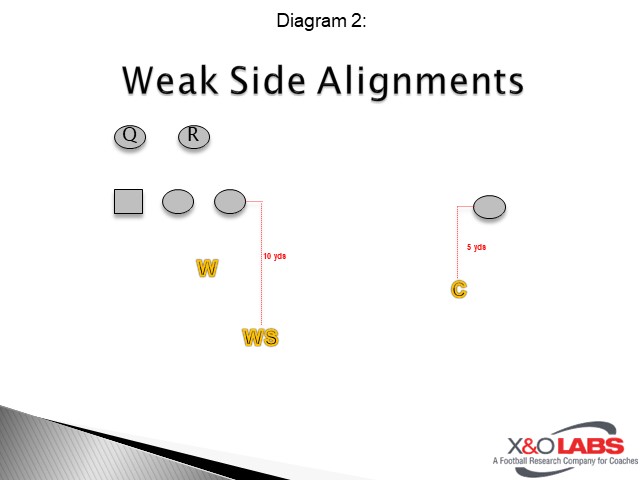
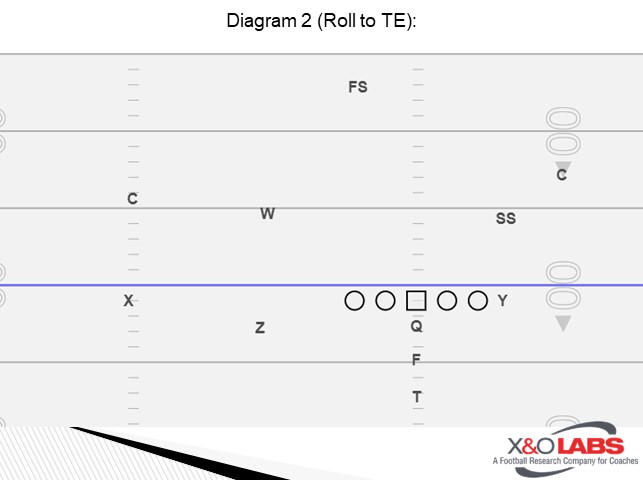
BC: Boundary Corner, Buck: Boundary Inside Linebacker, BS: Boundary Safety. These 3 players line up to the boundary/away from the passing strength. 

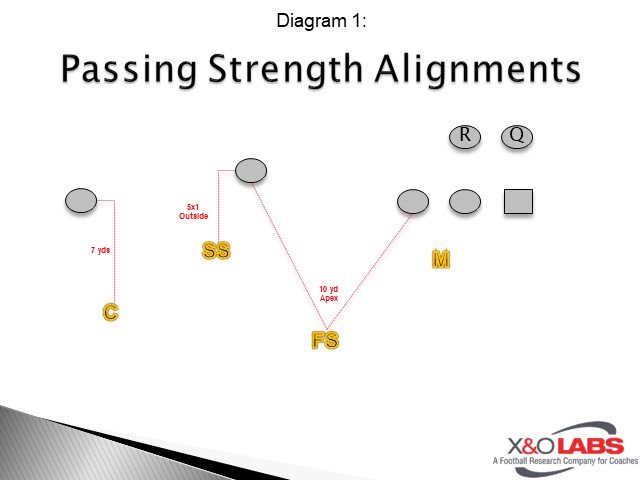
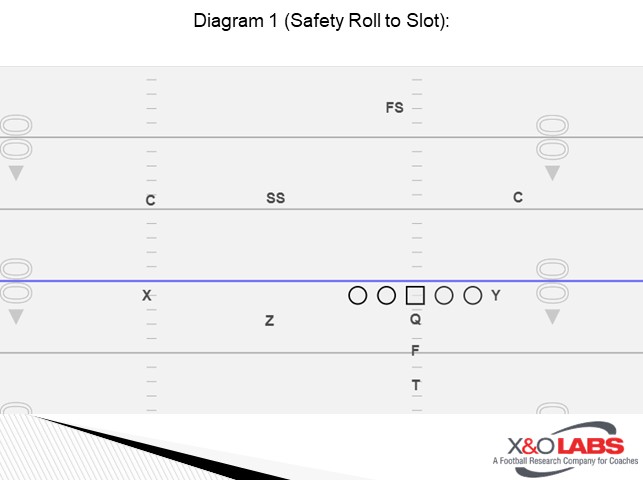
FC: Field Corner, Mike: Field Inside Linebacker, Rover: Field Low Safety, FS: Field High Safety. These 4 players line up to the field/to the passing strength.  

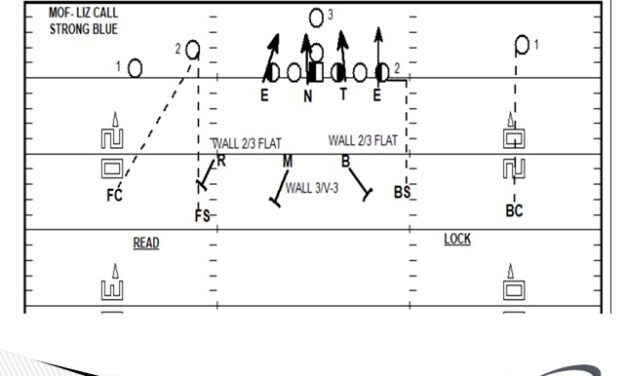
When the ball is in the MOF,  FS declares rip/liz to the passing strength side of the formation based on the # of skill receivers. 

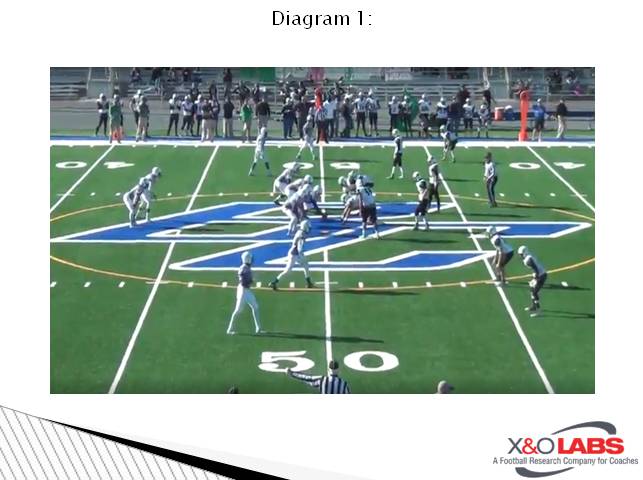
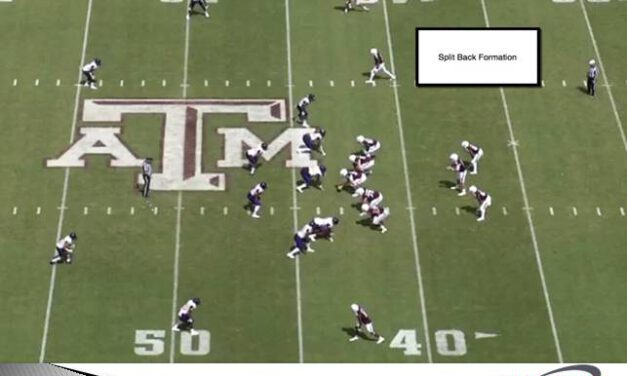
Blue Coverage vs. 10P 2×2, 11P 2×2 

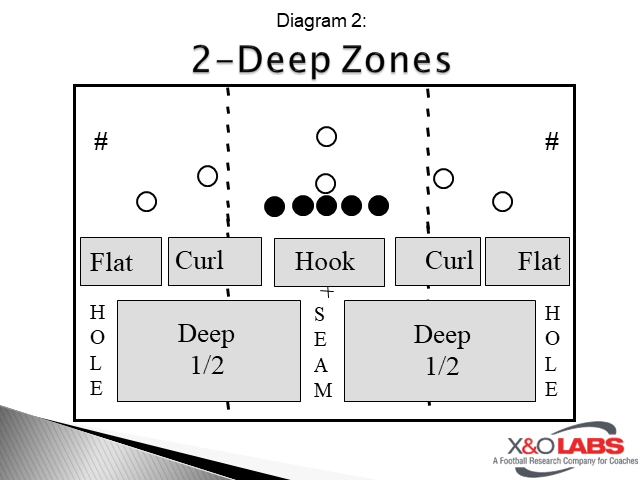
Against 2 detached receivers to the field, we will play read coverage as a standard check out of Blue. FC will align with divider rules 1×7 inside leverage of #1. Our FS will align with divider rules 1×10 inside leverage of #2. Our Rover will align by game plan, but generally inside leverage of #2 at 5-7 yards deep. Mike will gap align to the field. FC/FS read the release of #2. If #2 is out before the Rover then the FC will leverage #2 and break on him when the ball is delivered. The FS will flat foot read and open to #1. The FS will gain depth and play curl/dig/post of #2. If #2/#1 are vertical past the Rover, the FS/FC lock on man. If #2 is in before the Rover, the FS will shuffle and rob the direction #2 went. The Rover will wall #2 and play #3 to the flat. The Rover is the force player. The Mike is a wall #3/MV#3 player in 2×2. He will always open to #3 and he is a spill player. 

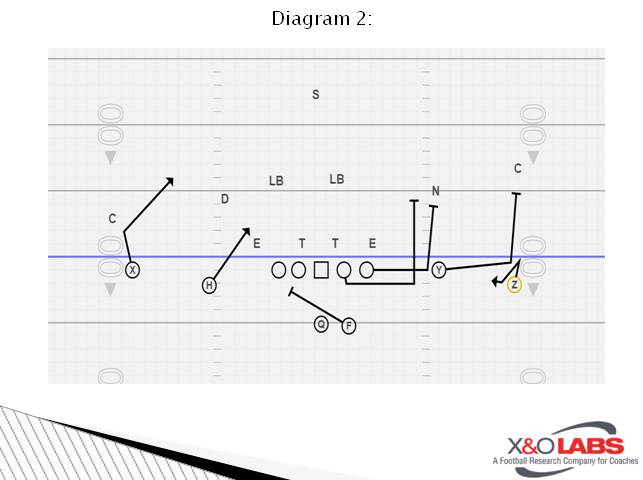
Against a pro-set to the Boundary, we will play Lock coverage as a standard check out of Blue. BC will align with divider rules 1×7 Inside Leverage of #1. The BC will play all of #1 except the shallow cross. The BS will align 2×7 outside leverage of an attached #2. The BS will play all of #2 except the shallow cross. The BS is the force player. The Buck is a Wall #2/#3 to the Flat player. The Mike is a wall #3/MV#3 player in 2×2. He will always open to #3 and he is a spill player. 

Read More

High School Coach “Hires” Digital Director of Football Operations: See What Happened Next…

By X&O Labs Research Team


When you talk with thousands of coaches every year, you get a sense what they want and need. The common denominator in our experience: coaches want more time. 

Consider for a moment what you could do to improve your program or impact your athletes if you had more time to plan, strategize, watch film, or just to invest into the culture of your team. Time is the most important resource you have, and yet the one thing you probably don’t have nearly enough of.  

This begs the question; how can you make more time? The simple is answer is delegate. More specifically, what can you delegate and to whom? 

What if there was a way for every high school football program to hire a Director of Football Operations (DFO)? Now there is… and we’re going to show you one coach who did just that. Keep in mind, until recently only colleges or high school with big-time budgets could afford DFOs. That’s not the case anymore… 

The primary duties of a DFO is to manage the logistics of a football program’s operations–things like scheduling, communication, summer-camp sign ups, texting, emailing, preparing and distributing drills and workouts, gathering materials for coaching meetings, tracking individual players’ workouts and progress, manage off-season leaderboards… and the list goes on.  

But now, every high school football program can afford a Director of Football Operations. We’ve heard from many of you that have already done so with MaxOne. Full disclosure, MaxOne is a partner of X&O Labs, but we only partner with the best of the best. 

MaxOne is a platform that allows you to organize, communicate, and train your players and program all with ONE login. Instead of having to hire a full-time DFO — let MaxOne solve this problem for you, and for much less money. No catches or gimmicks; just a proven way to free up more of your precious time–while not having to sacrifice quality management of your program.  

To help you better understand what MaxOne could do to save you time and enhance your productivity, we will be providing monthly spotlights that share the experiences of real coaches like you.  

Our first Q&A features an interview with Coach Kyle McKenna of Brooklyn Tech High School in Brooklyn, NY. Coach McKenna has been using MaxOne for 2-months and was eager to speak with us about the impact the platform has made within his program.  

What spiked your interest in using MaxOne as your DFO? 

Read More

RPO Drills to Help Train Your Quarterback’s Eyes, Rhythm, and Delivery

By Stephen Wasil
Quarterbacks and Wide Receivers Coach
Albion College (MI)
Twitter: @CoachWasil4


Introduction:

The concept of this report is to provide a handful of drills that I use for our quarterbacks to help keep them consistent with their RPO techniques. I believe these drills help train the quarterbacks eyes, rhythm, and delivery during our called RPOs. In our system, the quarterback’s eyes must first take him to the correct area on the field with the defenders for him to read. At the same time, he must get into the rhythm of the play and mesh point with the running back. From there, the defenders will tell him when and how to deliver the ball.

We have general rules for the delivery of each RPO, but all are subject to change based on the leverage of the defender. Any routes thrown as timing routes to the sideline (hitch, quick outs), we want delivered as possession throws towards the sideline. We will take the 5-7 yards and move on to the next play. If the receiver can break a tackle or make a defender miss, that is a bonus for us on these types of RPOs.

In a similar fashion, routes that work off the LBs or make a more aggressive path towards the tackle box must be looked at as possession throws with a chance for an explosive play. With more defenders in the middle of the field (linebackers, strong safeties, drop-down safeties), we want these throws delivered as body throws. We want the ball in an area on the receiver’s body so he can protect himself if needed, but also helps the receiver catch the ball with confidence in both the QB’s read and the opportunity to turn this into an explosive play.

We us a systematic approach to setting up our RPO read drills. During the early stages of fall camp, we will install the basics of our offense as well as going against basic looks from our defense. So, I try and use individual time to work on some of the throws I have seen our quarterbacks make in the past and adjust the individual drills from that point. During the season, we will only work the RPO reads and defenders we are trying to manipulate based on the game-plan for that week.

Drill: Rapid Throw Screens

I use this drill early and often during pre-practice in fall camp. It helps the quarterbacks understand how fast we need the ball thrown in certain situations, while also placing a premium on accuracy.

For this drill, there will be a center (usually me to control the tempo), quarterback, and stationary receiver (usually a QB, during pre-practice I try and get the receivers catching depending on their pre-practice schedule). Each quarterback will get 5 throws in rapid succession to one of our quick screens (I generally try to throw only the screens we have called for that practice plan). The center will snap the ball, quarterback will throw the quick screen, and almost as the ball leaves the quarterbacks hands the next snap is coming. If you have your receivers catching for you, have them tuck the ball away quickly and then relay the ball to a quarterback waiting his turn. I will have the QBs work quick screen throws into the boundary, from the middle of the field, and to the field (while working throws to the left and the right).

Slide1

This is a simple set up for a pretty simple drill. Again, this is to get the quarterbacks used to getting the ball out of their hand quickly when we get a pre-snap read to throw the ball.

Coaching Points:

WHY: The defense aligns in a manner that gives us an automatic throw read to the screen (both LBs in the box and we have them out numbered on the perimeter). The ball needs to be snapped as quickly as possible and the quarterback must get the ball out of his hands as quickly and as accurately as possible.

FEET: I talk about “setting the pitcher’s mound” or “set the mound” when getting my quarterbacks feet aligned. Just as a pitcher sets his back foot on the mound parallel to the catcher and pushes off the mound with his back foot to throw, I want a similar set up with my quarterback’s back foot set parallel to his target. This task becomes a much more conscious effort and involves more discipline when a right-handed QB is throwing to the right and a left-handed QB is throwing to the left. In both scenarios, they must work hard to “set the mound.”

THROW: I talk about two aiming points with the QBs when it comes to throwing our quick screens based on our receivers. For two of our screens the receiver’s chest will be facing the QB. During these throws, I talk about aiming for the up-field shoulder. This gives the receiver the ability to get a little momentum towards gaining positive yards. When running a true bubble screen or swing screen, I talk to the QBs about aiming for the front of the facemask. This keeps the ball in front of the receiver so he can catch the ball while continuing to gain width and keep their momentum going towards positive yards.

Variations:

RIDE AND PULL: There will be times the defense gives us a look where the quick screen throw may come during or after the mesh point with the running back (ex: LB maybe walked outside of the box or we must see how the perimeter sorts itself out). We do this drill two different ways; with and without a running back. I usually just have the QB visualize the scenario and why we are doing this drill.

Read More

“Steal” Coverage Concepts to Defend Trips

By Mike Giancola
ST Coordinator/Defensive Line Coach
Westfield High School (VA)

Introduction:

Offenses today work hard to manipulate into formations that force defenses into stressful situations. Trips (3×1) concepts, in particular, pose a number of problems to defensive coordinators as they “load” zones to one side of the offensive formation while creating potential matchup problems. So what can defenses do to gain the upper hand against offenses that create the stressful situations with trips formations?  We think defenses are best advised to take a week by week approach.

For us, success can be cultivated into the weekly game plan by having multiple coverage schemes to combat 3×1 formations. However, diversifying the game plan too much can result in a break in communication and execution between coaches and players. There is a fine line that needs to be walked.

The approach that will be outlined here allows us to both manipulate and disguise multiple coverage concepts to defend 3×1 formations, while approaching it in such a way that it can be easily relayed and taught to players. This will help to keep offenses on their toes and guessing at how the defense is playing them. This, in turn, regains the upper hand for the defense.

Verbiage

Many approaches to defending 3×1 formations consist of playing 5 defenders over the 3 eligible receivers to the Trips side of the formation. This allows the defense to be sound numbers-wise, even if the tailback shows up as a 4th Receiver. General terms for these 5 defenders are Flat, Hook/Curl, Middle Short Hole, Deep Third and Middle Deep Hole. These terms correspond to the zones these players are responsible for (Diagram 1):

Slide1

This terminology is sufficient when discussing football with those that regularly speak “the language”, but for those that are not as familiar it can be very confusing. We found that simplifying the verbiage we used when teaching our 3×1 coverage concepts enabled us to better teach the coverages we were installing, allowing us diversify our approach. The basic premise and location of the zones being covered are the same, except the language is adjusted (Diagram 2):

Slide2

Coaching Points

Here is a breakdown of how we teach these five Trips side defenders discussed above:

Steal 1: Initially, the job of Steal 1 player is to take away the Slant, or inside, of the #1 receiver. If #1 drives inside or sits down the Steal 1 player reads through the QB’s release, making a play on the ball or carrying #1 to the next zone before he passes #1 off. If #1 stems and continues vertically, the Steal 1 player plays underneath #1 until work comes outside to him.

Steal 2: The Steal 2 player is responsible for taking away the Slant of the #2 Receiver. If #2 disappears outside, the Steal 2 player sluffs off (drops vertically) with eyes finding the route of the #1 Receiver. If #2 drives inside or sits down the Steal 2 player reads through the QB’s release, making a play on the ball or carrying #2 to the next zone before he passes #2 off. If #2 releases and continues vertically, the Steal 2 player carries #2 to 10 yards underneath and looks for work coming to him.

Steal 3:  The Steal 3 player not only needs to steal the Slant of #3, but also carry him vertically to 10 yards if #3 continues up the field. Since there is not close help to the single receiver side of the 3×1 formation, it is imperative that #3 does not cross the face of the Steal 3 player after 3 yards up field. We allow shallow drags across the face as we consider those “low hanging fruits” that we can easily rally to. If #3 disappears outside, the Steal 3 player sluffs off and looks for work coming in to him.

Apex:  The job of the Apex player is to play in between #1 and #2 vertically, slightly favoring #2 as that is the easier throw for the QB.  He needs to read release of both receivers and should be the last player to the party on plays like Bubble, Rocket and Tunnel. He is ultimately responsible for anything over the top, including the fakes built in off those plays. If #1 and #2 sit down or disappear the Apex player should continue to get depth, looking for #3 coming into his zone.

Alert:  The Alert player is looking to work over top of #3. If #3 goes vertical, it is the Alert player’s responsibility (we declare vertical if he has gone past 10 yards) unless he breaks out to the corner into the Apex player’s zone. If #3 disappears the Alert player looks to rob the next receiver coming to him. 

The beauty of using this terminology is you can apply it to all your players in an easily explainable way depending on the coverage concept you are using. This allows you to be multifaceted in the way you coach and teach a number of coverages to defend 3×1 sets. This also lends itself to disguising what coverage you are using by giving your players “man” principles while keeping true to zone concepts. Alignments of the defenders remain relatively the same, posing the problem to the offense of appearing you’re in same coverage all the time while playing number of different coverages.

Alert Concepts

The following coverage designs will range from Cover 2, Roll 3 and Robber with the defenders holding similar alignments to give the perception that the defense is playing the same coverage the entire time. Each coverage incorporates the rules outlined above, but the player executing each rule changes. The commonality between these coverages is the weak side Safety (the one aligned away from the passing strength) is the Alert player.  We spend considerable time on teaching the players how to hold their pre-snap movement as long as possible to disguise what coverage we are actually in.

NOTE:  The backside coverage will be handled with the weak overhang and the weak corner, playing with one under and one over the #1 receiver with a pass read.

Spoke (Cover 2 Concept)

We call our 3×1 Cover 2 sche

Read More

The 20 Personnel Run/RPO Package

By Mike Kuchar
Senior Research Manager
X&O Labs
Twitter: @MikekKuchar


Case 1: Optimizing Skill Sets of Players and Building Formation Packages


Editor’s Note: This research report is comprised of three individual cases. All three cases can be found on this page along with all video and diagrams.


Introduction

Why play with one back if you can play with two? It’s a simple question that perhaps drove coaches to start building two-back personnel groupings into their offense. After all, one dynamic back can pose serious threats to defenses, so two can be catastrophic for the defense. The two-back structure is certainly nothing new. Perhaps it originated in the single wing offense at the turn of the century and was further cultivated by the flex bone and Wing T artists who have been using it for years. But what has made it even more popular has been the utilization of that F/H/Y player who, as an “off the ball” player, can be distributed in several different ways.

There is no doubting the popularity of this grouping. It was the most well-read topic among all our research this off-season, so we figured why not present an in-depth report on how coaches are using 20 personnel to drive their entire offensive outfit? And whom else could we get to chair this report than Texas A&M University offensive coordinator Noel Mazzone? Coach Mazzone has made a living- a very good living- by devising his entire offensive system around this grouping.

So, before we present our findings, it’s important to note that although our research is catered to 20 personnel groupings there are certainly some synergies between this grouping and 11 personnel groupings. As we explore the skill set and prototype of that F/H player, we found that he can be a true back, a true blocker, a true receiver or an “all in one” type player. Finding him in your system or in your hallways can take effort, but once you do there are limitless possibilities for what you can do with him. 

Advantages of 20 Personnel Groupings

Like most offensive concepts or personnel groupings, committing to utilizing 20 personnel groupings will take a full scale “buy in” to the system. While we realize that offensive coordinators can implement several different groupings during the game week, we wanted to work with contributors who “major” not “minor” in this grouping by using it at least 40 percent of their offensive snaps. We asked them why they use it. Their responses are below:

“To me the advantages are four-fold: it produces a six-man blocking surface without changing personnel, it produces the ability to build 2×2 or 3×1 formations quickly with motion, it creates match-up advantages with linebackers and it produces seven man pass protection against pressure teams.”- Noel Mazzone, offensive coordinator, Texas A&M University (45% of offensive system is based off 20 personnel groupings).

“I believe it gives you a couple of things.  Number one, it gives the look like we are doing things completely different, but we are likely to get some speed match-ups on linebackers because teams are less likely to sub out into dime or nickel packages against the double A Back look.  We have been more frequently using a tight end type body as the B gap that allows us to do many different formations, without changing our personnel.  It really keeps the defense on their heels.  It allows us to get a 6 man blocking surface with the B back, while continuing to run our RPO’s and helps our QB not have to make the 100 percent correct decision on an RPO.  Therefore we tell him when in doubt hand it off and we will have a 6 man blocking scheme to protect you.”- Dustin Beurer, offensive coordinator, Albion College (MI).

“20 personnel allows to you create an extra gap on either side of the offensive line. The H/F can insert into A, B, C, or D gap on either side of the football, as opposed to a hand down tight end who is only allowed to block the C or D on one side.”- Brent Dearmon, offensive coordinator, Arkansas Tech University (75% of offensive system is based off 20 personnel grouping).

“I like the flexibility of it especially when we use a ‘wing’ type player. Even with two backs in the shotgun we have good flexibility and it adds variety to our offense. You also get to see how the defense plans to attack these heavier, but flexible, formations. Will they add a hat to the box, near the box, play a different coverage, and maybe play man to one receiver side? It can open so many new doors for your offense.”- Kyle Ralph, New Palestine High School (IN).

“I like 20 personnel because it gives the offense control of the box. We want a six-man box. 20 personnel spreads the field out enough to give us a good look into what the defense is giving us. We have the versatility to run the ball with gap scheme run plays that utilize our fullback or get a favorable 1-on-1 or 2-on-2 passing match ups. We see a lot of 4-4 cover 1/3 defenses and running 20 personnel makes it easy for the QB to read the overhang defenders and know what to do with the ball.”- Dallan Rupp, New Plymouth High School (ID).

“We feel that this grouping adds a tougher running formation to combat heavy high school run boxes, but let’s us still keep our spread offense identity we have had for nine years.”- Derek Pennington, head football coach, Zeeland East High School (MI).

Read More

Fast Screen Variations from Doubles, Trips and Empty

By Jordan McGowan
Head Coach
Brookside Christian HS (CA)
Twitter: @coach_bdba

Introduction:

unnamed
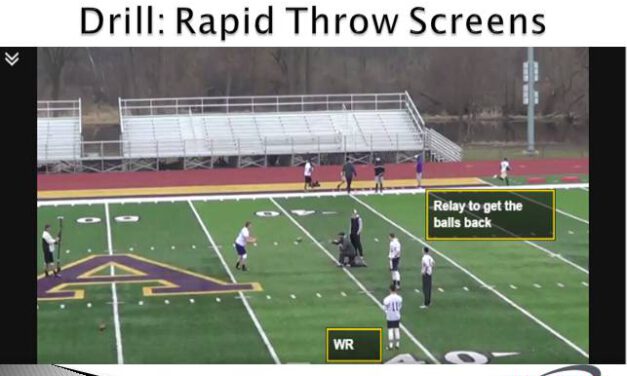
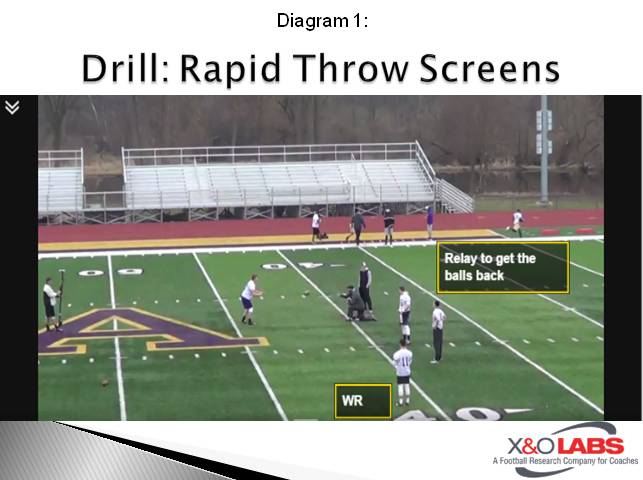
Here at Brookside, our brand of the Air Raid offense mixes traditional Air Raid concepts, several RPOs and our own variation the ever-popular fast screen. Our offense is designed to get the ball out as fast as possible to our athletes in space, whether it be through speed option, toss, RPOs or fast screens. We really stress yards after catch with our receivers. Their goals are to have at least 40% of our receiving yards being after the catch (YAC).

Base Concept

We are vanilla in our formation looks, spending about 35% in 2×2, 40% in 3X1, and 20% in empty. Very rarely do we go with 2 backs or with a TE set. Our goal is to use these formations to indentify where we have space or an advantage athletically and then to attack that space. The majority of the teams that we faced ran 4-2 with Cover 1, but we also saw some 4-1 box with man under 2 behind it.

Slide1

The fast screen has a number of benefits. Not only does it give our QB an easy completion, but it also gives us big play ability and helps us get our receivers involved in the game. We had success throwing the fast screen to the 1 receiver side away from trips or away from motion. We like to run zone away from the fast screen (even giving it a few times) to freeze the screen side flat player. We also like to run our double slant combo away from the screen. This gave the QB an option if he saw better grass away from the screen or if the defense wanted to overplay the called fast screen.

We rep our fast screens daily in practice for at one or 2 five minute periods. To do this, we would set out landmark cones for offensive line as well as the receivers. As we began to show that we could hit those landmarks, we would slowly progress the receivers into reading the most dangerous man (MDM).

Coaching Points:

The key phrases that we use when teaching fast screens are “flat & fast” then “find him.” It is imperative that the lineman come off the ball flat to their land mark before looking to find their “him” who is the MDM. Typically, our play side tackles are able to get out to the slot defender and our play side guards end up catching an inside backer if they are able to get out. Sometimes our play side guards get caught up with the defensive line, preventing them from being able to climb. This isn’t ideal, but it also isn’t the end of the world.

Slide1

Our most effective fast screens are the ones when our receivers handle their business in the blocking aspect. Diagram 2 (above), shows the Y attacking flat at the feet of the Z then getting vertical to the corner giving the Z a two way go once he has the ball.

Read More

The 2018 RPO Evolution – Case 1: “Big” Personnel RPO’s

By Mike Kuchar 
Senior Research Manager 
X&O Labs 
Twitter: @MikekKuchar 


Special Reporting by X&O Labs Contributing Writer Adam Hovorka 

Introduction 

When the RPO craze hit the football industry back in 2014, many of the concepts being developed were designed from open, one back personnel groupings. Concepts were devised from 10, 11, 20 personnel from doubles and trips formations. Made sense at the time because many RPO advocates were spread coaches by nature. These formations and personnel groupings were already part of their offensive play menu. So, they were constructing ways to protect their top runs from these structures.

But the paradigm has started to shift now into how to present these same run/pass conflicts to defenders using heavier personnel sets. Programs with able-bodied full backs and tight ends (that can both block and stretch the field vertically) are creating pass conflicts from their base runs to affect defenders. In this case, we present our research on how a small group of coaches are keeping heavier personnel groupings on the field not just to run the ball on third and short, but to create manipulations in the RPO game by affecting dual read defenders. 

Editor’s Note: The personnel groupings included in this report include the following:

12 Personnel: one back, two tight ends

13 Personnel: one back, three tight ends

21 Personnel: two backs, one tight end

22 Personnel: two backs, two tight ends

Benefits of Using “Big” Personnel RPOs

According to our research, only 41 percent of coaches dabbled with using RPOs from these personnel groupings last season. But the ones that did saw a vast improvement in offensive production.

d6

Two of our sources were quick to extol their statistics since using these groupings:

Ocean City High School (NJ): Offensive Coordinator Paul Callahan

  • 56% completion percentage at 13.0 yards per attempt
  • Averaged 5.6 yards per carry in the run game.
  • Averaged 9.5 yards per play on RPO from 12 personnel

Whitehall High School (PA): Head Coach Brian Gilbert and OC Chris Kinane

  • 11-17 for 214 yards 7 TDs and 1 INT (all on one concept)
  • 7 times it was an explosive play (15 yards or more)
  • 0 times was it no gain or a loss

While these numbers may not seem as explosive as other concepts in an offensive play menu, it’s important to note that our contributors use these RPOs as change-ups. Many of these coaches do not major in these “big” personnel groupings. So, while the sample size may not be extensive, the benefits are hard to ignore.

When we asked our sources why they are using RPOs from these groupings, we found several common denominators:

  • It was a way to utilize a very good Tight End.
  • More defenders in the box led to more RPO opportunities outside.
  • It is extremely difficult for a defense to be gap sound and coverage sound.
  • It forced a safety either to make a decision in the box or in coverage. It eliminated the element of disguise.
  • Allows the use of a tight end as both blockers and receivers.
  • It’s a perfect complement to red zone offense.
  • Teams that loaded the box early had to lighten to defend the pass option. This in turned opened the run game.
  • The tight end created an extra gap in run game.

Like any other offensive probability of success, it all came down to numbers. Having two tight ends (or one tight end and a FB) creates two advantages:

Read More

The 2018 RPO Evolution – Case 2: PSO’s: Pass/Screen Option Concepts

By Mike Kuchar 
Senior Research Manager 
X&O Labs 
Twitter: @MikekKuchar 


Special reporting by Adam Hovorka, X&O Labs Contributing Writer 

Introduction 

One of the more current branches growing from the RPO tree is the implementation of screen concepts that are attached to the drop back pass game. It’s probably one of the newer trends in the RPO menu. According to our research, only 39 percent of coaches are attaching screens into their pass concept menu.

d81

To be clear, a PSO (pass/pass option) couples a quick game to the concept side (such as stick, snag or shallow) with a delay screen to the running back on the backside. These take the place of any other backside options such as a free access throws to the X or a two-receiver mirrored concept progression. According to coaches, there many advantages to attaching backside screens into the pass game menu. Some of the more common benefits we found are below:

Benefits of Utilizing PSOs:

  • It takes advantage of pass rush and pressure.
  • It slowed the rush down and provided a big play without throwing the ball down field.
  • It allowed the QB to have multiple options without having to run.
  • It helped with having younger QBs in gaining their confidence to throw an easy pass.
  • It helped the QB to read more quickly and kept the tempo of the offense move smoother and more efficiently.
  • It allows for a plus one advantage when the QB makes the right decision.
  • It forces defenses to play vanilla defense.
  • It forces the QB to not hold onto the ball too long and gives a play with good coverage a higher percentage throw.
  • It’s a way to protect the base runs or RPOs already implemented in an offensive system.

Editor’s Note: The PSO concept is embedded into the offensive system developed by University of Arizona offensive coordinator Noel Mazzone. All of our sources for this case are NZone members. To access more information on Coach Mazzone’s system, click here: http://nzonefootball.com/

Best Practices: Ideal Situation

Our research has shown that 65 percent of coaches use PSOs on 10 percent of snaps or less.

d221

But when utilized correctly, PSOs can provide an easy catch and throw for the quarterback to the quick game side or a big hitter on the screen. Victor Valley College (CA) head coach John Teuscher boasted about a 79 percent completion percentage on these concepts, much higher than any other concept he had in his arsenal. One would assume the high completion percentage can be useful anywhere on the field, but we did find certain circumstances were more beneficial than others when using PSOs among our sources. Here’s what they told us:

Noel Mazzone, offensive coordinator, University of Arizona: “It’s good as an opener on first and ten and good in the mid-red zone, inside the 20-yard line or inside the 25 yard line. But you don’t want to call it against man teams. You need to run the boundary or crack screen against those situations. If it’s pure man coverage, we’ll tie in a man beater and attach a screen to it.”

Bobby Acosta, offensive coordinator, Bucknell University (PA): “For us this is a man beater when RPOs are not working. When our RPOs are dead, we lean on PSOs. We attach them to our bubbles, meshes and quick game. But usually we call the screen because we have thrown the pass concepts a few times and we see the defense has adjusted or done a great job reacting to the pass concept. We also see more man, so the screen is a man beater for us.”

John Teuscher, offensive coordinator, Victor Valley College (CA): “Everything goes with how we decide to attack that team that week with our base runs and RPO game. It’s an extension of our run game. We want to protect our base pass things that we do. It is a way to protect what we do, teams will be slower to how they run our base things. Teams know we will run these concepts and we find ways to be able to run them. This is great stuff against even fronts that will run two high coverages like 4-2-5, 4-3 is great. We will run this against everything primarily against any two high. We love this against pressure, the screen makes that very advantageous, even the pass part is good against pressure because of how quick it is.”

Read More

The 2018 RPO Evolution – Case 3: Pistol Formation RPO’s

By Mike Kuchar 
Senior Research Manager 
X&O Labs 
Twitter: @MikekKuchar 


Special Reporting by Adam Hovorka, X&O Labs Contributing Writer 

Introduction  

One of the more telling cues in preparing for an RPO offense is where it places its offset back in shotgun formations. In most cases, the placement of the back will predicate the side of the run/pass option concept. So, in turn defenses are finding ways to use combination coverages or man coverages to eliminate any potential conflict defenders to the side of the back. This is why it’s important now for offensive coordinators to design their RPO’s out of Pistol formations so defenses cannot get a tell on which side the RPO is being activated. One would assume that because of this tendency most if not all OC’s would be transitioning into using the Pistol for all of its RPO’s. Yet, according to our research, of the 61 percent of coaches utilize RPO’s from Pistol formations only 21 percent of coaches use the Pistol on more than 50 percent of snaps. 

d15

The coaches that contributed to our study cited the following advantages for utilizing their RPO’s from the Pistol formation.  

Benefits of Using RPO’s from Pistol Formations 

  • It creates balance issues for the defense- without a pre-determined strength of formation; they were left to guess for shades and stunts. If the ball were in the middle of the field, it would cause automatic field defense strength.  
  • It forces defenses to balance up and play head up defensive linemen, which is something they are not used to doing.  
  • The depth of the running back often froze linebackers from making the correct run fits.  
  • It helped disguise the side of read in the RPO game.  
  • It allows offensive coordinators to vary the side of the read in the RPO game. 
  • It provides cleaner reads on the second level with more downhill flow from linebackers. 
  • It allowed the QB to keep his eyes on his secondary read while having his shoulders/feet pointed in the direction that he was going to throw. 
  • It allows the QB to choose the side he’d like to open up to and read pre-snap, which could be based off the tightest apex defender. This could actually be done by having the QB hold his hands behind his back and signal to the RB which way he was going to open for the mesh.  

Productivity 

It’s difficult to argue with the productivity that the coaches we sourced are having with the Pistol RPO game. Consider the following numbers:  

Eric Struck, offensive coordinator, Sioux Falls High School (SD) 

Pistol Free Access Throws: 

7/8=87.5% for 41 yds. and 4 TD’s; 0 interceptions 

Pistol Bubble Constraints: 

6/7= 85.7% 83 yards and 1 TD; 0 Interceptions 

Pistol Inside Zone/1 Back Power: 

67 carries for 519 yds. 7.74 yards per carry. 6 TD’s 

Matt Mishler, offensive coordinator, Rolling Meadows High School (IL) 

Read More

Teaching Landmarks and Vision Principles to Zone Defenders vs. Hot Throws

By Mark Theophel
Defensive Coordinator 
Hartwick College (NY)

Introduction

Every year our defense utilizes a mixture of both man and zone coverage concepts. While both serve their purpose, zone coverage has consistently been most effective for us when it comes to making big plays on defense, particularly in the pass game. Plays where we are in zone coverage (namely 3-Deep and 2-Deep) account for about two-thirds of our interceptions and sacks in the last three seasons. A big reason for this is the way our teaching in zone coverage contrasts with man coverage.

Our zone defenders will cover an area of the field, rather than locking on to one receiver, and we apply landmarks to help our players get to their drops quickly while reading the QB. This is especially helpful when defending “hot” throws, which is a major point of emphasis for our defense, particularly because we are often playing zone coverage behind some form of pressure. A smart QB can neutralize the effectiveness of a stunt/blitz by throwing “hot” to an exposed zone, so defensively we spend a lot of practice time trying to counter this by coaching our players to anticipate those throws and break on the throw from the QB, creating opportunities for takeaways. In addition, denying these hot throws can create held balls and gives us more time to get to the QB with the pass rush.

Defining the Zones

It is important that our players first understand the different zones of the field in our 3-Deep and 2-Deep coverages. This will help them understand their landmarks better. Additionally, they must understand how to relate to WRs in their zone after the pattern distribution is finished. We will diagram these zones for both 3-Deep and 2-Deep coverages, separately, and term our drops for the underneath coverage defenders to fit those areas of the field.

Slide1

3-Deep Zone Drops:

  • SCF (Seam-Curl-Flat)
    • Re-Route #2 in the seam, expand and play #1 curl-to-flat
    • Landmark is 2 yards outside the hash
  • Hook-to-Curl
    • Relate to #3 in the hook, #2 in the curl
    • Landmark is 2 yards inside the hash
  • Final 3 (used in zone pressures)
    • Defend the hook inside the #3 WR after all exchanges
    • Landmark is the goalpost

Slide1

2-Deep Zone Drops:

  • Flat
    • Relate to #1 at the numbers
  • Seam/Curl
    • Re-route #2 in the seam, expand and play #1 in the curl
    • Landmark is the Hash+2 (2 yards inside or outside, depending on QB/routes)

Drilling the Technique

We must dedicate practice time to teaching our pass drop technique, including taking a good initial angle and being able to break on the throw by the QB. Here are a few drills that we use with our linebackers to improve their drops in underneath coverage.

We use the “Flash + Sink” drill to practice dropping flat to a zone and undercutting hot throws.

Slide3

Flash + Sink Coaching Points:

  • LB push flat to the cone, eyes on the QB (Coach). If the QB throws hot to the first cone, undercut the throw and intercept.
  • Buzz feet at the cone and flip hips inside (zone turn). The QB/Coach will point front shoulder up-field.
  • Sink and read the QB, break on the throw and intercept

This drill best compliments the technique of a final 3 dropper in our 3-Deep/3-Under coverage behind zone pressures. This defender is responsible for defending the hot throw in the middle of the field and defending inside the #3 WR. Here are a couple of good examples of the Flash + Sink drill applied in a game situation.

Read More

Building Pre-Snap Option Route Tags Based on Leverage

By Stan Zweifel
Head Football Coach
University of Dubuque (IA)
Twitter: @StanZweifel


Editors’ Note: In our preseason research, we had a large number of coaches reach out to us to ask about running option routes. The more we dug into this topic, the more we ran into people who told us that the best place to learn these concepts is at the University of Dubuque from HFC Stan Zweifel. This report covers how he teaches this technical concept.


Introduction

The concept of our option pass play is for the quarterback to read a receiver as opposed to reading a coverage. Over the years, we have noticed an improved completion percentage by our QB’s when they are sure of who to throw the ball to.

Base Concept

We identify our receivers in our Mustang Personnel Grouping (11 Personnel) as X – SE, M – Slot, Y – TE, and Z – Flanker. When we tag one of those receivers, we are identifying who is running the “low option.” The low option is a route run at a depth of 5 yard and the main coaching point is to simply GET OPEN. We coach the quarterback reads the receiver, not the defense and give receiver limited routes against any coverage.

Terms Defined
MOR – Mandatory Outside Release. This is used by outside wide receivers to get outside of a rolled up defender. This creates horizontal stretch from the low option.

Low Option – 5 yard get open route. If you are aligned as an inside receiver, here are your choices:

  • Attack leverage – Break Inside
  • Attack leverage – Break Outside
  • Attack outside – Wrap behind defender, into a void in zone and sit.
  • You have 2/3 of the field to work

High Option – 10 yard get open route. If you are an outside receiver, never break away from the ball!

Read More

5 Motion Sequences to Create New #1s

By Steve Monninger
Head Football Coach
Norfolk Academy (VA)


Introduction

When I used to be a defensive coordinator, I had a difficult time getting my corners, safeties and overhang defenders to adjust to motions that created a new #1 receiver. What seemed easy to handle in scout team reps and walkthrough sessions proved more challenging on game day. When I became the head football coach at Norfolk Academy six years ago, my mindset switched over to the offensive side of the ball, but I always remembered what gave me fits as a DC.

When installing a no huddle offense at Norfolk Academy, I knew that I wanted to feature offensive motions that were simple for us, but difficult for defenders. It had to be simple with the ability to be executed out of any personal grouping. This report will explain our reasoning behind creating new #1s with motion and will cover specific examples of how the motions are put into practice for specific plays at Norfolk Academy. Let’s start with the top five reasons we like to create a new #1:

Reason #1: Adding new width to the formation affects the defenders:

  • Corners cannot effectively use press or jam technique.
  • Safeties must adjust over-the-top alignments.
  • Overhang defenders must adjust their apex alignments.

Reason #2: Match Ups

  • We can easily get our bigger TE against a smaller corner.
  • We can easily get our fastest slot WR against a slower corner.

Reason #3: Enhance Inside and Outside Run Game

  • These motions can pull defenders out of the box, creating a numbers advantage for our inside run game.
  • These motions tend to soften the flank for our middle zone (pin and pull) run game.

Reason #4: Improve RPOs

  • These motions tend to “clean up” the C Gap, helping our QB make good reads for our Run Pass Options and perimeter passes.

Reason #5: Route Assignments

  • Since all our pass pattern concepts follow a #1, #2, #3 principle, we can use motions to target a better receiver running a specific route.

Implementing Our Formations and Motions

To get our offensive players in the appropriate places, we simply signal a formation, a specific player and a motion from the sideline. The formation will tell all the players where to line up. The player identified (A, Y, Z, W, etc.) knows that he will be going in motion and the type of motion will tell the player where he needs to end up. During the cadence, the QB will simply point to that player to send him in motion. For the sake of this report, we will look at two motions that create a new #1. These motions are “Mo” and “Out.

“Mo” is a motion that sends a player across the formation to create a new #1. This motion will typically change the formation from trips to doubles or doubles to trips. Examples include the following; A Mo, Y Mo, Z Mo, W Mo (Diagrams 1-4). 

Slide1Slide1Slide1Slide1

Read More

Double TE Empty Run/Pass Package

Ed Honabarger 
Head Football Coach 
Danville High School (OH) 
Twitter: @DanvilleFootbal 

Introduction 

Several seasons ago, we wanted to incorporate some TE sets into our 5-wide attack. Depending on the player types we have year to year, we have created different personnel packages to bring more true TE body types into the game. We felt this caused problems for the defense while giving us angles and advantages across the front. We implemented three different TW 5-wide looks that each had their own strengths and we have used them heavily since that time. The formation that we liked the best is our double TE look. It is called Patriot after New England because of the success they were having with two TE’s and utilizing empty variations. 

Slide1

For us this is a simple change. We moved our slot on the 2-man side and our #2 receiver on the 3-man side into the TE positions because we wanted to leave the same skilled players on the field that we had in our 5-wide package. This formation specifically helps us create a numbers advantage in the box or over the field. We felt if teams were going to load the box up to stop our running attack, we would be able to pass at will on them. If the defense was more concerned about the pass, then we would be more than happy to attack them with QB runs. The defense really needs to pick their poison on what they want to give up and then we must be disciplined to attack their scheme.  

The greatest thing about the Patriot formation is we are able to run the same plays we run in our zero TE 5-wide package. In practice, we may not cover all of the plays we could possibly run out of Patriot, but the players receive the play reps out of one of our other formations and can easily make the small adjustment to run the play during a game if need be out of this set.   

Alignment 

The box will look like a traditional two TE set. Our OGs, OTs and TEs will all maintain three-foot splits. Depending on where the ball is set for play, we adjust our three split receivers. The 2-receiver side will always go to the boundary, and the 3-receiver side will always go to the wide side of the field. Occasionally, we will do the opposite if we see that we can exploit the defense. 

We like to create space with our receivers, so we like the split ends to align outside the numbers. The slot receiver will then split the difference between the tight end and split end on the 3-man side. When the ball is on the hash, we have the split end on the 2-man side as close to the sideline as the referee will allow while still keeping the split end on the 3-man side outside the numbers and the slot splitting the difference. This helps create a lot of space for our receivers to run their routes, catch the ball, and let their athleticism take over. You could move the slot closer to the tight end or the split end to create different looks and route combinations.  

Slide1

The Box 

One of the best parts of this formation is that the defense will often times will not line up soundly.  DBs struggle with whom to cover and at what depth they should align. Defensive fronts are really in trouble now with the two TE look. We see a lot of 6-man boxes. If you are playing a 6-man defensive front that has a traditional alignment (ex. 4-2 or 3-3), how are they going to align and be gap sound? The short answer is that they cannot do it. To account for the extra hat, they have to change their box and this usually pushes someone into the wrong position.  

Diagram 3 (below) shows a 4-2-5 look that we see frequently.  You can see why we are excited against this look as only six defenders in the box and the defense is giving up the run.   

Slide3Slide3

Read More

Robber Coverage from Two High Looks

By Matt Sutjak
Defensive Coordinator
Millersville University (PA)
Twitter: @coach_sutjak


Introduction

During the offseason leading up to the 2017 season, our main focus as a defense was to find a way to add numbers into our run fit defense. We needed to do this without sacrificing our ability to match vertical routes and allow an offense to find uncontested throws. We decided to install a two high robber defense to give us the ability to accomplish this.

To run this coverage, you must have two safeties that do not shy away from inserting themselves into the run game when their read takes them there. They must also have enough speed and acceleration to run with slot receivers when an offense tries to challenge the deep middle of the field. Your corners need to have patience and trust their underneath coverage. They must also have the ability to win on deep passes against the top receivers in the league.

Our success is built on the discipline of our defenders to keep their eyes on their read progression and trust what their keys are telling them. We work constantly to master the small techniques within the scheme that put our guys in position to make big plays.

Passing Strength – Alignment, Keys and Reasonability

When teaching this coverage to our student athletes, we begin by teaching it versus a Twins formation to our passing strength. Our free safety alignment is a 10 yard apex between the #2 receiver and the tackle. Our strong safety is aligned 5 by 1 outside leverage of the #2 receiver. The strong side corner is aligned 7 by 1 with inside leverage on the #1 receiver. The middle linebacker’s alignment will vary based on front calls and the running strength.

Slide1

Once aligned, the free safety will survey the formation for tendency keys. He will then focus his eyes on the near tackle and read through the backfield. We term the free safety’s responsibility in this coverage as “CV” (Curl/Vertical). His pass responsibility is to “rob” the Curl to Vertical route of the #2 receiver. His run responsibility is “alley support”. Against downhill runs (Inside Zone), the free safety will take outside/in leverage to the football. Against perimeter run (Fly Sweep), the free safety will take inside/out leverage on the ball carrier. With run away, his responsibility is cutback replace behind the middle linebacker.

The strong safety will begin with his eyes focused on the end man on the line of scrimmage, through the backfield. He must also keep the #2 receiver in his peripheral vision to see immediate bubble routes. The strong safety’s responsibility versus the pass is the “flat” zone. Once he gets a pass read, his eyes go from the #2 receiver to the #1 receiver. If #2 pushed inside or vertical, he will work underneath #1. Against the run, the strong safety is our force player with perimeter run to him. With run inside or away, he is ultimate cutback player and he should never over pursue the football.

The strong side corner will begin with his eyes on the same keys as the strong safety and free safety. Like the strong safety, he has pass first responsibility. Once he gets a pass read, he becomes a half field corner. He reads from the #2 receiver to the #1 receiver and must be deeper than all routes. In the run game, the corner is a secondary force player with run to and the “touchdown saver” with run away by always taking a high angle.

The middle linebacker will begin with his eyes on the surface of the offensive line. Once he gets a pass read, he will drop to the strong side “hook.” We call this responsibility a “hole technique.” His eyes push from the #3 receiver to the #2 receiver. He will wall #3 until another route enters his zone. With a run read, the middle linebacker’s run fit will change based on the front call.

Weak Side – Alignment, Keys and Reasonability

To teach the weak side of our robber coverage, we begin by explaining it versus a one receiver detached formation. We will adapt the rules versus different formations and build a system of checks if there are formations we do not like the coverage against. The weak safety is responsible for making the adjustment call to the weak side linebacker and corner. The weak safety will align 10 by 1 yards outside of the tackle and the weak side corner will align 5 by 1 yards inside of the #1 receiver.

Slide1

Read More

The 21 Personnel Slot Formation Package

Chris Andreadis
Offensive Coordinator
Red Mountain High School (AZ)


Introduction

RPOs. No-Huddle. Up-Tempo. Spread offense is all the rage. Try making it through a coaching clinic without hearing those words. Everyone has 4 WRs every snap. No one has an in line TE or a fullback. With all of this happening in mass, I have found that our offensive system has become more rare. 

I started my coaching career as an offensive line coach. I learned very quickly that a commitment to the run game has many positive effects:

  • It’s a low-risk / high reward offense (only ball carrier fumbles can cost you). The worst thing that can happen is that you run three plays and punt.
  • It moves the chains and controls the ball and game tempo.
  • It wears down the opposing defensive front – and keeps your defense fresh (and a little ornery if you keep them standing around too long).

Overall, I am a big proponent of a balanced attack. I don’t think that necessarily means 50/50 run/pass. To me, balance means the defense is not exactly sure if a run or pass is coming on any specific down, distance or field position out of that specific formation.

While you can certainly spread to run the ball, I believe that using four WRs every snap never forces the defense to play an extra gap (or two) like an In-Line TE and fullback does. In our quest to stay multiple, we found that the 21 personnel “slot” formation gave us everything we wanted. It allowed us to be in our 2-back set (I and off-set), We kept our in-line TE and we had a 2 WR side to throw various passing concepts. Formationally, it put our run strength and pass strength on opposite sides.  This forced Defenses to make a decision as to how they would line up. It was the perfect formation for us.

We basically focused on 2 Coverage keys during the game: 1) Where they rolled their safety in a 1-high look, and 2) where they played their Outside LBs. *NOTE: We never saw a defense go “corners over”, but if they did – we would use motion and shifts to get the matchup we wanted.

Slide1

If a team rolled coverage to the slot side (see above), that meant the only “non-box” player left to the TE side was the CB. In our experience, most corners want nothing to do with setting the edge or getting in the box – so that dictated we attack the TE side with off-tackle and perimeter runs ; as well as play-action passes.

Diagram 2 (Roll to TE)

If the defense rolled their safety (see above)  to the TE side (for run support), that meant we had our slot WR matched with an OLB. We would attack that side with passes  (both drop-back and play-action). 

Slide1

If they stayed in 2-high, and apexed their WOLB, we ran the ball. If they stayed in 2-high and kept a 7-man box, we threw a quick pass to our uncovered slot.

If teams played zero, we had built-in checks. We had a few very talented WRs that were matchup problems for most teams – we picked the matchup we liked, max-protected and took a shot.

Some front considerations:

So, if we were facing an odd-front – did they walk Sam up on the TE?, Did they remove their Kat (weakside OLB) to the slot WR? Did they Eagle down and cover our guard?

Versus an even front – did they bump LBs or just add safety in? 

Slide3Slide3Slide3

We were also able to run all aspects of our offense, both run and pass. Our best play-action was our “Boot Spine” which was a flood concept with our FB leaking out to the flat. Any two WR pass concept was fair game. 

Slide6Slide6

To study game film of this concept, click on the video below:

Read More