Whole, Part, Whole Teaching of the H Counter Concept

By Jacob Knight
Offensive Line Coach
Waverly High School (OH)
Twitter: @CoachKnight55


Introduction

At Waverly High School, we are a “hang-our-hat” on being an 11 Personnel offensive team that wants to establish our running game with an inside zone focus. When running inside zone, we do it almost exclusively with our TE on the backside of the run kicking out the backside DE. The counter scheme has become a great changeup off this run look. Over time, counter has become our staple run to counter the inside zone.

Concept Overview

We teach counter as a physical downhill A gap run play. We want our running back to stay in the A gap as long as possible. When we run counter, we typically run it from 11 personnel and with a TE. We primarily live in formations where our TE is aligned directly behind the tackle three yards from the ball; this is our most common formation. During the season, we found different ways to formation this run so we could appropriately tag RPOs with this. For example, we would vary the location of the back as well as mix this concept with jet motion.

Slide1Slide1

To study game film of this concept against Even fronts, click on the video below:

Read More

“Keeper” and “Creeper” Pressure Concepts to Defend Screens

By Zach Cunningham
Assistant Coach
Spring Valley High School (NV)
Twitter: @CoachCunny


Introduction

An attacking defense is one of the toughest things to game plan for and play against. Bringing heat and blitzing a flustered quarterback makes everybody’s job not only easier, but more fun. We all know that a well-executed screen can not only neutralize a blitz package but make the defense extremely cautious throughout the (rest of the) game. We play a 3-4 defense which means we like to bring heat, a lot. We will still bring 5-man blitzes vs teams that have an effective screen game by using our “Keeper/Creeper” concept. This philosophy works whether we are in man or zone in the secondary.

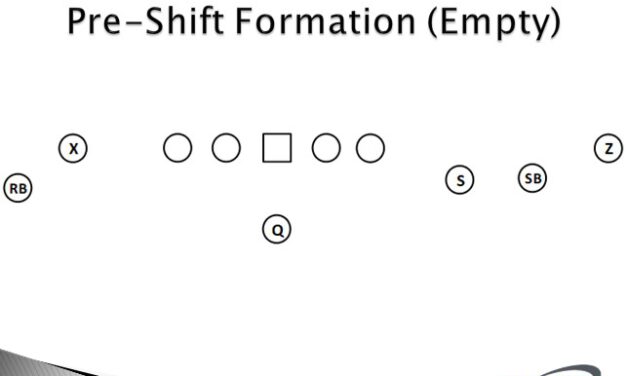
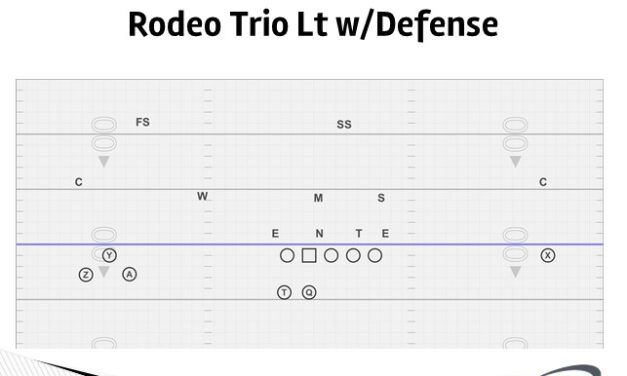
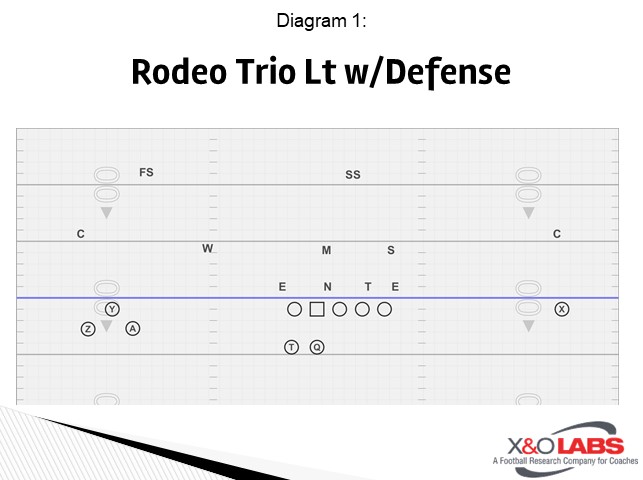
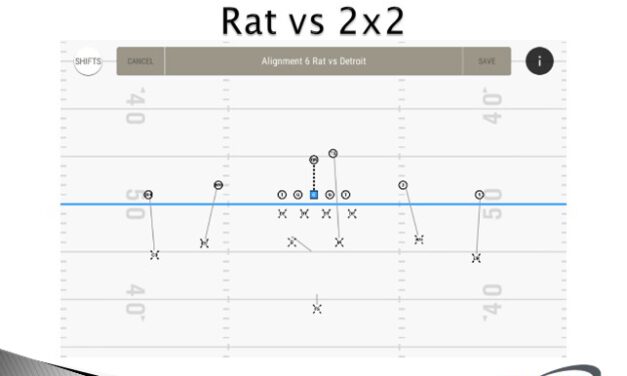
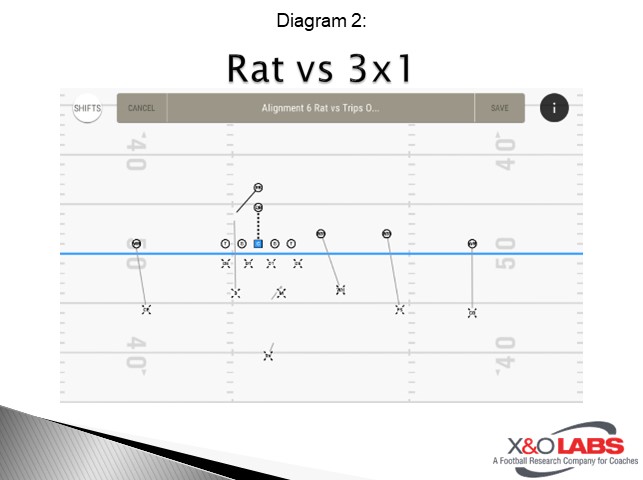
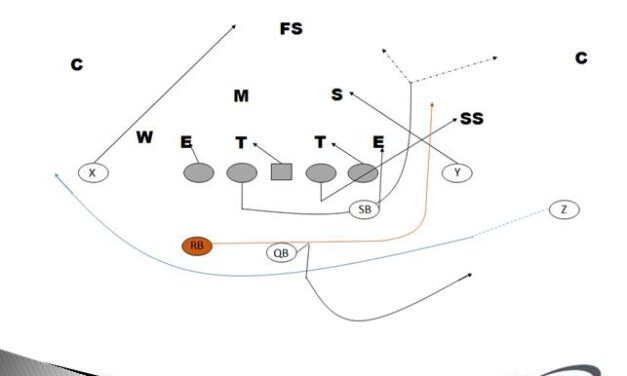
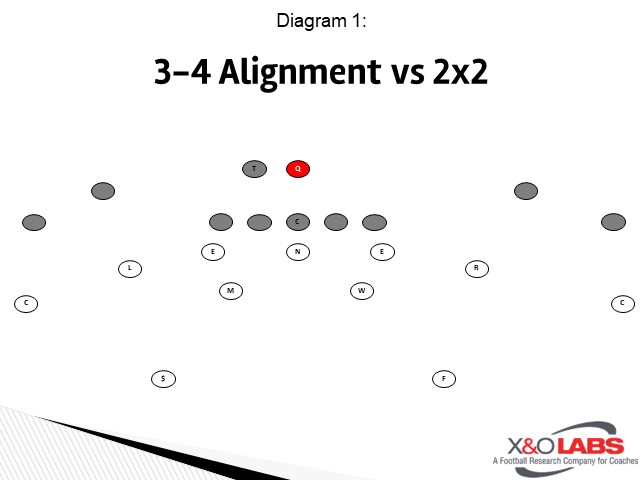
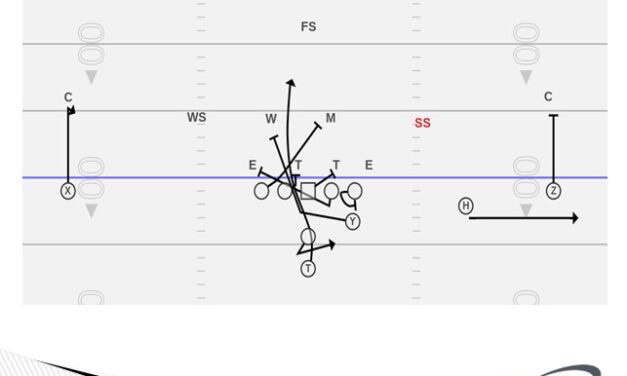
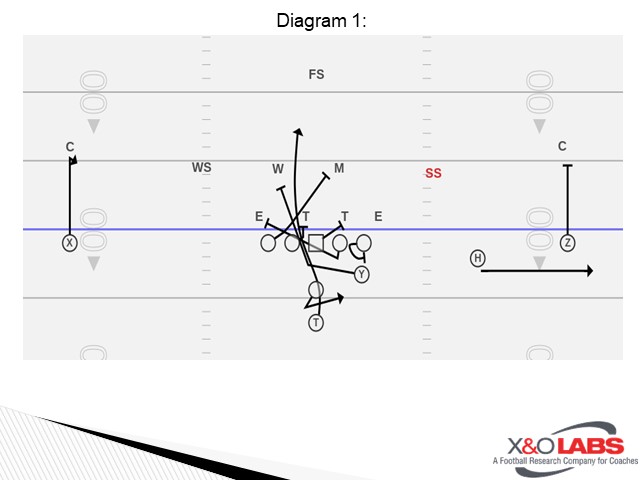
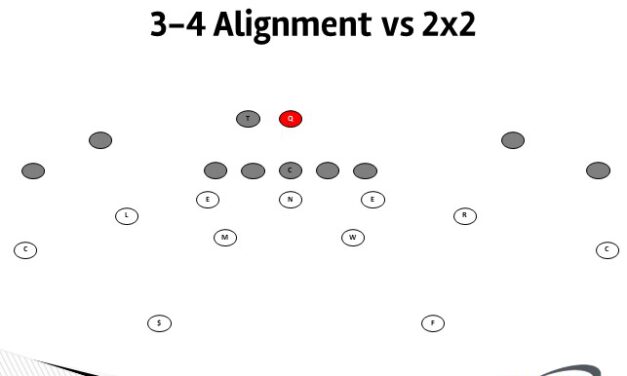
Alignment: For the purposes of this article, I will introduce our “Keeper/Creeper” concept versus a 2×2 formation. In our base 3-4, our DEs are in a tight 5-technique alignment. Mike and Will are basically in a 40-I technique and our Leo and Robber are set at 3×5 off the tackle depending on the width of the #2 WR (Diagram 1).

Slide1

Importance of the Back

We use two main blitz packages in our 3-4 defense. Each of these can adapt into multiple variations. The RB alignment will dictate which linebacker is involved in the blitz in our Ambush and Crash blitz concepts.

Slide1

The RB is the key to our pressure game. We can call the blitz however we want (i.e. strength, field, back, etc) but the players need to know how to adjust based on the alignment of the back. In every blitz we have what we call a “Keeper” and a “Creeper”.

  • Keeper – ILB aligned to the side of the RB
  • Creeper – OLB aligned opposite of the RB

Slide3

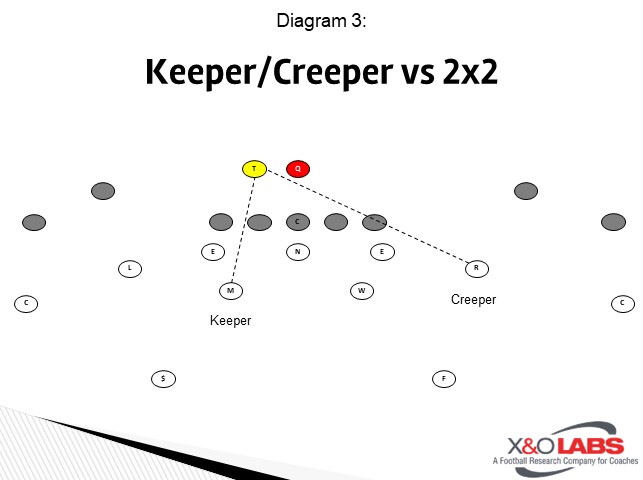
These two players need to know on every play who is the Keeper and who is the Creeper. The ILB tagged as the Keeper will never blitz. The OLB tagged as the Creeper will still go if he is involved in the call, but he will blitz with caution.
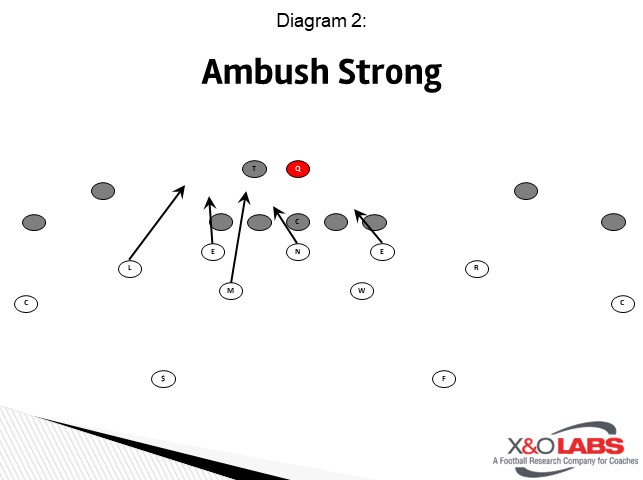
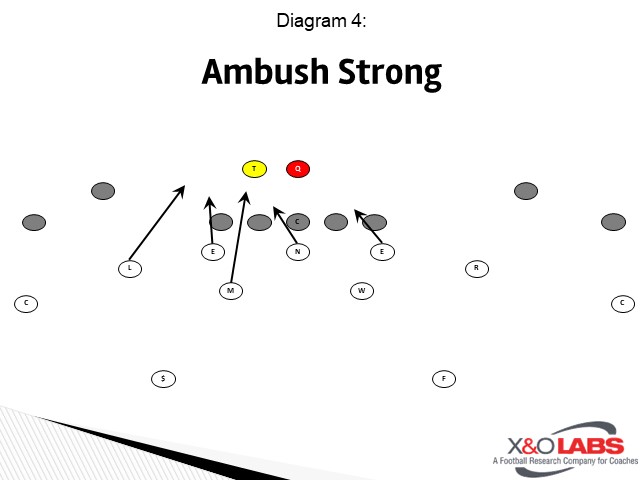
Ambush Blitz

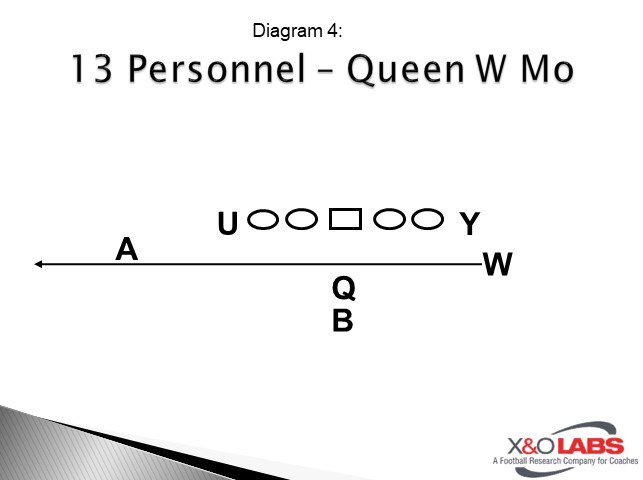
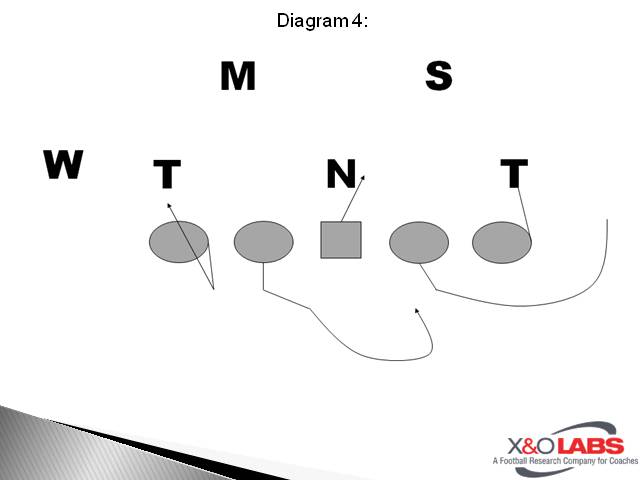
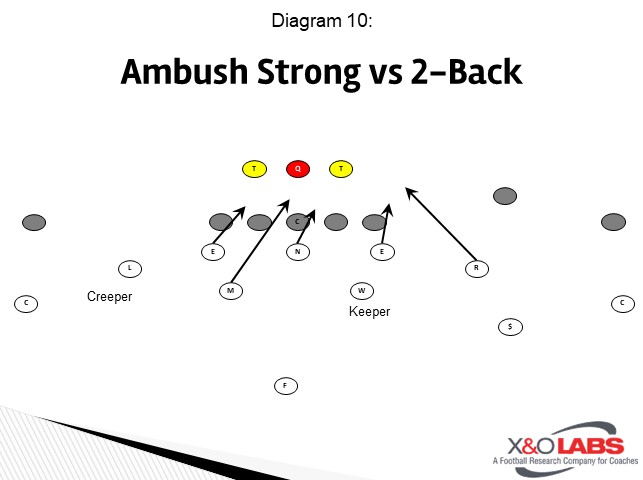
We like to call our Ambush blitz to the strength which against 2×2 would be to the RB (Diagram 4). The Keeper is the Mike called into the blitz and the Creeper is the Robber. The adjustment made is that the Mike will then pass his blitz off to the Will. The Robber is still the Creeper even though he is not called into the blitz (Diagram 5). We still get our 5-man pressure but are not susceptible to the RB screen to a certain side.

Slide3Slide3

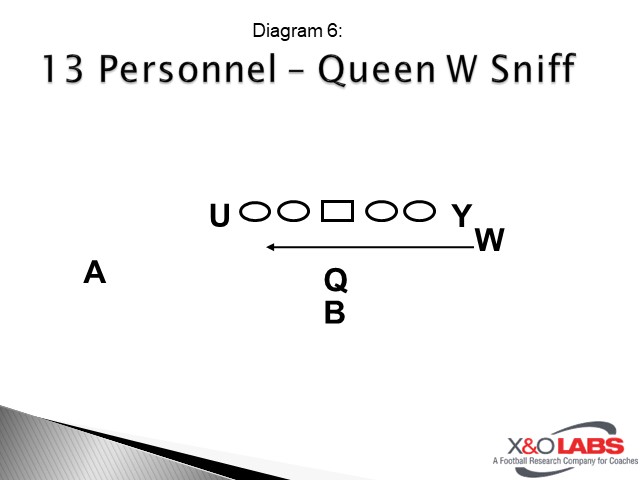
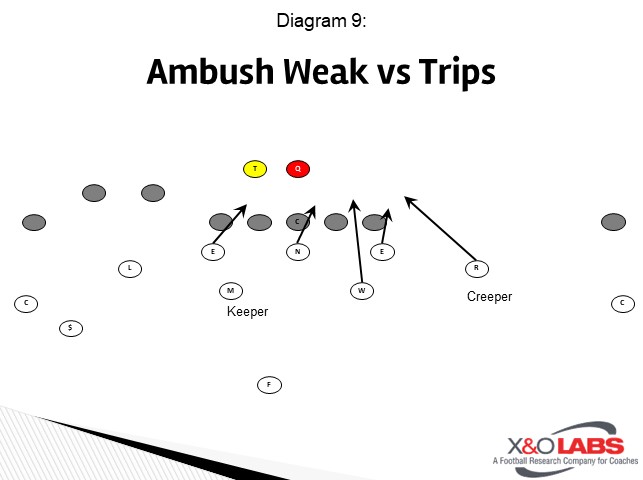
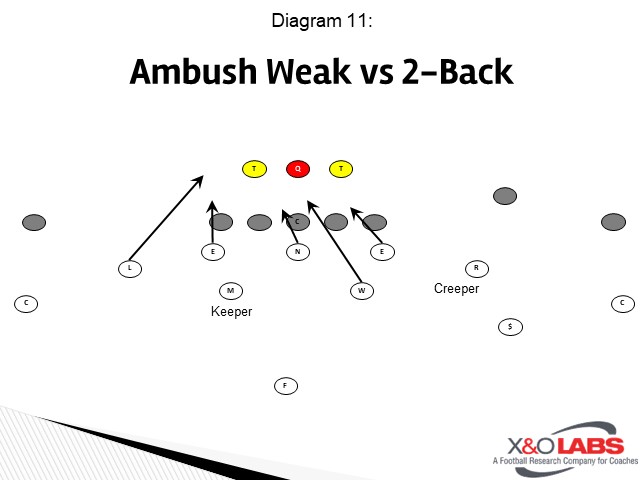
If we call an Ambush Weak against the same look, the Keeper & Creeper rules still apply (Diagram 6). The Mike is the Keeper so the Will is free to continue on his blitz.

Slide6

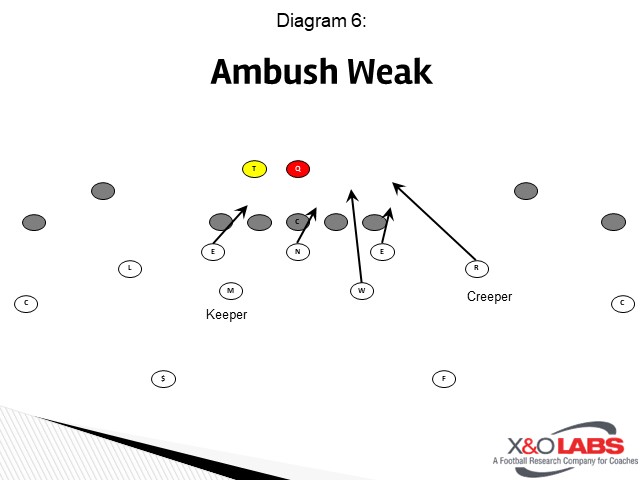
The Robber is still the Creeper, but he will still go in the call. His technique changes though as he is essentially spying the RB while blitzing. This is done by keeping the proper blitz angle of the upfield shoulder on the QB, but his eyes are tracking the RB’s release. If the RB goes away or stays in to block, the OLB will continue his path to QB. If the RB releases towards him, he will peel off and stay on the back. In doing this we do occasionally lose a blitzer, but it always guarantees us that somebody will be on the RB for screen or any other route he may run.

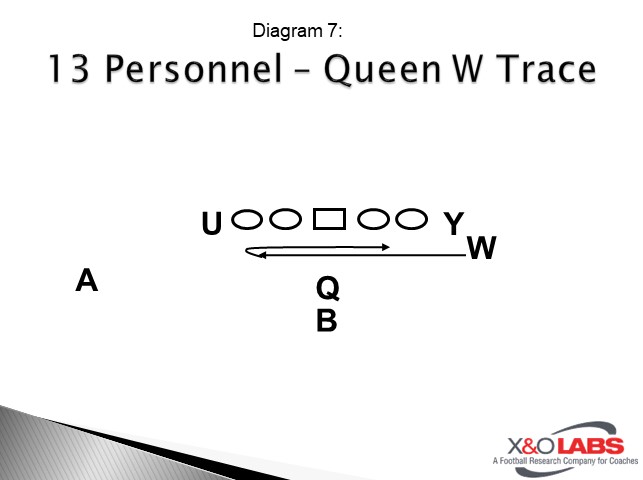
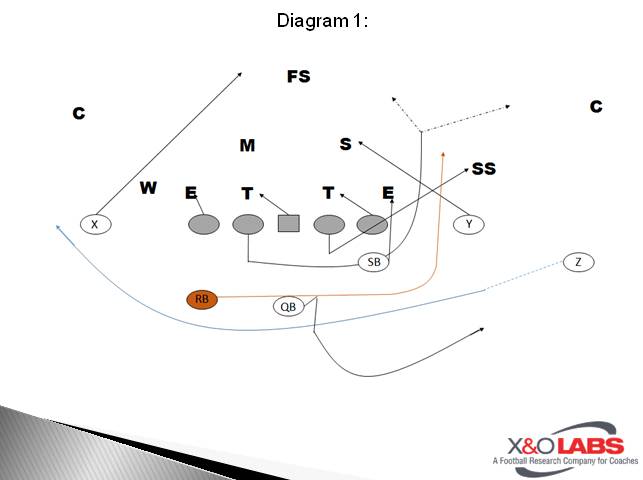
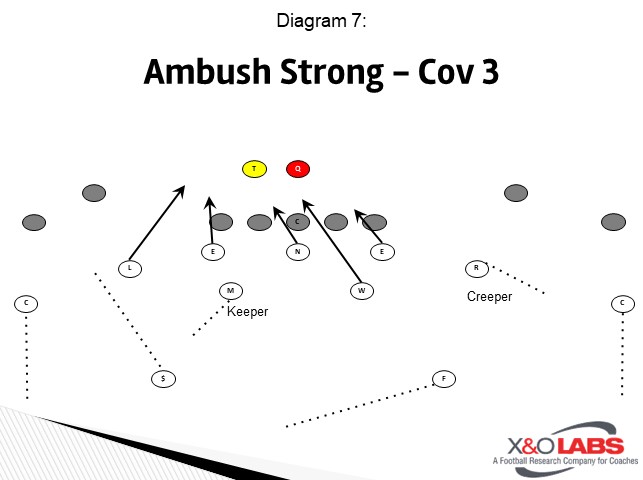
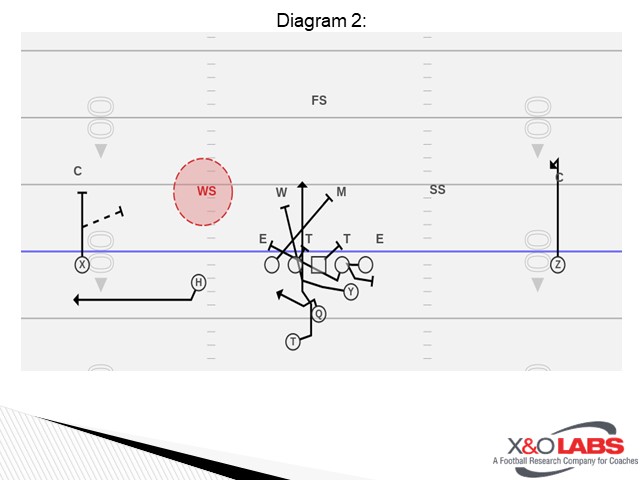
This system is used in both man coverage and zone coverage. In Man, we run a Cover 0 in the 3-4. This is due to not enough skill guys to cover 4 to 5 receivers and it also simplifies everybody’s job. We will use the same exact Keeper/Creeper rules in both Man and Zone. The last thing we want to do is blitz people out of an open half of the field or be outnumbered to a side in Zone (Diagram 7).

Slide6

Variations

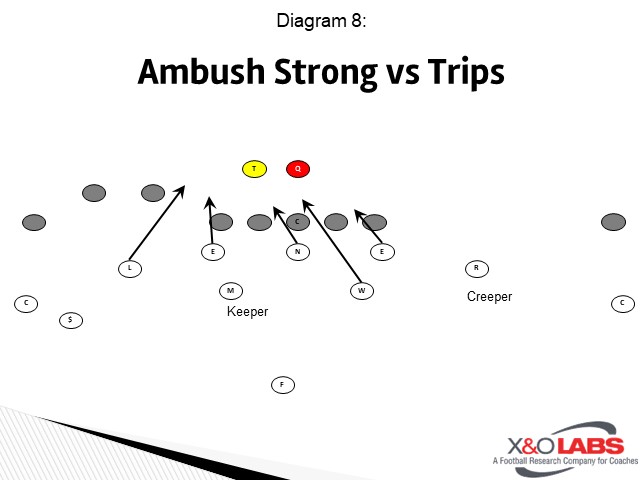
This concept works against every formation. As you will see, there is always a Keeper and a Creeper in every case.

Slide8Slide8Slide8Slide8

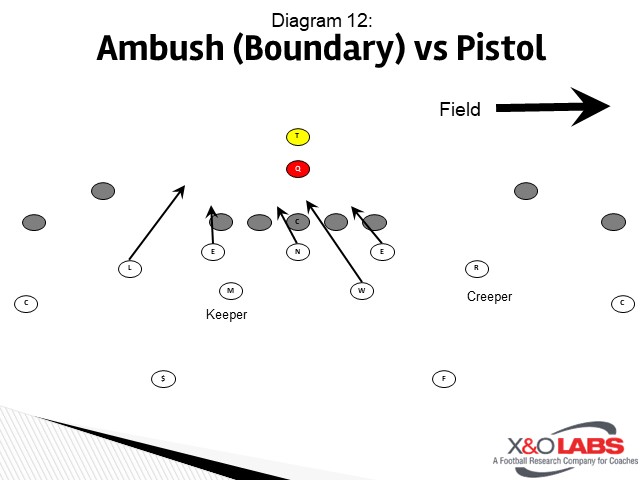
A very common issue that many of us face is the Pistol backfield. One reason offenses do this is, so a defense cannot predicate themselves to the RB. This directly affects our Keeper/Creeper concept. One way we adjust, besides breakdown data, is based on the field and hashes. If the offense is on a hash with a Pistol backfield, we will automatically make the boundary ILB the Keeper and field OLB the Creeper (Diagram 12) The called blitz is still on.

Slide8

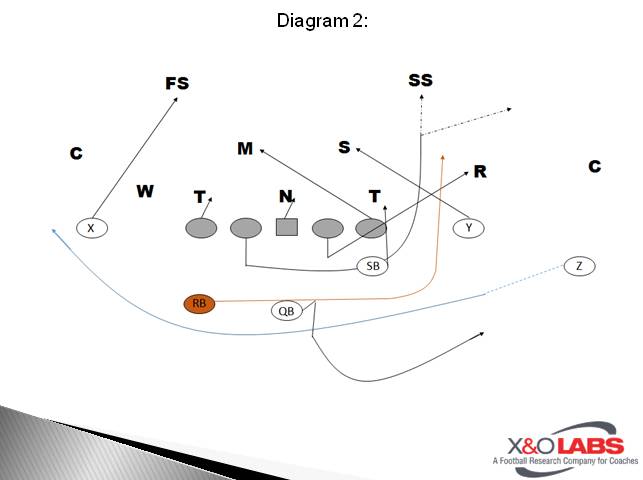
Another variation to this concept is with a different pressure package. We can use the same system when bringing two guys off the edge. This is our Crash blitz (Diagram 13).

Slide13

Here you have a couple options on how you want to defend the RB screen. Since you still have both ILB’s free for RB, you can have only them on Keeper responsibility and let the OLB be free to go. The other option is to maintain the same teaching principles

Read More

Creating a Winning Culture in the Off-Season

By Tony Hurps
Defensive Coordinator/Strength & Conditioning
Berne Union High School (OH)
Twitter: @Coach_Hurps

Introduction

In the majority of my experiences at both the high school and college level of coaching football, I have been tasked or have assisted in turning the football team around into a winning program. In every one of these situations, the project is really about improving the program’s culture. It has been my belief that the only way to do that is by creating change during the off-season.

The majority of my coaching experience has been at small schools, and many of our players play multiple sports (which is encouraged), but also makes it difficult to make sure the players continue to train and build the culture we desire.

As much as we would like to believe that all of our players love football as much as we do, that is just not true. Many of our players do not watch any football at all unless they are watching film with us. Because of this, we are challenged with the task of creating that love in other ways.

Like others, we have faced excuses from players and obstacles to overcome during the off-season:

  • It isn’t fun
  • It takes too much of my free time
  • It is painful to train
  • I am participating in other sports
  • The off-season is “my time”

With that as a background/challenge, I attack the offseason with two main priorities in mind. My number one priority as a coach is to keep my players safe. The second priority is to make it fun. The off-season is a great time to have fun with our players, and that is what we do to help build that culture of trust, effort, competition, and, ultimately, winning. It helps to get players talking about football all year long in a positive light.

Read More

Cardinal Double Team Technique in Gap Schemes

By Gabe Fertitta
Offensive Coordinator
Catholic High of Baton Rouge
Twitter: @fertitta_gabe

Introduction

Catholichigh
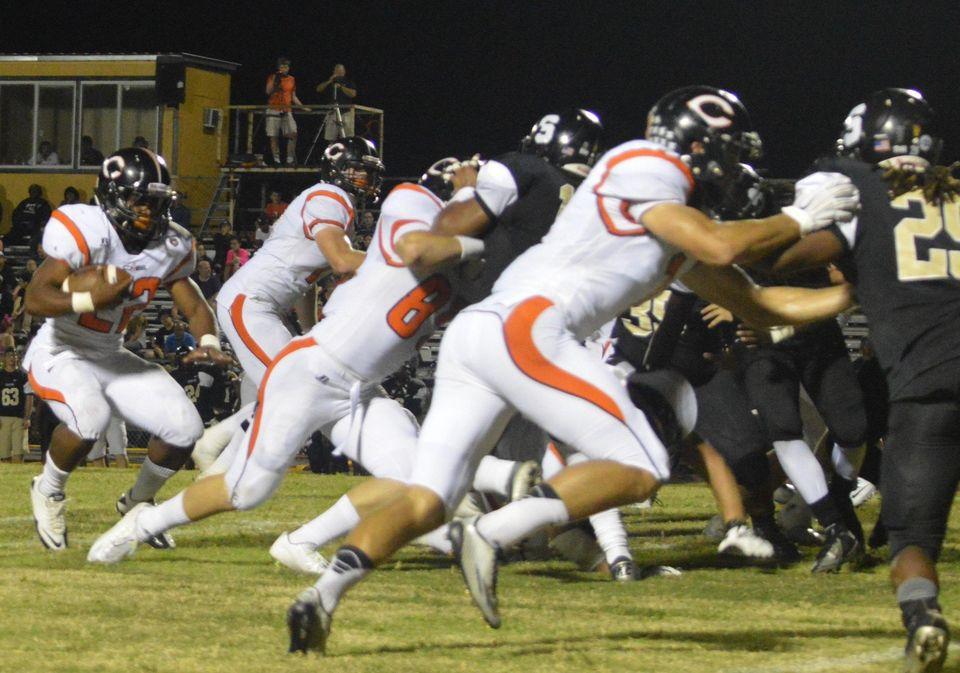
One of the staples of our offense for 3 years at Catholic High has been the power play. In three seasons, we have averaged calling some version of power over 150 times per season and have averaged 7+ yards per carry. One of the most influential changes we instituted to the fundamentals of our blocking came from our study of Stanford University’s techniques on the front side double team, or what we now call our “Cardinal Technique.”

Coaching The Tackle/Guard Combination on a 3 Technique

In the past, we have taught traditional footwork for the power double team. The inside (or post man) would take a settle step with his inside foot and work his second step through the crotch of the 3 technique and use “half bench” hand technique. For the most part, this part of the concept hasn’t changed. Our tackles used angle footwork with their backside (non-play side) foot and attempted to “dent” the defense vertically. He used “full bench” hand technique. We taught both the guard and tackle to work the 3 technique as vertical as they could to create a dent in the defense to run power.  Our running back aiming point was and continues to be “A-Gap to Bounce.” We do not allow our running backs to cut back on power unless they score. Stanford’s coaching point on this is “we only cut back for a $20 bill and not a $1 bill.” 

This technique worked well for us and Power was a staple run for us even before we changed techniques.  That said, the wisdom we gained from hearing Coach Bloomgren discuss the technique they use at Stanford illuminated a fatal flaw in how were blocking the front side double team on power. We were asking our guard to work toward a 3 technique in one direction and our tackle to work toward a 3 technique in another. Simple physics tells us that resulting vector from those two forces will not be as strong as if both forces were moving in the same direction. Fixing the angles would allow for more movement at the point of attack.

Understanding the Cardinal Technique

Our “post man” in the double team will still use his “settle – lift” footwork. This is what Stanford calls jab and crotch. However, instead of trying to force the 3 technique vertically, the guard will attempt to “torque” the 3 tech down the line of scrimmage when he feels the “bump” from the tackle.

The tackle uses what we refer to as “high leg shuffle” footwork. This technique assumes that the tackles are in right and left hand stances on the right and left side of the line, his dominant foot will be his inside or post foot. We work a high leg shuffle or gallop technique in which the tackle will attempt to knock the 3 technique over and on to the guard. His first step should still be with his “backside” or inside foot. We look to make contact on the third step of this footwork (although it doesn’t always happen just like that)  We target the hip of the defender and use “half power technique” which resembles old school shoulder blocking. 

When the guard feels the tackle bump the down lineman, he then torques the defender using the force from the tackle and works the DL down the line of scrimmage. If there is not enough initial “bump” to completely torque the DT, the two then work hip to hip on the double team similarly to the way we would teach the power or gap double team before. 

Coaching Points

Aside from the usual coaching points, there are some things that must be emphasized when using this technique. The tackle’s pad level must remain low so that he can target the hip of the DL with the top of his shoulder pad. Although this is what we teach, many times this doesn’t happen. The OT will usually end up being a little too high, but if we teach them to target the hip and the miss a little high we can still win on the double team.

The guard and tackle must also be extremely aware of LB run through in the A gap. If this happens, the guard must come off of the 3 and block down to protect his gap. The tackle then must respond by working from half power to full bench hand technique

One of the benefits of teaching this technique is that it helps the tackle to stay square for the LB when he gets to the second level. Many times in our old power technique, the OT would be turned at a 45 degree angle and would not be able to redirect if he had to come off for the backside LB running over the top of the double team. The cardinal technique allows us to stay squarer longer and makes catching the LB running over the top of the double team a lot easier. By staying square, the tackle also has a much easier time picking up movement from the 3 technique if he were to move from a 3 to a 4 or 5 technique.

We also like to teach the OT (or driver of the block) to not come off the double team early for the LB. Stanford refers to this as “U-Out.” When the LB works hard over the top of the double team, the tackle can simply work a U path to widen the LB past the A-Gap. As long as your RB is patient and presses the A gap, this technique will be extremely beneficial. This technique can also be used between a TE and tackle as well against under defense. The tackle becomes the post man and the TE becomes the driver.  The technique also allows smaller TE’s or offensive linemen to deliver far more force into the down block than previous techniques. This particular technique makes an already physical play much more physical. 

Read More

Lion Coverage vs. Trips

By Chris Endress
Co-Defensive Coordinator/Secondary
Seneca High School (MO)
Twitter: @ChrisEndress1


Introduction

Trips presented us an issue a couple seasons ago because our weak safety was tied into #3 strong for vertical routes (Solo coverage). That left him out of place in his run fits to the weak side and got us in trouble. With the rise of more power read and speed/lead option to the weak side, we needed an answer that kept our Willie (weak safety) to the weak side while still be sound against trips routes. Lion coverage was that answer. It is a quarters based coverage to trips where we will use two deep defenders versus a possible threat vertical threat while remaining solid in perimeter run defense on both sides of the offense.

What is Lion Coverage?

At its core, lion is a split cover concept used against trips formations. It resembles a ¼, ¼ look with two deep defenders. It also has an overhang player responsible flats and force on run and a linebacker expanding under the hook/curl zone and collisioning and carrying the first incut threat.  All the secondary players except for the PSLB are keying #3 to the trips side for keys and assignments post-snap.

Overhang Player: Base Key, Alignment, and Assignment

The base assignment for our overhang player in 2×2 looks is to be force on run and work under #1 on pass read (Drop 1 in our language). He will then pick up any final #3 from the backfield or the other side of the formation. We try to keep our key, alignment, and assignment the same in our base coverages as often as possible for simplicity of teaching and because techniques and fundamentals overlap.

The overhang player aligns 1 yard inside by 5 yards off the #2 receiver.  We base the 5 yards depth from the LOS if #2 is a slot receiver. He keys the #3 receiver for his run/pass key.  We teach the following different actions from #3:

  • Vertical release
  • Outside release
  • Inside release
  • Outside run block (arc)
  • Scoop block

Slide1

We designate any route where #3 is at a depth even with the starting depth of the overhang as a vertical release. That has made teaching a lot easier for overhangs to identify vertical routes.

Slide1Slide1Slide1Slide1Slide1

These are the assignments for our overhang versus each release:

  • Vertical release: Drop 1 (get under #1), walling #2 on a vertical or inside release. Be on alert for a final #3 from the other side (drag or RB out from backfield).
  • Outside release: Expand with #3 walling #2 on a vertical or inside release. The overhang has #3 as soon as he crosses the LOS or the QB throws to him (i.e. bubble, arrow, wheel).
  • Inside release: Same as vertical. Wall 2, Drop 1, alert for final #3.
  • Outside run block: Eyes on #2 now! Work for outside fit on #2 because the overhang is now the force defender on run his way.
  • Scoop block: shuffle inside the box to replace the nearest LB. The flow is away and the overhang is now responsible for cutback, bootleg, and reverse.

PLSB: Base Key, Alignment, and Assignment

The base assignment for our PSLB versus trips is align toes at 5 yards apexing the #3 and the ball.  This stays the same even if #3 is a TE because the PSLB will need to widen slightly because of the trips but not too far from his original alignment. In a trips look, the LB will be cross-keying the QB and the RB. He keys the one furthest from him for run/ pass. In our pass defense, we account the LB as a ½ a pass defender because he is a run first player in our run fits.

Depending on our front alignment, the LB could be responsible for A or B gap to his side on runs his way. We keep try to keep his run fits the same regardless of fronts, and in our base coverages, the LB pass rules are always the same:

Read More

Pairing the Peek RPO with Power, Counter and Pin and Pull Runs

By Pete DeWeese
Offensive Coordinator / QB Coach        
Sprayberry High School (GA)
Twitter: @petedeweese

Introduction

The 2017 season marked a season of change for me and my team. After calling defenses for the past 6 seasons, I moved to a new school with an almost entirely new staff. Along with that change, I returned to the offensive side of the ball as the QB coach and Offensive Coordinator of the Sprayberry Yellowjackets. My hope was to take many of the schemes and formations that had given me fits as a defensive coordinator and to develop them into a sound offensive system that fit our kids.

For the team, the offense was an adjustment. In the years prior, the team utilized only a few formations and schemes. Our staff knew that we were asking them to do more, to learn more, and to execute more than what they had been asked to do the previous season. On top of that, the program had just lost an excellent senior class and we knew that we were going to have to rely on many young players with limited varsity experience. As an offensive staff, we knew that we wanted RPOs to be a big part of our arsenal. With that, we understood that we needed versatile RPOs that were easy to teach and easy for young players to grasp and execute. That is why we focused on the “Peek” RPO tag.

Why Peek?

Like most teams that utilize RPOs, we installed perimeter screens as part of our run game. With every run play that we installed, we had screens that were part of a pre-snap read for our quarterback. Depending on the formation, we had the ability to utilize bubble screens to the 2nd or 3rd receiver in a formation. We also had the ability to throw key screens to 1st or 2nd receiver in a formation.

Slide1

These screens are effective ways to help an offense move the ball and stay on schedule. As a DC, there were few teams that ever scared me when they were throwing the screens. I always felt that there were ways that I could leverage the screen and take it away pre-snap. When you combine that with the knowledge that bigger/stronger/more athletic DBs do more than level the playing field, I started looking at RPO tags that allowed us to throw forward passes (not lateral) in a timely and efficient manner. Our peek RPO tag proved to be just that. 

What Is Peek?

We first installed peek for use in our 3×1 formations. Over time, we adapted the tag to use with almost any formation that gives us 2 or 3 receivers on one side of the formation, regardless of personnel.

During our spring football instillation period, we had some success throwing Y-Stick off of our Zone Read run game. While the play had early success, our staff agreed that it was too easy for a defense to leverage the stick route and maintain a numbers advantage in the box.

Slide2

Our staff decided that we needed to find a way to take advantage of any LB or safety that is trying to cut or rob the stick route by giving our WR an opportunity to bend his route to open grass and find the void created in the defense.

Slide2

Read More

Adjusting the Pop RPO to Attack Man Coverage

By Mark Holcomb
Head Football Coach
North Davidson High School (NC)
Twitter: @FootballHolcomb


Introduction:

As our program has delved into the world of RPOs the past 5 seasons, we have added many concepts to our offense, but none have been more productive and easier to install than the Pop Pass. We did not have to change any concepts for our offensive linemen which are the most important part of any offense. This article will focus on formations, reads, and wrinkles we use to make this play as successful as possible and it remains a mainstay of our offense.

We run the Pop pass concept with a variety of run looks. Below I will detail the Iso, Counter, and Truck concepts as they relate to the Pop pass.

Isolation Play:

The isolation play is a simple fold play with the back side guard pulling into the open gap to lead up or isolate on the play side linebacker. The play side Guard and Tackle will simply zone or fan block based on the front and open gap. Against a shade Nose, the play side Guard will block down because B gap is open. The Center has the job of blocking back on the first down defender on the backside.  The back side Tackle must make sure there is no penetration by the Defensive Tackle or Defensive End into the B gap. There are numerous adjustments that can be made against slanting fronts and blitzes.

The main adjustment we use against blitzing Linebackers is to make a “zone” call and the Offensive Line will zone block and there will be no pullers. This read is usually is fast and easy for the QB because the zone covered by the Linebacker(s) will now be open for the Pop pass. Below are the most common fronts we see and the blocking assignments against each.

Slide1Slide1

Counter Play:

The Counter has always been a staple of our offense no matter whether we were in a Pro I offense or the Spread. The rules remain the same for the front side and back side no matter what front we are facing. The front side rules are “Gap, Down, Backer” and we double everything we can to the back side Linebacker who is our actual “QB Read” on the play. The Center has the job of blocking back on the first down defender on the backside. The back side Guard will pull and maintain a track into the line of scrimmage and attempt to “dig out” the Defensive End to the play side. The back side Tackle will pull and fit in the line to the front side Linebacker. We drill each week against teams that will use the “squeeze and spill” technique with their defensive ends. Against that technique, our back side Guard will log the Defensive End and the back side Tackle will continue on the outside of the Guard to the play side Linebacker.

The main adjustment we make on the Counter is against a chasing back side Defensive End. When we see this, we simply make a “Texas” call which locks the back side Tackle on the back side Defensive End and the play is essence becomes a long trap by the back side Guard. We will also try and double the front side Guard and Tackle to the front side Linebacker in the event of a give read by the QB. Below are the most common fronts we see and the blocking assignments against each.     

Slide3Slide3

Truck (Pin/Pull) Play:

The Truck play is the new version of the old Packer Sweep but is used now as a change up to the Outside Zone play. We will typically not take both the Truck play and Outside Zone play into the same game plan. As a staff, we will decide if we can reach the Defensive End. If we can, we will run the Truck play with the advantage of pullers as lead blockers. If we cannot reach the Defensive End(s), we will run the Outside Zone and reach to widen for the cutback by the Running Back. 

Our Truck play has simple rules except for the play side Tackle. The play side tackle will reach block the Defensive End and attempt to set the edge. All other players have the same rule which make this a simple play to implement.  If the player has a down block they will take it and if they do not have a down block they will pull to the play side. For example, if you are running the play against a 3-4 defense that is not slanting the assignments will be as follows:

Read More

Utilizing Shifts & Motions in Situational Football

By Brian White
Offensive Coordinator
Rose-Hulman Institute of Technology (IN)
Twitter: @CoachWhite_RHIT


Introduction

Our offense is based on playing fast. We want to snap the ball as quickly as possible as often as possible. In a play fast offense, success breeds success, meaning that first downs must be achieved in order to keep up the pace and continue to snap the ball quickly. For example, we find it ineffective to use a Green Word, or 1-word play call, after an incomplete pass or rush for a short gain. Another issue that all play fast offenses must addresses is how to attack the defense during a four-minute drive. Our staff has found out the hard way that continuing to play fast while protecting a late lead can sometimes allow the opposition to get back into the game. On the other hand, the unfamiliar mechanic of calling plays from huddle and approaching the line of scrimmage deep into the play clock can disrupt the rhythm and execution of your own offense.

With these two thoughts in mind, a major addition to our offensive package this season was the use of shifts and motions. This package allowed us to still line up quickly and give the threat of snapping the ball then rapidly changing the picture that the defense sees. One of the major benefits of this pre-snap movement was the amount of communication that the defense was forced to make. This mimicked the effects that playing fast on a defense, by giving them a very short period of time to diagnose the formation, then the new formation, and make their calls and adjustments.

We also found that the use of shift and motion was effective in disguising some of our top plays.  Through self-scout, we found some major down and distance and formation tendencies. The use of shifts and motions helped us runs plays that our offense is comfortable executing while not allowing the defense to lock in on their call. This is especially useful on 3rd down calls.

Mechanics

All of our shifts start in an empty formation. This causes a defense to get out of the call that they wanted to play and forces them to make their empty check. In addition to the formation signal, the movement (shift or shift with motion) will be signaled as well as the play. All formations, shifts, motions and plays are identified by a single signal; so the combination of formation, movement and play is accomplished with a minimal amount of signs.

In our base offense, we align with a RB in the backfield, left and right side outside receivers, a slot WR to the field and a Superback that adjusts his alignment to the formation called. When shifting, we will call one of our one-word empty formations then signal the shift in. All players know to end up aligning in their base alignment, with the Superback adjusting to the new formation. The RB will motion into the backfield in an alignment based on the play called. We want to place the most stress on the defense by having our Superback align opposite where the shift will bring him. Many defenses that we see like to make their formation strength call to the location of our Superback. Having him cross the formation results in the maximum amount of defensive communication and personnel movement.

Repeat

In our regular offensive procedure we will use a “repeat” word to execute the same exact play from the same formation immediately after the whistle ends the previous play. We will use this after an explosive play in an attempt to get the same result, assuming that they defense will either have to make the same defensive call or not even be ready to play. If we “repeat” a play that includes a shift and motion, the shift and motion should be repeated as well, as the second play is an exact duplicate in the first.

Read More

Unbalanced Line Structures in the Spread Offense

By Thomas Hotmer
Head Coach
Princeton High School (MO)
Twitter: @coachhotmer, @PrincetonTFbal

Introduction

The unbalanced line in our spread offense allows us to create more leverage space on one side for our passing game and the other side for our running game. The idea is to create confusion on the defensive alignment up front. Diversifying the spread in a new way to create spacing and matchup advantages creates nightmares for opposing defensive coordinators. At the same time, our players enjoy the creativity each week learning a new wrinkle and enhances their focus on play design with individual responsibilities. While we did not use this in every game, the threat of using it requires opponents to use practice time learning how to line up to it rather than only focusing on our base plays.

Rodeo/Lasso (Tackle Over)

When implementing our tackle over package, the main priority is to ensure your tackle understands the run blocking rules from the tight end position. In our system, we have base blocking rules determined from the defensive alignment. We coach our lineman from the idea of where the run play is called and if they are covered or uncovered by a defensive lineman. Beyond this simple blocking concept, our tackles can go unbalanced as a tight end and still be effective blocking in our run game.

Once we started doing this, we noticed the extra spacing to the opposite side of our call based on the defensive shifts. We mainly utilized this to create more space for our passing game on the backside with all players keeping their eligibility and creating an extra gap for our running game on the overload side. The extra gap and 4-6 extra yards of space on the backside has given us the freedom to keep all of our plays the same with the ability to make the defense have to tackle well in more space. If we call a pass play, we run it as called. If we call a run play, we always tag it with an RPO so our quarterback can read pre-snap leverage. The following diagrams will present a few formation ideas that gave us leverage advantages for both our run and pass game RPO’s.

Slide1

Rodeo Trio Lt Coaching Points:

When using this formation, the main thing I want to know is how they will defend us up front and the space they will allow to the trips receivers. If they do not shift with our tackle over, we will run the ball to that side. If the defense over shifts and gives us more space, I like to throw bubble or now screens as well as all verticals.

Slide1

Rodeo Eagle Lt Coaching Points:

This formation allows for us to get into a spread look with our two best receivers on the same side. This allows us to avoid brackets on our two best receivers and create the one on one mismatch we like with the space they give us.

Slide3

Rodeo Chief Ace Lt Coaching Points:

This formation allows our tight end to look like a left tackle in a trips set while maintaining eligibility. We can still run the ball with any run play we like as well as tag run pass options with this balanced line. We can get mismatches with a slot receiver on a linebacker or our tight end on a linebacker to take advantage of in the passing game.

To study game film of this formation structure, click on the videos below:

Editor’s Note: Coach Hotmer has provided clip by clip narration for each of these plays:

Clip 1: On this play, the defense does not shift to the tackle over. They choose to shade to the tight end that has been hurting them in the pass game with their defensive line, a linebacker, and a safety creating for an easy QB Iso to the tackle over. The key to this is maintaining eligibility with our receivers and tight ends so that the however the defense aligns, we can make them wrong.

Read More

Defending Tight vs. Wide Bunch Formations

Michael Donnelly
Cornerback Coach
Michigan Tech University (MI)
Twitter: @M_Donnelly21


Introduction

Bunch formations are becoming a popular tool by offenses to muddy the reads for defensive backs in coverage or create a mesh by alignment for man to man coverage. Teams are lining up (or motioning) to stack formations which helps create a free release or rub route for the WR in the back of the stack. Dealing with a trips bunch formation puts an extreme amount of pressure on the DB’s eyes. The secondary must recognize where the bunch is located and what to expect out of the different alignments through film study. Not only will teams use trips bunch formations to pass the ball, but it also can create gap integrity issues in the run game pending distance from the end man on the LOS.   

Tight Bunch Formations

RUN

Slide1

For running purposes, the tight bunch gives the offense the ability to try and gain an edge (block down the point man on DE) or slice/pull #3 to create an extra hat play side.

 This clip is more to show how an offense can use the alignment of the bunch to run a gap scheme play away from the bunch, but still utilizing the bunch.  We are treating this bunch different than the variations I will get into so the way we are playing this is not important.  It is important to recognize if your DE can be affected by the bunch so he must recognize the type of block he has to defeat or be alerted from the backend. 

Read More

Teaching the Back-Shoulder Fade Route

By Danny Freund
Wide Receivers Coach
University of North Dakota (ND)
Twitter: @dfreund7

Introduction

A well thrown back-shoulder fade is a major weapon. We believe in throwing back-shoulder because it is hard to defend when executed, and usually gives the receiver a chance to make a play on the ball or draw a pass interference call. We throw a quick game back-shoulder route against press man in the open field and red zone. We also ask the quarterback to read the defender and throw back shoulder on go routes, wheel routes and fade routes from the slot. 

This isn’t an easy throw or route. We practice it every day in some fashion because the concept depends heavily the tempo of the throw and speed/adjustment/separation of the receiver. These daily reps develop the confidence and timing it requires to execute on game day.

We threw more back shoulder balls last season because our wide receivers had good size and athleticism, but lacked the speed to consistently run past defensive backs in our league.

Types of Back-Shoulder Throws

We break this concept down into two types back-shoulder throws. The first is what I typically think of as a back-shoulder throw; a quick fade ball in the red zone or open field. The second version is where the quarterback and receiver making adjustments on certain deep routes based on the leverage and eyes of the defender.

3-Step Back-Shoulder

This is a ball that is thrown versus tight or press man coverage. There are a lot of factors that go into making this work, but the most important being the placement and tempo of the throw. A perfect ball can potentially make up for a poor release by the receiver and good defense by the defensive back. As a general aiming point for the quarterback, we tell him a foot above and a foot behind the wide receiver’s back shoulder. It is really important this type of throw has some tempo to it. We want the receiver to flip his hips and adjust late to the throw, leaving the defender with little reaction time to make a play on the ball or receiver’s hands.

It is very difficult to complete this throw if the quarterback misses inside. It no longer becomes a “back-shoulder” if the ball is thrown to the front of the receiver! The ball is more likely to be caught if it is at shoulder level or above. If the throw is lower, then it should be a little more behind the receiver to clear the defender’s body.

More often than not, this is a ball thrown into the boundary. It is a higher percentage throw because the ball travels a shorter distance. It is a precise throw and the shorter distance allows for better accuracy. It is also typical to see more press man coverage into the boundary, which is the only coverage we attack with the three step-back shoulder.

Coaching Points:

  1. The wide receiver should work a release and get three to four steps vertically into the defender before looking. If he looks too early or doesn’t get vertical, he can get squeezed into the sideline and allow the defender a better angle to play the route and ball.
  2. The receiver should avoid leaving space between him and the defender. He must stay tight and vertical for as long as they can. He will also hold the line and leave room for the quarterback.
  3. The receiver will use his upper body at the top of the route. Bigger wide receivers usually have longer arms and they can use that length to create separation with a slight push off just before the ball arrives.
  4. The catch, tuck and finish of this route is the most important. Defenders are not looking for interceptions in man coverage. They want to break up the pass. They will play the ball aggressively and attempt to punch or rake it out. The receiver needs to execute a quick catch and tuck, and not leave the ball exposed for the defender. We coach them to catch, tuck and rip it away as we try to flip our hips completely.

Deep Back-Shoulder

Read More

Adapting a 13 Personnel Package for a H.S. Spread Offense

By Steve Monninger
Head Coach
Norfolk Academy (VA)


Introduction

As we prepared for the 2017 football season, we did not consider ourselves a team that would ever use three tight ends in one offensive set. Our overall identity is that we are a spread offense (using 1 or no TE’s) that utilizes RPOs and focuses on having a high completion percentage. 

After a successful preseason camp and beginning the season with a record of 2-0, we soon found out that our tight ends were better than we thought. Therefore, we decided to install a 13 personnel package that included two formations and still utilized our base plays. From Week 3 to Week 10, our 13 personnel package became a very important part of our offense. During that span of the season, we ran our 13 personnel package for about 25% of our snaps each game. Here are the top reasons why we installed it during the season:

  1. We liked our TE’s. We had confidence in the talent and depth of our TE’s in terms of blocking and receiving. We understood that our X’s and Z’s would be on the bench more, but we still felt it was worthwhile. 
  2. We liked our RB’s. We felt that this package could highlight their skills and their toughness.
  3. Broad Blocking Surfaces. 13 Personnel formations present broad blocking surfaces. If defenses do not adjust, uncovered gaps can be created in the tackle box while at the same time, tight ends and wings can out leverage the flank. 
  4. Defenders are taken out of their “comfort zone.” Since we can switch back and forth between spread sets and 13 personnel sets, our opponents would typically keep their base defense on the field. We felt that this was an advantage for us. Corners like to play in space, but we made them play off a nub TE or Wing. Safeties like to play deep, but we made them move into the box and that would set up play action passes.     
  5. Easy Install. We felt like we could use our base plays using the same principles and rules. For the run game, our OL learned nothing new. For the pass game, our patterns follow a 1, 2, 3 concept. Our TE’s and Wings just had to know their placement within the formation in order to determine their route.
  6. Easy Motions. We love to create matchups using motion. Using our standard rules, it was easy to motion our key players for certain plays. Generally, we use motions in this package to change the strength of the formation or to create a sniffer.  
  7. Usable in Several Gameday Situations. Our 13 Personnel package helped us with important gameday situations including short yardage, 4-minute offense and in the coming out zone. This package was also used to help us sustain a longer drives to give our defense a rest or just eat some clock to keep our opponents electric offense off the field. This fall, time of possession became an ally for us because of using this personnel package.

Formations

Here are some diagrams of our formations and motions from 13 personnel. The A is our best slot WR who has the most shake, but you certainly could use your best X. Our Y is the home TE that aligns to the strength of the call. The W is the Wing that aligns to the strength of the call. Our U is either the backside home TE or the extra wing in Hammer (Diagram 2).  

Slide1Slide1

Queen Motions

Slide3Slide3Slide3Slide3Slide3

Read More

Rat Coverage Principles to Defend Third Down

By Mike Giancola
Defensive Line Coach
Bridgewater College (VA)
Twitter: @CoachGiancola


Introduction

The chess match that is played on the field during a game is one that comes down to a few critical moments that will ultimately determine the outcome. Because of the high value nature of these situations, we call them “money situations.” While certain downs are more critical than others, all downs that give us an opportunity to get off the field are categorized as money for us.

As such, the game plan each week has a unique set of fronts and coverages for third down. We put a lot of effort into dissecting an offense in those situations to come up with a plan that will give us the best chance to get off the field. This article will discuss a few different coverage concepts that helped us maximize our third down efficiency over the last two seasons.

3rd Down Coverage

On third downs, the three most successful coverage concepts were utilized were Rat, Thud and Punch coverages. 

Rat Coverage

Rat coverage is a single high man concept we use to take away the outside stem of pass routes, and funnel receivers to our two rat players in the middle of the field. Depending on down and distance, we will have short and middle hole rats, or middle and deep hole rats. The purpose of the rats is to take away shallows, digs, and posts.

Rat coverage also puts stress on offenses as it is designed to create five-man pressure if the back stays into block. The ILBs are responsible for the TB. Whichever LB the TB steps to has him, and the other becomes rat player. That LB that gets the back will insert, keeping the possibility of screen in mind as he goes.

The rat players will always be a linebacker and a safety. The funnel players will be the corners, the other safety and the OLB.

Slide1Slide1

Using Rat Coverage
Rat Coverage can be utilized in any down and distance, and is our primary man coverage concept we like to use on third downs. Tag the coverage with different calls to indicate where the rat players should play (short, medium, deep holes).

Rat Coverage Coaching Points

Corners

  • Left alone on island on outside receivers
  • Inside leverage, pressed or six to seven yards off receiver
  • Late help over the top ONLY IF there is a deep hole player
  • Funnel Players

Man coverage, but help inside from rat players

  • Pre-snap outside leverage, take away outward breaking stems
  • Squeeze near hip of inside stems, eliminate dead space, maintain leverage
  • Routes can be passed off once you see your own color running with it
  • Pedal or shuffle technique

Rat Players

  • Must read run/pass. Needed in run fit no matter formation
  • Look to rob crossers and inside stems
  • Short/Middle hole rats don’t back up
  • Deep hole rat must gain depth in the middle of the field and read eyes of QB

Editor’s Note: Coach Giancola has provided a clip by clip analysis of each of the plays below:

RAT COVERAGE CLIPS

Clip 1: 3rd and 6.  Rat coverage with short and middle hole players. QB quickly looks to #2 on skinny post/dig, sees rat safety color and forced to pull ball down because of good coverage.

Read More

Designing an Empty RPO Package

By Zach Turner
Offensive Coordinator
Kenton High School (OH)
Twitter: @Zach_Turner1


Introduction

At Kenton High School we have had a long history of being an empty team. Our base passing DNA comes from the Mouse Davis Run and Shoot system where the receivers based on the coverage make sight adjustments. We start every year with teaching our kids as much about coverage’s and defensive structures as we do with the ins and outs of our offense. Over the past few years, we have discovered that we are getting far less of the “base” generic man coverages (cover 0, cover 1, or cover 2 man). We are also seeing fewer pure zone coverages like spot drop cover 2, cover 3, or cover 4. We see more pattern matching, bracket coverages, and split field coverage’s.

Since we do not have the time to teach our players the ins and outs of each new coverage, we have learned with an exotic offense often comes exotic defenses and multiple looks. Rarely do we see the same defense 2 weeks in a row. We found that RPOs gave us the answers we needed to these different coverages.

Development of RPOs

In 2016, I thought our QB was getting hit too much. We were not giving him the answers with in our play calling for all the different looks he was given and that was on us as coaches. We put together some empty RPOs that we would hang our hat on and develop throughout the season. They are all one-word calls that involve a pre-snap side. The pre-snap side is always based on a yes or no scenario. Along with the pre-snap side, there is a post snap side which involves a read key to either run or throw the ball.

Advantages of RPO’s in an Empty Set

RPO’s have given us a number of advantages. The first being it has always given us an answer. We started using the RPOs as openers to get us into a rhythm. It gave our quarterback some comfort ability knowing there was a guarantee. We get this guarantee because the defense just cannot match numbers. It also gave us as coaches a chance to see alignments and structures to adjust to what we are seeing. That said, the biggest advantage was it kept us ahead of the chains and detoured the defense from bringing pressure.  

The Difference

In 2016, we had 3997 yards of total offense through 10 games. In 2017, we had 4746 including 3529 through the air and 1217 on the ground. We increased our points per game by more than four points a game, but more importantly, we decreased our quarterback knockdowns and sacks. In 2016, we were knocked down 87 times and sacked 56 through 10 games. In 2017, we were knocked down only 21 times and sacked 9 times. I contribute that to two things. One is our RPO system we developed but the other is we hired a great offensive line coach this off-season. This season RPOs consisted of 20% of our offense. Our completion percentage was 67% when running an RPO and we averaged 8 yards per play. The biggest number to me is when an RPO scheme was called only twice did we have a negative play of minus yardage.

RPO Structure

The structure of our RPOs is very simple. We have a pre-snap side and a post snap side. It is crucial to the success of the RPOs to make sure all players understand what determines the pre-snap side getting the ball, or not getting the ball. For the post snap, we must understand the read key. With the pre-snap and post snap side, we attach one of two of our base run plays.  

When we begin to teach the RPO system, we start with the pre-snap side. The pre-snap side to use is always the screen game side. When looking at the RPOs we wanted a system that could guarantee us we were moving forward and for us the easiest throws are with in our screen game package. We stress 100% completion when throwing the screens so it must be automatic.

Pre-Snap

When looking at the pre-snap side, we tell our players it is a yes or no scenario. Yes we can throw the screen or no we cannot throw the screen. To get to that yes or no answer we have a two step criteria our QBs must go through to determine if it is yes or no. The criteria go as followed:

  1. Number of force defenders (defenders below the hard deck 7 yards) – We played with the depth we considered a force defender. We started at five but we saw that most defenders at six to seven yards still have the ability to put their foot in the ground and play down hill quickly. This makes tough blocks for our guys especially since we are usually smaller on the perimeter (5’7” 145) on average.
  1. Leverage – Leverage is an over used term in football at times because we just tell our players have leverage, use leverage, gain leverage but never tell them what it is or why it is important. For us, we want our blockers to have leverage on the force defenders, if we are going to throw the screen. We use two terms in teaching this. The first is catch point and the second is rendezvous point. They easily work together. To define each, the rendezvous point is the meeting point where our receiver meets their defender to block them. The catch point is where the receiver will catch the football. The bubble screen and our now screen have two different catch points. Now screen is the numbers and the bubble screen is two yards outside the hash.

Post Snap

Read More

Shotgun Buck Sweep PAP

By Cameron Cox
Offensive Coordinator
Refugio High School (TX)
Twitter: @CoachCamCox

Introduction

The play action pass off the shotgun buck sweep is a staple of our offensive scheme at Refugio High School. It’s an effective concept that not only takes advantage of overly aggressive defenses, but it creates mismatches on the edge. The quarterback is able to get out of the pocket, out leverages the defense, and floods a portion of the field for a chance at a big play. It also is a play that has lots of potential options for complimentary plays including a built-in throwback.

The Buck Sweep Running Play

To make any play action work, it starts with the base running plan. This is a look at our shotgun buck sweep play. As you can see, we pair the buck with the reverse motion to get the defense moving and to set up the play action later.

Slide1Slide1

Play Action Pass Off Shotgun Buck Sweep

Offensive Line Play 

One of the many benefits of this play is that the protection looks almost identical to the run blocking scheme we use on the buck sweep play. The more resemblance your play action protection has to the run play from which it is derived, the more effective it will be. This is a six man protection, in which we pull both guards. The action of the guards pulling, coupled with the backfield action, will trigger the linebackers and safeties to come stop the run. When done correctly, he down blocks and pulling guards are almost indistinguishable from the blocking scheme on our buck sweep play.

The play side tackle and center must have great footwork to pull this off. The must step flat enough to not allow early penetration to cut off the pullers while not stepping so flat that they let the defender cross their face or roll out of their block for a free shot to chase down the quarterback. Ideally, the play side guard will pull and log the defensive end that is closing with the down block of the play side tackle. A common reaction by defenses to try and stop the shotgun buck sweep play is to widen their defensive ends so that the sniffer back cannot block them down. If this is the case, the play side guard needs to notice a wide defensive end before the snap and know that he will need to get more depth on his pull with the goal of at least squaring up the defensive end and not allowing him to pressure our quarterback. The back side guard will pull and gradually gain depth. As he gains depth, he will turn inside and pass block. He is responsible for any backer run through or back side edge pressure. The back side tackle will pass set and block the back side defensive end.

Slide3Slide3

Backfield Action

The backfield action is identical to our buck sweep running play. Let’s assume that we are running the play action pass to the right. We will end up with our sniffer back set 1 yard back and directly behind the right tackle. The running back will be set to the left of the quarterback, directly behind the left tackle, with his “heels on QB’s toes”.

Read More