21 Hour Football Program – Case 5: Build Accountability by “Vesting” Players

By Kyle McKenna
Head Football Coach
Brooklyn Technical High School, Brooklyn, NY
Twitter: @CoachMcKenna


Introduction

In 2012, in an effort to create a measurable way to track accountability, Brooklyn Tech Football began the Vesting Program. It was very important to us to increase football intelligence and emotional intelligence during the upcoming offseason because we thought we had lacked both in the previous post-season. We wanted to know, with certainty, who we could count on to be an “all-in” player, especially when things were tough. We knew our team would be one of our most talented in years and wanted to prepare them for both the adversity and the success of the next season. 

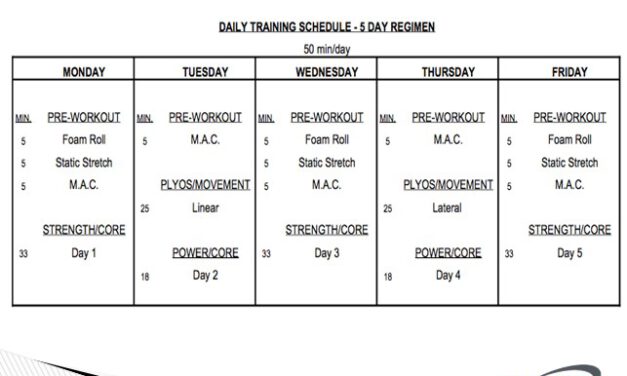
The time period we had to implement the program was six months during the off-season, ranging from January through June. We wanted to have one or more milestones along the way, to re-evaluate and measure the success of the program. This would also serve to break up the monotony of the off-season by giving players incentives to put in maximum effort and improve. Our team lifts on Monday, Wednesday and Friday in the afternoon and has twenty days for spring football practice (non-contact) in May. We are also a very rigorous academic school, so time must be allotted for tutoring. 

The original program we created was influenced by similar programs at Temple University under Head Coach Al Golden and Wagner College under Walt Hamline. In 2011, Coach Golden had been sharing his Temple TUFF program in off-season clinics. Coach Golden’s program held the individual accountable and made sure the group working towards climbing the levels of commitment. Coach Hamline’s system divided the program into teams that competed against each other in the off-season and were graded on every drill in their winter workouts. We looked to combine these two approaches into what would become our Vesting Program and subsequent off-season competition. 

In our program, players that were “vested” would receive patches to be displayed on their jerseys. The idea came from my pension as a teacher and the concept that you had to work for ten years in order to be vested in the system. The idea for the patches came from the tv show Sons of Anarchy; to be a member of their crew, you had to be a prospect and earn your cut. Only then were you “patched” in.

vested

Application

We believe that what gets measured, gets managed, so we set out to construct a quantifiable way to measure whether a student-athlete could be trusted to come to work and give maximum effort each day. We decided to use hours as our main unit of measurement and set a minimum requirement for being on the team. We also wanted to have components that measured academic progress and service. Within the program, we also wanted to have leadership training, fundraising, investment in program administration and participation in the Parent’s club. What we came up with focused on the individual by requiring that each player complete 60 hours in the weight room by April 1st. In addition, each player had to complete four hours of community service, two hours of program service, and 12 hours of film study on Hudl. Also, the players needed to arrive on time to school, maintain academic accountability and disciplinary accountability. On March 31, they would apply for Vesting with proof of all requirements. At that time, our leadership council would review all applications and refer them for vesting, vesting probation, or removal from the team.

Read More

21 Hour Football Program – Case 6: 3-Step Plan to Develop an “Uncommon” Program Identity

By Luke Mertens
Head Coach
Lake Zurich High School (IL)

Editor’s Note: This is one of our most popular reports. At the time of writing this report, Coach Mertens was head coach at Lakes Community High School (IL), a position he held since 2005. This 3-step plan helped Mertens build Lakes into a highly competitive program going 72-50 and qualify for the post-season each of the last eight years. In the spring of 2017, Coach Mertens was asked to lead the Lake Zurich High School (IL) program after a hazing incident the previous year. Again, he’s using his 3-step plan to build a special kind of program. In his first season at Lake Zurich, the Bears went 13-1 and were ranked #7 in the state. 

Introduction: 

Being the first and only head football coach in the short history of Lakes Community High School has proven to be one of the most unique experiences in my career. It was my first experience working in a public, co-ed school, and although I thought I had all the answers as a first-time head coach, I was quick to learn that I was not as ready as I had originally thought. For the first couple of years, I did all of the things “good” programs do: year-long lifting program, an extensive summer camp, strict discipline, holding players to high standards – all that I had learned from being a product of Chicago Catholic schools. We had some success with this blueprint, but not enough to satisfy my competitive spirit. I knew something was missing, so I started to really evaluate my program, and I concluded that two vital components were missing: tradition and spirituality. My next challenge became ‘How do I incorporate tradition and spirituality into a new public school?’ 

My first action step was to create an identity for the program that would encapsulate the tradition and spirituality I felt were missing, and Tony Dungy’s book, Uncommon, held the answer. Since adopting that simple word, “Uncommon”, we have qualified for the state playoffs 7 straight years, won 5 consecutive conference championships, and haven’t lost a conference game since 2011. More importantly, we have created a program that teaches our players lessons that they carry with them for years to come. Below are three examples of what we do to make our program “Uncommon.” 

1. Don’t Make It About Football 

I knew that if my players were to believe in “Uncommon” we would need to create something that was not ordinary – something that would not be found in other programs. Consequently, I authored a book that teaches our players not about football, but rather how and why being uncommon will help them to be successful in life. 

The book I created is broken up into chapters, such as Attitude and Effort, Confidence, Discipline, Excellent Character, Failure, I in Win, Leadership, No Excuses-No Explanations, Passion, Preparation, Pressure, Together, and Vision. In addition to my own thoughts, each chapter has quotes, anecdotes, interactive questions, and even poetry. Starting in the off-season and continuing through the end of the season, we are teaching our players what it means to be “Uncommon”. 

In the off-season, we typically cover one lesson per month. During summer camp, we will move to bi-weekly lessons, and once the season begins, we meet with our players twice per week. How each lesson is presented varies too greatly to adequately cover, so I will only describe what we typically do in-season; however, what we do works for us. Each year I survey my seniors, and they always talk about the impact of the lessons. It is what they remember most, which is a very telling sign. Their comments never focus on wins/losses, play calling, etc. but always on how we are teaching them to be uncommon. 

By the time the season starts, our players have a solid understanding of what being uncommon means, so I then have them take ownership of the weekly lessons. They are assigned to groups, an assistant coach volunteers to be the moderator, and that group presents a chapter of their choice on game day. Earlier in the week, I will have introduced the weekly theme, but other than that, I purposely do not give any instructions or parameters for their presentations. I want them to sculpt it to their vision, and they usually exceed my expectations. Their presentations have included movie clips, musical lyrics, PowerPoints, and even very personal background stories related to their topic. I LOVE Friday nights, not due to the game, but rather to see what the groups have prepared. 

Following their presentations, we break into small, coach-led groups to further discuss. I give my assistants complete autonomy on how to run their small groups. Some coaches will have players share their answers to the discussion questions in the book, while others just let the conversation go wherever it leads. Either way, both the coaches and players enjoy this time together. It really unites and allows us to truly understand each other. After the small group discussions, we meet as a whole team to view highlights from the previous game. Although the creation of the weekly highlights is an onerous task, it is well worth the time. Each video contains cutups, pictures, heart-pounding music, along with embedded messages highlighting the week’s topic. Players really enjoy watching themselves performing at high levels from previous games, and the entire organization exits the meeting feeling confident and ready for the next opponent. 

Read More

Defending RPOs with Split Coverage Out of the 3-4

By Isaac Sturgis
Defensive Coordinator and Linebacker Coach
Guerin Catholic High School (IN)
Twitter: @IsaacSturgis

Introduction

We play in a very competitive conference with four teams playing for state championships in the past three years (Roncalli High School, Brebeuf Jesuit High School, Lafayette Central Catholic High School, and Indianapolis Chatard). All of these teams use RPOs as a significant part of their offense so we have been forced to come up with answers to compete with these powerhouse programs.

This report is going to explain how we combat RPOs from our slant angle 3-4 using split coverages. I will primarily outline the concept that we use to defend 2×2 formations especially if the back is in the pistol. Later, I will get into a few different concepts to defend 3×1 RPOs that I will briefly touch upon.

Game Planning for RPOs

Before I get into our concepts, I think it is important to understand how we scout these types of teams. The very first thing I do is run the following reports on HUDL. Note that some of these reports are custom, while others are the HUDL templates.

  1. Down and distance
  2. Field zone
  3. Formation
  4. Motion
  5. Offensive play (top plays)
  6. Offensive play by backfield
  7. Offensive play by down and distance
  8. Offensive play by down and distance and personnel
  9. Offensive play by offensive formation
  10. Offensive play by option choice (3 step, 5 step, play action pass, screen, draw, sprint out, play action rollout, give, keep, pitch)
  11. Passing Zone
  12. Summary

With these reports in hand, I then look for the following things in the data (in no particular order):

  1. Are they spreading teams out to run or are they spreading teams out to pass? If the answer is run, then we will play more cover 3 or some variation of it. If they are spreading us out to pass, then we will play more cover 2 or some form of it.
  2. Is their QB a running threat or a passing threat? I like to have two defenders (an inside player and an outside player) for every option in the run game. My inside player on the dive is the chase OLB and my outside player on the dive is the back side LB. My inside player on the QB is the play side ILB and the outside player of the QB is the OLB.
  3. Who is their RPO Guy? Do they target one receiver more in the RPO game then others? Most of the time, it’s the slot or the flanker to the side of the back. Once it is determined, I look to see how I can get him doubled if possible. This could be by using an over the top safety in Cover 2 or an underneath LB and an over the top corner in Cover 3.
  4. Who do I have to stop? The RB, the QB, or the receiver? With that information in hand, the Front/Veer/Coverage are dictated on that answer.
  5. Run Game or Play Action? We like to determine whether their inside/outside run game or their play action pass off of those scheme is most dangerous.
  6. What formations do they use most to run their RPOs? 2×1, 2×2, or 3×1? Against 2×2 looks, I really like split coverage. Against 3×1, I like Cover 2 or 3 cloud. Against 2×1, I like both Cover 2, Cover 3, and or Cloud.
  7. In their 3×1 formations, are they trying to attack the high hole or the deep middle? If so we need to be in more Cover 3 cloud. If not, then play more Cover 2.
  8. In their 3×1 formations is their single WR a stud? If so, we will run less 3 Cloud and more Cover 2.
  9. Is their back offset? If so are we going to veer to the back or away from the back? The answer depends on a lot of variables. Can both of your OLB’s get the job done against the run and the pass? Who do you want defending the WR who is being targeted in the RPO passing game a safety or OLB? If the back is in pistol, you really have to look at field tendencies.
  10. What part of the field are they attacking with their RPOs? If it is the flats or the vertical seams, then Cloud and Cover 2 are good against both. You close the flats with your corner and your OLB and ILB can hang on the seam and you still have over the top help with the safety. 
  11. What other passing concepts do they run out of 2×2 and 3×1 that can hurt your coverage? We chart those concepts and rep them all week in practice. This also helps determine which side is the Cover 2 and which side is the Cover 3 if using split coverage against 2×2.
  12. What do I do if they motion? Our answer is to keep the front the same meaning we never change the veer and which OLB is coming. We only change our coverage and most of the time we just check Cover 3 (3 deep 4 under).
  13. What answers do we have if they start hurting us with the RPO’s or start hurting us in our split coverage? Our answer is to zone blitz with 2 deep 4 under or 3 deep 3 under coverage. We might also sprinkle in some of our 2-ma

Read More

A Seasonal Plan for Off-Season Training

By Noel Piepgrass, MA, CSCS, CiSSN
Assistant Coach
Exeter High School (CA)
Twitter: @noelpiepgrass, @OmniStrong


Introduction

As sad as it can be to have your hopes of a championship season end in disappointment, the start of the off-season brings with it a new-found optimism for the season to come. If you’re anything like me you spend December and January evaluating where you are weak and what you need to do to improve for next year. You set up your spring clinic schedule, your off-season team calendar, and you start to think about what to do with your off-season strength and conditioning regimen. 

It is that last component, the strength and conditioning regimen, that I have been commissioned to write about in this article. The particular area that I want to focus on is how to create a comprehensive plan for your off-season training.  After a decade of work as a high school strength coach, teacher, and on-field coach, I have learned a thing or two and I’m excited to see if I can offer any help. 

Mapping Out the Calendar

The first task of creating a comprehensive strength and conditioning regimen is mapping out the different phases of the year. It’s a little different for everybody but here’s how I do it. 

Winter

Essentially, this is the time from the end of our last game up to Christmas break. Depending on how deep you’ve gone in the playoffs, this can be anywhere from 2-6 weeks. During this time, I have always focused on testing, recovery, and informal training. 

Testing 1 Rep Maxes (1RM’s) in the Hang Power Clean, Squat, Bench, and Deadlift is important to see how strength has developed or diminished during the in-season period. However, we have also always assessed performance skills like Vertical Jump, 5-10-5 Shuttle, and either the 10 or 40 yard dash depending on weather and our ability to get outside. Not only are these great for getting a beginning of the off-season baseline, but they are competitive, and tend to build camaraderie as your student-athletes compete against and cheer for one another. 

Once you’ve got testing completed, if there is still time before Christmas break, you can begin some sort of informal training. I’ve used timed body weight circuits, boot camp style training in the stadium, and games like ultimate frisbee, soccer, and touch football during this block of time. My goal is to keep their bodies from completely detraining but also have some fun and do some things that we won’t ever do again. 

Finally, in the winter, you’ve got to give their bodies a chance to recover from the stresses and strains of a long season. Also, I think kids need a mental break from the stress of practicing and performing at a high level. We ask a lot of our kids from May to November and I feel like a little down time during December can go a long way. One of the ways this has always been expressed in my program is by not opening the weight room over Christmas break. I just think it’s important that coaches and players take breaks when they’re allotted and since we’re out of school and it’s supposed to be a time for family and celebration, it’s a perfect time to give the kids some time off. 

Read More

3×1 Counter Trey/Glance RPO

By Nick Coleman
Offensive Coordinator
Itawamba Community College (MS)
Twitter: @QB_CoachColeman

Introduction:

coleman
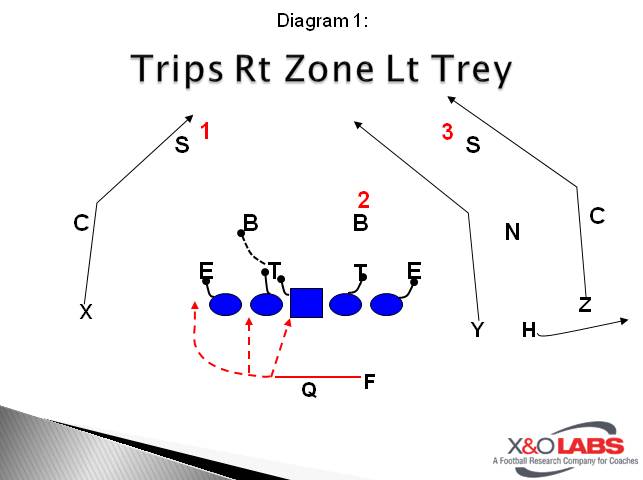
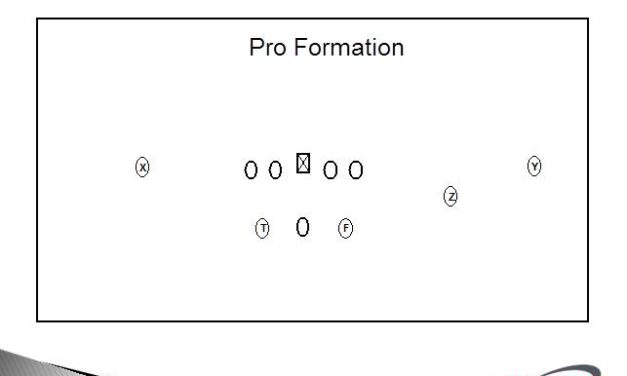
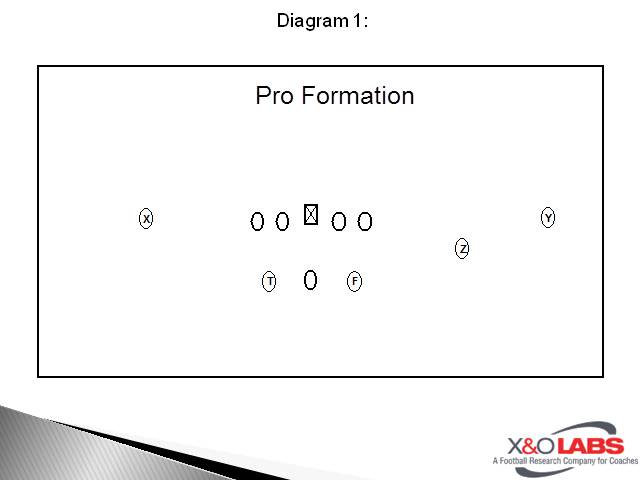
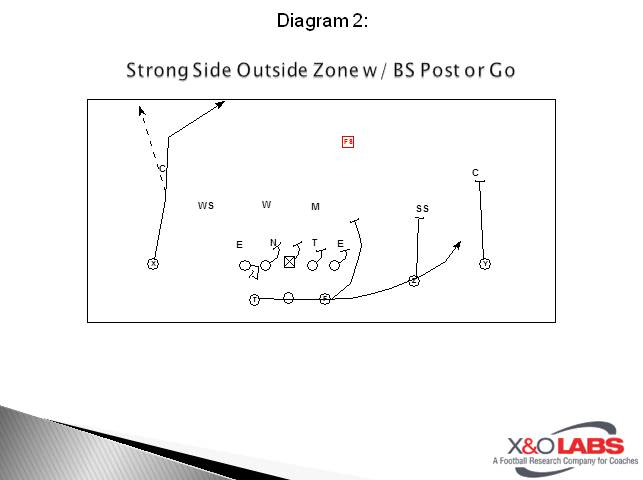
Most RPO concepts involve quick game tags off of the run game. While these can be very effective concepts, we also wanted ways to stretch the field with RPOs as well. The offensive philosophy behind our Trey concept is to make the defense cover the field vertically. This not only gives us a chance at larger chunk plays, but it also serves to control the safeties that are looking to stick their nose into the run game.
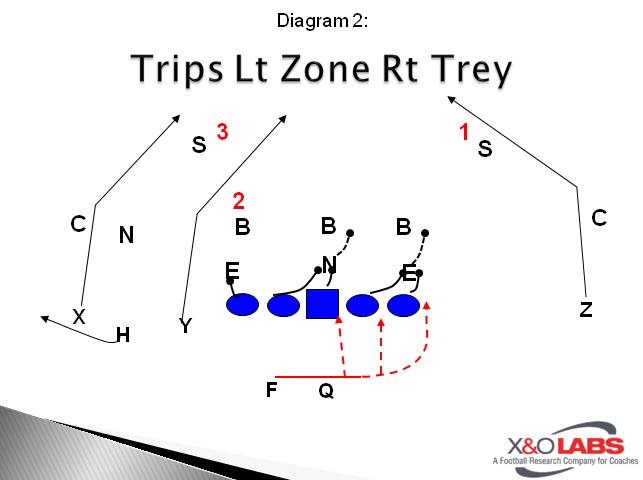
Base Concept:

This concept is based out of 3×1 and allows the QB to have five options on any given play. We can run the play both towards and away from trips in this formation. The routes are as follows:

  • The #1 receivers on both sides are running 5 step glance routes on the outside.
  • The #2 receiver in trips runs a bubble route.
  • The #3 receiver in trips is also running a 5 step glance concept in the middle of the field.

While we predominately ran this piece away from the trips this season, there certainly are opportunities to be had running it trips and out of other formations.

We like to pair this concept with our inside zone, power, and outside zone with an RPO action. To modify the play for the RPO, we will use our back side tackle as a “lock player” instead of the full zone concept. This gives our QB more protection to make this throw.

Slide1Slide1

Read More

Lateral Stretch & Swing RPO Concepts

By Jordan Neal
Offensive Coordinator/QB Coach
Hendrix College (AR)
Twitter: @CoachJordanNeal


Introduction:

Lateral space is the name of the game these days and we here at Hendrix have made it a huge focus as we have built this program to a playoff contender. Our RB stretch and the RB swing pass with a read-option while blocking power and GT counter have been staples of our horizontal attack. Here are some advantages of pairing the RB Stretch/Swing Pass with either Power/GT Counter run-action:

  1. Versatile concepts that can be run from multiple personnel groupings and formations. Can also implement fly-sweep motion.
  2. Simple to teach, simple to call, simple to execute, high percentage play, and can be run in a wide variation of downs/distances.
  3. Can build an entire offense around it, and is favorable for teams with inferior athletes/linemen—explosive for teams with superior athletes.
  4. Forces the defense to account for the entire width of the field.
  5. Easy to play-action pass or screen off of it.

Procedure & General Points:

Offensive Line – The first thing you must do as a coach when running these plays is identify what you can block up front most effectively. Our players at Hendrix are proficient with down-block schemes, so we tend to use more Power/Counter with the lateral backfield action more so than inside zone. The overall concept of the play creates false reads and misdirection for LB’s, as well as favorable angles for our offensive line to execute their blocks.

Running Back – Secondly, we get our fastest guy at RB. He either runs stretch or swing based on which side of the QB he is lined up. The RB does not concern himself with what run play has been called. Just go lateral!

Quarterback – Third, we teach the QB to identify his read key and make that player wrong. The QB only has to know what run play is called insomuch as when he does keep the ball, he knows what aiming point he is looking for (in many cases simply find the puller).

Receivers / Tight End – Fourth, we teach our WR’s and TE to ID the most dangerous players in the perimeter space and block them. WR’s and TE are not concerned with what run play is called. Simply get on your block and stay on your block.

Power w/ RB Swing and Stretch

The QB will always read the end man on the line of scrimmage. In this case, versus an even front, the QB reads the DE. If the DE cannot make the play on the RB, the QB swings it out. If the DE goes lateral right now to take the back, the QB keeps it on the power. The receivers identify the most dangerous threat and block leverage. The TE arc releases and works to circle the scraping play-side LB.

Slide1

Here it is from 10 personnel. In this case the #3 receiver must determine if the scraping LB or the play-side safety is the most dangerous threat. Typically, the LB is in better position to pursue the swing. Therefore the #3 slot usually ends up with this man in his lap.

Slide1

If we see blitz from an edge player, such as the nickel, the QB must treat him as the end man on the line of scrimmage and read him. If the nickel can reach the RB, then the QB keeps on the run play the same as he would normally, and now the play-side offensive tackle must account for the DE as the new B-Gap player. Sometimes we will see teams line up in a “Bear” front (50 front). The QB simply sticks to his plan of finding the end man on the line of scrimmage and reads him. The offensive line simply makes a “Down! Down!” call and all front-side linemen block down to their inside gap.

Slide3

To study game cutups on this concept, click on the video below:

Read More

Man Free Concepts to Defend RPOs

By Grant Caserta
Defensive Coordinator, Defensive Backs Coach
Husson University (ME)
Twitter: @gcaserta1

Introduction:

You can always spot a defender in conflict. He is the one sprinting in from the outside to fill his gap on an inside zone play. Only, it’s not a run – the QB pulls it and throws to the perimeter. This defender is now turning and sprinting back to the outside, while his pass responsibility is gaining an easy first down. Run-pass options have been effective in recent years by exploiting defenders that are “in conflict”, or asked to do two jobs. A linebacker that is responsible for both an interior run gap and also an outside passing zone is “in conflict”. He cannot fill his gap and also simultaneously fulfill his pass responsibility. It is one or the other. In the past, defenses could get away with teaching defenders to have a run gap and also a pass zone, because a run was a run, and a pass was a pass. As long as the defender made the proper run-pass read off his initial key, he would get to where he needed to go. However, the RPO has exposed the flaw in having defenders tied into both the run game and the pass game.

Slide1

Recently, offenses have taken advantage of defenders in conflict by optioning them. This causes that defender to be wrong no matter what he does. If he stays back for the pass, his run gap is open. If he fills his run gap, his pass zone is vacated. At Husson, we have eliminated conflict in our defenders. Each position on our defense is either a “run first player” or “pass first player”. The four defensive linemen and the two inside linebackers are always run first players. The two corners are always pass first players. The three safeties will be either a run first player or pass first player, depending on the formation.

Slide1

Slide3

By identifying who is responsible for run and who is responsible for pass, we prevent anybody from being in conflict. We will always have all run gaps covered and we will always have all receivers covered down. This system allows our players to aggressively play their responsibility with no conflict. Run defenders can focus on eliminating the run, while pass defenders can focus on stopping the pass. This concept is certainly nothing new or revolutionary that I’ve come up with. Everything I know and teach, I stole from someone else. However, I hope to be able to share some of these things I’ve learned and that you can find them useful as well.  

1 High Coverage Alignments

At Husson, we are geared toward stopping the run. We will deploy six in the box, at a minimum, nearly all the time. With our remaining five defenders, we will go 1 for 1 on any receiving threats (receivers or tight ends). In a 2×2 set, we will have our Free Safety working the middle of the field (MOF). In a 3×1 set, we will have our Free Safety over #3 and our weakside safety, or Whip, working the middle of the field (MOF). This alignment allows us to give a Cover 1 (man free) look at all times. The advantage to a one high safety look is having everyone “covered down” at all times. This is especially useful against RPOs.

Although we have changed alignments in the past, we now align our slot defender (on #2) in outside leverage at five yards depth, keying #2. I believe that if a DB is to be pass first, he should have his eyes there to begin with. Since we have at least six defenders dedicated to the run inside, we do not need the slot defender to have his eyes on the EMOL for a run/pass read. Pass first defenders are late to the run game. We align in outside leverage because we want to force vertical routes inside to our MOF defender.

Our corners will almost always be in press alignment with inside leverage. Press is particularly helpful against RPOs because quick or short passes to #1 are much harder to complete. We align with inside leverage because we want to force vertical routes to the sideline.

Most Commonly Defended RPOs

Although there are many different types, the RPOs that we see the most are what we call “zone read triple”. The interior mechanics of the play involve zone blocking, with the backside end being unblocked (and read by the QB). The outside part of the play usually involves a vertical release by #2 (pop pass, hook, etc) or a bubble by #2 (which could be accompanied by #1 blocking or running a slant). For this article, we will focus on this type of RPO.

Read More

How Mount Union, NDSU and Temple Talk Tackling

By Mike Kuchar
Senior Research Manager
X&O Labs
Twitter: @MikekKuchar

Editor’s Note: The following research was conducted as part of XandOLabs.com special report on “Designing Tackling Systems.”


Introduction

Football is a game of short bursts and shorter words, so in this case we wanted to provide coaches with the specific verbiage our contributors are using to teach tackling. While some of these words may be familiar, there are different ways to say the same thing to your players and a coach never knows which words will stick. We asked our coaches the following question:

Which common buzzwords do you use to teach tackling with your players?

Mount Union University Buzzword Catalog (Chris Kappas, Defensive Coordinator)

“Full Speed as Long as Possible: “We talk about going full speed as long as you can to close out the space (between you and the ball carrier). You can’t give defenders a landmark because it’s a feel thing. It’s not three yards, etc. The goal is to get that near foot shimmy to step on that ball carrier’s toes. You have to break down close enough where he can make moves but you need to be far enough where he can’t run straight through you if you miss the arm tackle.”

Lindenwood University Buzzword Catalog (Jamie Marshall, Defensive Line Coach)- Rugby Style Emphasis

“Tracking the Near Thigh”: “We talk about tracking the near thigh (instead of the near hip) because as you track the ball carrier the near thigh always tells you where the receiver or the ball carrier is going. Your eyes can get lost if it’s up on the hip because that can lead to the belly button. We went to the near thigh. Wherever your eyes are looking your body is going to take you. We talk eyes to the thigh, wrap and squeeze. You can’t look at the hip if you’re asked to contact the thigh.”

“Shoulders Through Thighs”: This pertains to the finish component of the roll tackle where a defender’s shoulders makes contact with the ball carriers thighs.

“Run or Roll”: This pertains to the decision that the defender makes post contact on whether or not to run through the tackle or roll through the tackle.

North Dakota State University Buzzword Catalog (Matt Entz, Defensive Coordinator)

“Hit Up Position”: “We don’t use the phrase coming to balance because I think it brings out some different thought processes for kids. If I just said ‘be careful to keep your balance,’ the general player will widen his feet and drop his center of gravity where his footwork is outside of his frame. Now if that ball carrier changes direction I’m going to have to step underneath myself to recover. What we talk a lot about is getting to a hit up position where my feet are under my armpits.”

“Near Foot, Near Foot”: “We are always attacking the near number or near pec of the ball carrier. We want to make sure we maintain the stagger position on the swoop (inside out) tackle.”

“Finish”: “We want our defenders to have eyes on the ball carrier’s throat with his hands in the holsters and grabbing cloth.”

“Head to Near Pec or Near Number or Near Armpit”: “We never teach having the head across. We tackle with our chest.”

“Keeping the Cup”: “We will have a pursuit player, force player and fill player in the cup always. For example, if we are playing a coverage such as Tampa two with the Mike and the back runs the check down because the Mike is dropping. The Will or Sam work a compression tackle with the Mike linebacker filling the cup. We should have three on one in our tackling situations. They have to understand where my leverage is and where my help can be coming from. They have to know if they are leverage players are spill players.” 

“Suck the Air Out”: Used in open field tackle situations where the defender must close ground (suck air) on the ball carrier.”

“Jump off the Diving Board”: Used as a metaphor when defenders lunch at ball carriers without moving their feet.

Temple University Buzzword Catalog (Linebackers coach Mike Siravo)

“Grab Skin”: Rather then teaching to grab cloth, Coach Siravo teaches his players to grab the skin of the ball carrier to emphasize the clamp in tackling.

“Yell at Your Feet”: This emphasizes the quick feet movement needed after contact on a tackle.


Read More

Zone Coverage Variations From a Three-High Alignment

By Joey Didier
Co-Defensive Coordinator
University of Saint Francis (IN)
Twitter: @coachjoeydidier

Introduction:

CaptureWith the advancement of modern offenses and spread passing attacks, it becomes extremely important for a defense to give a QB and offensive coordinator multiple looks from the same alignment. With “check-with-me” cadences and audible systems, defenses need to be flexible and not be tied into a single coverage given a specific formation, down/distance, personnel group or vertical field position. In addition, with varying tempos and huddle systems an offense may employ, a defense must be prepared to be able to play consecutive downs within its sub-packages. For example, it is not guaranteed that a defensive coordinator can get his third and long Nickel sub-package off the field to play first and ten if the offense converts.

To show variations sounds simple at first. There are countless coverages, pressure schemes, and check systems a coach can call to attack with different looks. The tough task, however, is in creating a teachable system in which your players can effectively execute the techniques required to carry out these contrasting techniques. In a previous article, our defensive staff presented our Nickel cover 2 concept. This sub-package specifically designed to negate a vertical passing attack that has been extremely successful for us to utilize on longer conversion downs. This clinic report will show how our simplistic coverage variation to such a personnel group has taken that concept to the next level.

Cover 2 Recap

To get into our nickel sub-package, we insert our next best safety in for an inside linebacker. We try to keep a three high alignment at all times, as illustrated in Diagram 1 (shown against a 10 personnel 2×2 set).

Slide1

Our base coverage in this sub package is our Tampa 2. Diagram 2 below shows our Tampa 2 coverage rules which are as follows:

  • Corners: Soft Flat read on #2
  • Safeties: Deep ½ Read on #2
  • OLB: Hook-Curl Drop
  • Mike: Low Hole Drop
  • Nickel: Carry #3 or Deep hole

Slide2

Read More

Empty QB Trap RPOs

By Jeff Smith
Offensive Coordinator
Warrenton High School (MO)
Twitter: @C0ACHSM1TH


Introduction:

RPOs have evolved into a movement in today’s game. With the many types of RPOs out there, the type that intrigued me the most was what Baylor was doing. They were reading 2nd and 3rd level defenders and throwing the ball down field, as opposed to throwing screens. When I sat down to study them, I was impressed with the execution of their scheme. The byproduct of that was obviously huge offensive numbers. Like most other offensive coordinators in the nation, I tried mimicking similar concepts with my offense. When doing this I ran into 3 problems that a lot of high school coaches might also run into:

  1. My wide receivers weren’t fast enough to stretch the field vertically in the amount of time necessary to make the appropriate read of the 3rd
  2. If my quarterback did get a pull read and threw, he couldn’t always put it on a rope 15-20 yards down the field like most D1 quarterbacks.
  3. I had the realization that my quarterback was also my best runner, so why am I not making him a running threat in this scheme.

These problems created a quick shift in my mindset from traditional RPO concepts with 10 or 20 personnel and my quarterback reading 2nd and 3rd level defenders. Instead, I moved to Empty RPOs where my quarterback is the run option and is reading the 2nd level exclusively. In this article, I will go deeper into how I use modified empty formations, an outside trap scheme, and quick game with options to create major headaches for defenses.

Formations

As I said before, I wanted to run RPO’s from empty formations.  The problem with a traditional empty formation is that you are locked into a 5 man blocking scheme.  This led to me coming up with the following formations:

Slide1Slide1

With the insertion of the H back as a wing, these empty formations present five vertical threats while allowing me to have a 6-man blocking scheme. These are only two examples of formations that fit this mold.

Blocking Scheme

The blocking scheme that I have had the most success with is an outside trap scheme. With the insertion of the H, it can become a counter scheme. This is perfect for RPOs because it gives you an extra hat at the point of attack and you aren’t setting the weak side end free like a traditional counter scheme. The rules for our outside trap are as follows:

Read More

22/11 Personnel Wide Zone Run Concept

By Shawn Byrnes
Offensive Line
Scottsdale Christian Academy (AZ)


Introduction

Our wide zone play out of our base 11 personnel package is designed to attack the perimeter to the TE or to the ghost TE. Our running back will take his wide zone track and read first down lineman outside/in to the #2 down lineman to the play side. We teach him to react to flow of the defense, be decisive, and get the ball downhill. Our blocking surface (offensive Line/TEs/FBs) will execute wide zone principles and rules.

Assignments for 11 Personnel

Slide21Slide21

There are many coaching points when it comes to running this play. This is our top rushing play and we practice it as such. We firmly believe that if it is not your featured play it will not be that effective. This play takes tons of time teaching and repping for the offensive line, TEs and RBs. The key to success is for your players getting a feel for all the different type of scenarios they will encounter (i.e.  soft- read defenders, penetrating defenders, LBs playing over the top or underneath, Stunts, Blitzes, etc.) and to have all the tools and calls to handle them.

Offensive Line Coaching Points:

  • Make sure calls are correct and the right “Mike” is spotted.
  • The footwork will change depending on the defender’s alignment. Aiming spots is will determine the footwork.
  • Lock the back hand when you are on the back side running the defender. Landmark is TEs original alignment.
  • If he is in a solo scenario on the front side, he will “club” or “back hand” technique that helps us with inside penetration when we have no inside help. We aim our inside arm for the defenders inside armpit while we are still aiming our helmet for the outside shoulder pad and trying to stretch the defender.
  • Cut the backside as much as possible. It gets the DL/LBs to play hesitant. Our mantra is “
    If you can’t block them then chop them!”
  • If you stay up on the LBs to the front side, the block on them does not need to be devastating. Fit them up on outside shoulder with a locked back hand to prevent the fight off inside if the back cuts behind your block. He will then lock on, and when he feels them fighting off, he must run his feet and make it hard for them to shed the block and make the tackle.
  • Chop hands on grabbing defenders on the backside.

Tight End Coaching Points:

  • Our TE alignment has his helmet breaking the belt line of the tackle. We keep him off the line of scrimmage because of the amount of motioning and shifts we do with him. We try to scheme with him to attack the defense on how they align and adjust to his movement. If they will flop the defensive ends, we will play games and just motion him over, and right back. If they don’t adjust and put a smaller “rush” defensive end on the open tackle, we like to motion him over to that side and take advantage of that match up.
  • This also gives us the ability to go from an attached TE 3×1 set to a 2×2 and vice versa very quickly.
  • Lastly, we like to slip our TE out the back side on our “naked-slide” play. This is one of our play action schemes off of the wide zone. Keeping him off the ball allows him to get out behind the offensive line into the flat. 

Running Back Coaching Points:

  • He must trust is read and be decisive. No double cutting.
  • Feel the flow and react.
  • Press the line of scrimmage and get the ball downhill.

Quarterback Coaching Points:

Read More

Trap Coverage to Defend RPOs

By Pete DeWeese
Defensive Coordinator/LB Coach          
Milton High School (GA)
Twitter: @petedeweese


Introduction

Every coverage has a weakness. Offensive coaches know and understand what those weaknesses are and how to exploit them. As offenses continue to reinvent the wheel and add RPOs to their playbook, it seems like most good defenses are scaling back. Utilizing sound coverage principles and simple, time-tested, coverage checks are still a great way to defend most any offense.

Quarters coverage is easily one of the more popular coverages at all levels of football, but good OC’s know how to attack quarters teams. The simple trap check is a great addition for any quarters team. Trap allows a cornerback to “trigger” on a route to the flats while protecting any vertical by the #1 WR with leverage and help from the safety. Trap allows us to maintain our Cover 4 principles that we like versus drop-back-pass concepts while easily adjusting to quick game concepts that offenses like in most down and distance situations. 

Defend the Flats

One of the biggest flaws of Cover 4 is the ability to defend the flats. Most defensive coordinators are going to place an emphasis on stopping the run. While Cover 4 does add safeties to the box to assist with the run game, the defense is giving up the flats if they keep their LB’s or APEX players attached to the box to defend the run.

Slide1

Widening the LB’s/APEX defender gives the offense a potential numbers advantage in the box and makes the defense more susceptible to the run game. With so many teams using some form of RPO, defenses are often having to pick their poison and remain vulnerable in one phase or the other. Using a Trap check in your quarter’s coverage principle will help your defense handle quick game concepts while remaining strong against the run.

What Is Trap?

Our Trap check is an easy way of marrying your Cover 4 with Cover 2 principles while protecting your outside linebackers and run-game integrity. Trap is safe against four verticals and safe against 2×2 quick game staples like fade/out, smash, or all hitch. 

Teaching Trap

The basics of the Trap check are easy to install and implement. I like to start by teaching the concept and then training them on when to utilize the check. The concept starts with an understanding that we want to maintain inside leverage and “zone eyes” in the coverage. 

Coaching the Corner

In Trap, our corner will take his normal Cover 4 alignment which is 7 yards from WR and 1 yard inside). 

Slide1

Once we have made the Trap check, his alignment does not change. What does change is his eyes.  The corner will key the #2 receiver. We teach “three shuffles & go” to our cornerbacks for their read steps in Cover 4. Those steps do not change with the Trap check. What we ask is that the corner read the #2 to activate his “go” based on their route. If the #2 WR works either vertical or inside, the CB will snap his eyes to #1 and work to maintain his inside leverage.

Slide3

If the WR works outside in his route, then the corner will “trigger” and jump the outside route by the #2 WR.

Slide3

The hardest thing for our cornerback to read is a hitch route by both WRs. He has to understand that he can’t see a hitch by #2 and immediately drive #1 because he expects a hitch on the outside too. As a coach, I must remind him that we will give up that hitch if it means protecting against a double move. If we can drive the ball when it is thrown and tackle him where he is standing when he catches the ball, then we are doing a good job.

Coaching the Safety

In our traditional Cover 4, we ask our Safeties to align 9×2 (9 yards deep X 2 yards inside) from any #2 receiver that is removed from the formation. In Cover 4, he is reading the nearest uncovered lineman for his run/pass key and then getting his eyes to #2 for his coverage drop. Any time that we make a Trap check, we want the safety to show the same alignment then gain depth before the snap. Ideally, we would prefer that the safety get to 12 yards deep in a Trap check. For his read, the safety will simply follow #2 with his eyes and body.  If the #2 WR works vertical then the safety will match his vertical stem while maintaining his inside leverage.

Slide5

Read More

6 Determinates for Maximizing Post-Season Self-Scout Protocols

By Justin Iske
Offensive Line Coach / Co-Offensive Coordinator
SW Oklahoma State University
Twitter: @justiniske


Editor’s Note: Coach Justin Iske is considered one of the top offensive line coaches in the country. He is also one of the most read authors in X&O Labs history. Coach Iske has published a brand-new book through X&O Labs called, The Iske Offensive Line Manual. The book is available here.


Introduction

Scouting our own offense is an invaluable resource. It is a great way to determine what our best offensive plays are and what formations those plays are best out of. Self-scouting can also show an offensive coordinator what play calling tendencies we have developed based on personnel, formation, down and distance or field zone. The focus of this article is not on play calling, but on how to use the raw data from the self-scout to help make our plays (and players) better.

Organizing Plays/Determining Efficiency

The first step in the process is how to determine what makes a play efficient. Simply adding up the number of yards gained on a particular play and dividing by the number of times the play was ran can be deceiving. For instance, big plays can make the average for a play look good, but that doesn’t mean that a play was efficient.

We split our run game up into four categories (Inside Zone, Outside Zone, Gap and Man Schemes). If your offense uses run/pass options or give/keep reads as part of your offense, those categories can be added as well. For us, an efficient run is a gain of four yards or more on first or second down, and a first down gain on third or fourth down. Our goal is to be efficient on 55% or more of our called runs.

Read More

Backside Choice Routes In 20 Personnel RPOs

By Dallan Rupp
Head Coach
New Plymouth High School (ID)
Twitter: @DallanRupp


Introduction:
This past year we felt we had two good running backs who could carry the ball and a quarterback who was a dual threat and had the ability to make decisions within the game. We added a 20 personnel shotgun split backs formation to our offense which we call our pro formation. Out of this formation, we developed a run/pass option play in which we could run an outside zone and combine it with some backside receiver option routes. We like this formation because we feel like we can run the outside zone to either side of the formation and have a good run play based on our quarterback’s pre-snap alignment reads, but also have a backside throw possibility off our receiver’s pre-snap alignment read of the defense. We feel as if this play will then open the field even more for our offense because we have several complimentary plays that we can go to off this base play to take advantage of the way the defense plays it.

Slide1

Outside Zone Post/Go RPO:
The outside zone is not our best run play but the action of the outside zone gets the defense to move horizontally opening up space on the backside of the run play.  The outside receivers (X & Y) are reading the alignment of the cornerback to determine their route. They make the decision on what route they are running, and they communicate their route to the quarterback and the Z receiver. We want to run the post, but if we have a corner who is playing heavy to the inside (2 to 3 yards or more) with off coverage (5 yards or more) then he will run the go route.

It is the same read versus press coverage, which we don’t see much of, but because he is tighter we can now say that if he is playing your inside shoulder run the go/fade otherwise run the post. The receivers must also consider the flow of the game as they make their decision. An example of this would be if a cornerback is continuously playing 3 yards inside and we have ran the go several times already, it would be smart to mix things up and run a post. The importance of good route running comes into play in order to be able to do this. The receiver must be good at setting up his defender.

Zone Strong RPO:
Against a 1 high safety we are going to run the outside zone to the strong side of the formation (Diagram 2).

Slide1

Player Assignments:
QB: Pre-snap check the route of the X receiver and the location of the safety. Post-snap get your eyes on the safety, step back with your back side foot then take two shuffle steps as you ride the mesh with the TB. If the FS moves back side or stays in the middle give the outside zone to the TB. If the FS moves to the outside zone pull the ball, set your feet, and throw the post.

TB: Turn, open and lead with your inside foot first and run to the sideline across the toes of the QB.  If the ball is not there or the QB pulls it out then the QB is throwing. Carry out your fake. After you receive the hand off get outside and read the blocks of the Z and the Y.

FB: Lead for the TB around the end up to the ILB. If the OT needs help hooking the end then double team first before getting up to the ILB.

Z: Block the OLB. Run at him like you have a route. Do not run inside of him; stay on his outside. Break down 3 yards away from him, mirror him till contact then try to work to the OLB’s outside armpit to seal him in. Keep a wide base with your feet chopping and your hands inside.

Y: Block the CB. Run at him like you have a route. Do not run inside of him; stay on his outside. Break down 3 yards away from him, mirror him till contact then try to work to the CB’s outside armpit to seal him in. Keep a wide base with your feet chopping and your hands inside.

X: Read the corners alignment and communicate your route to the quarterback. To run the post, work towards the inside shoulder of the CB, push vertical, then plant the outside foot at 10 yards and cut at 45 degrees. To run the go, work towards the inside shoulder of the CB, plant on the inside foot before you reach the cornerback and cut up the field at the bottom of the numbers.

Play Side Tackle (PST): Reach block the play side C gap. Take a flat step down the line with the play side foot working to control the play side armpit of the defender.

Play Side Guard (PSG): Reach block the play side B gap. Take a flat step down the line with the play side foot working to control the play side armpit of the defender.

Read More

TMC’s Pistol Triple RPO System

By Mike Kuchar
Senior Research Manager
X&O Labs
Twitter: @MikekKuchar

“The quarterback knows who is going to end up with the ball based on the formation. It doesn’t make sense to target individual defenders for mismatches in the RPO game because we know who is going to end up with the ball based on how they defend it. Once the play starts its hands off for the coaches, and that’s the way I like it.”- Trevor Stellman, offensive coordinator, Thomas More College


Introduction

As a former flex bone option quarterback at his alma mater, offensive coordinator Trevor Stellman was enamored with the flexibility of the post-snap RPO game but wanted to find a way to mesh it with the structure of a pure triple option offense. While most RPO offenses contain a backside read away from the run action, Coach Stellman wanted a read directly in his quarterback’s face. Something most option quarterbacks are accustomed to seeing. This would mean the quarterback would actually have the option of running the football on the perimeter, rather than throwing it out there to an intended receiver. The creation became a pure option football concept that is quarterback friendly. Coach Stellman calls it a “QB driven system,” so much so that in 2016 he called it 114 times. He called this play 114 times or 17% of the time and the QB ran it 12 times. TMC averaged 6.8 yards per play on this scheme and 9 yards a completion. The QB averaged five yards a carry and handoffs were seven yards a carry.

Overview of the System

At Thomas More College everything revolves around the midline zone scheme, which is analogous to Coach Stellman’s triple days. The difference is he’ll use multiple formation groupings (which he calls formations) particularly in the form of 21 (two backs, one tight end), 11 (one back, one tight end), 20 (two backs, no tight end) and 10 (one back, no tight ends) for every run he uses. “We think of groupings as what they can do from that formation,” Coach Stellman told us. “Our goal is 24-26 formations. If it’s too much, we’re not getting enough time during the week to practice it. If we’re too little, we get stale in what we’re doing.”

But Coach Stellman doesn’t use numbers in his system. Instead, he’ll use colors for each personnel grouping so players know exactly what they are supposed to do from that grouping. Because of this labeling, he’s able to get creative on what he can do from those formations, whether it’s a motion look or moving the fullback from the backfield into a wing.

Although TMC is a no huddle outfit, it doesn’t run at breakneck up-tempo speed. Coach Stellman calls it a “methodical” up-tempo. “We’ll get the ball snapped with less than 20 seconds in the play clock,” he told us. “We’re not trying to get it snapped in 30 seconds. We’re not like the Baylor’s and the Oregon’s of the world. It’s about being efficient and not too quick.” The reason for this is because Coach Stellman will use various pre-snap shifts and motions to help see coverage and in order to clear up the read key for the quarterback. There are specific concepts built into a name. All of TMC’s runs are cities and states. If it starts with an “M” it’s a midline run such as divide zone, isolation or the midline RPO concept that will be discussed in detail in this report.  Power runs start with “P” and counter runs start with “C.” Cold is left, hot is right, it’s that simple. “Because of this we don’t use built in tags that we have to add,” said Coach Stellman. “We don’t need to necessarily tag every little thing. If we want a passing concept built in, we just tag that concept.”

Midline Blocking

Quite simply, the offensive line blocks inside zone just like midline but the distinction between midline and inside zone is that the midline play is not designed to cut back in this system. According to Coach Stellman, the read side offensive tackle must track the hip of guard on the midline mesh because that linebacker will really be coming downhill. “The midline hits so quick, those linemen can block the second level just by being in the way,” Coach Stellman told us. “The tight end either zone blocks or will get wider than the defender on or inside them. If it’s a 9-technique, we still arc on them so what that does is promote the handoff on the midline zone scheme.” One of the things that Coach Stellman will do is over split his play side offensive tackle to make sure there are two off the edge on the read side (Diagram 1).

Slide1

Pistol Mesh Mechanics

Before we detail the post-snap read, it’s important to cover the midline mesh that Coach Stellman teaches his quarterback. For starters, his quarterback is typically 4.5 yards from the line of scrimmage with the back at 6.5 to 7 yards from the Center. He will move a faster tailback further back and a slower tailback further up, with the goal being a 2.5-yard gap between the quarterback and tailback. As in most pure option coaches, Coach Stellman puts a premium on the quarterback getting off the mesh point, but it’s a completely different mesh than zone read. “In true zone read, you tell your quarterback to replace the defender that you’re reading,” said Coach Stellman. “We can’t replace the guy we’re reading, because we’re going to get tackled and not throw the ball.” According to Coach Stellman, the key coaching point is about getting from the back to the front foot and bursting out straight for a couple steps. “If he (quarterback) goes for three hard steps his shoulders and eyes will be in line to make the completion,” said Coach Stellman. “We’re not asking him to throw 30 yard passes here on the run. It’s five-yard routes. There’s not a lot of deep throws or hole shots. It’s quick intermediate routes.”

Read More