4-3 Blitz Checks to Attack Protections

By Adam Hovorka
Head Coach/Defensive Coordinator
Schreiber High School (NY)
X&O Labs Contributing Writer

Introduction: 

Defensively, our philosophy is to put pressure on the opponent’s quarterback and make the offensive play caller worry about how often his quarterback is going to get pressured. We will marry this with our man coverage. With today’s offenses being so multiple in terms of formations, motions and personnel, it was getting harder and harder to predict which blitzes would work vs. different game situations. To make this situation better, we did what the offensive side of the ball has been doing for years and just created a blitz-on-me system. 

Blitz Problems

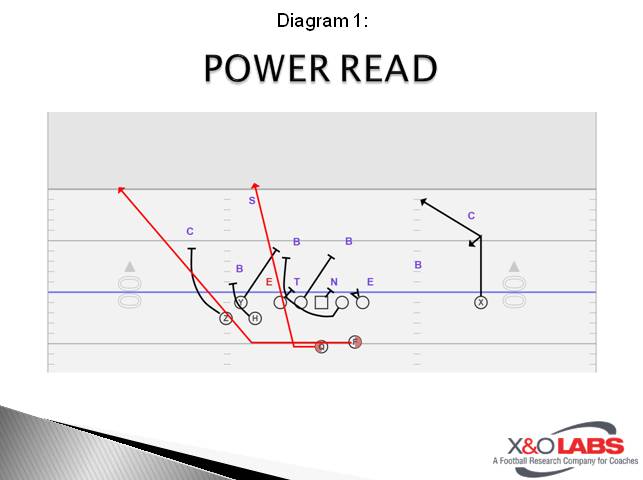
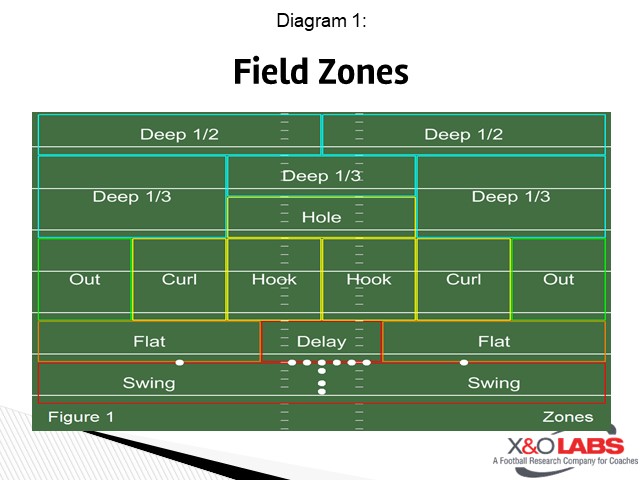
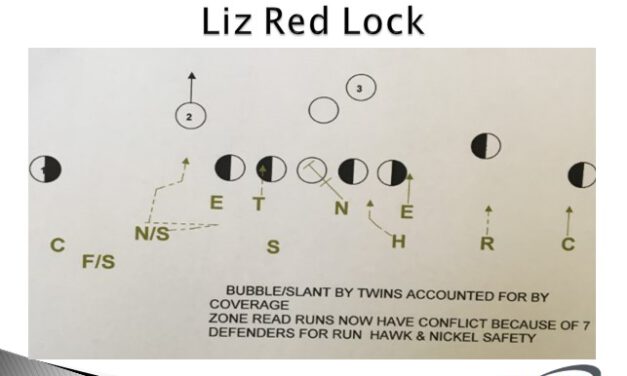
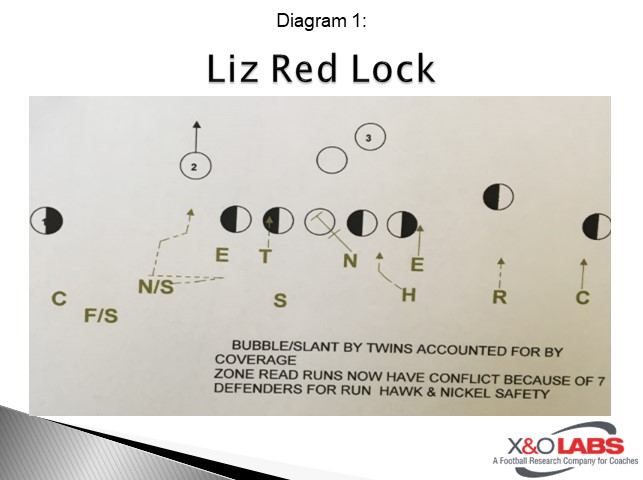
In the past we would call a blitz, and hope that the pressure matched the formation called or our kids could adjust quick enough to still get the blitz to come from where we wanted it to come from and have everyone covered. For example, we would call for a pressure with a blitzer off each edge. Thinking that a two-back formation was coming, we would practice against a two back set all week. However, during the game when the blitz was called; the offense wasn’t in two-backs any more but a two-by-two open look.  Since, we are 4-2 box with one high at all times, the pressure vs. two backs would be easy to teach and install. 

Slide1

In this example, the outside safeties would come of the edge and the FS would lock on the TE or #2 and the inside backers would be man on the backs.

Slide1

Instead if they came out in a one-back two by two set both outside safeties couldn’t come unless you put an inside backer on one of the inside receivers, and that was something that we didn’t want to do. 

Slide3

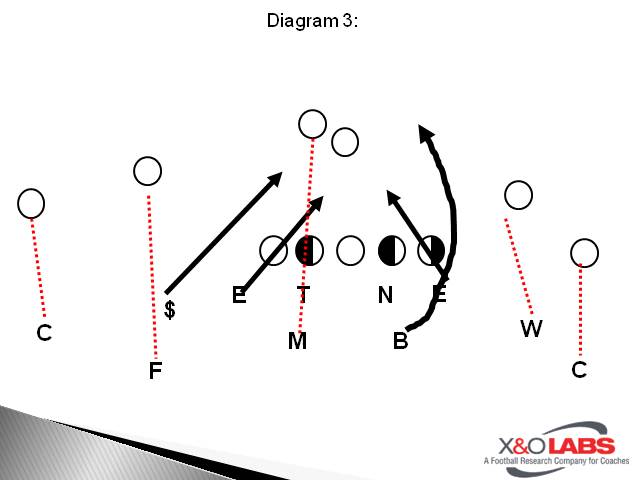
So to rectify the above situation, we would have adjustments to the blitz called based on the formation that the players saw and the inside backer would blitz off of the edge instead of the safety. If we called both outside safeties to blitz, but they came out in one-back, it would be one adjustment and if they came out in trips it would be another adjustment. We were spending so much time in our blitz period just adjusting to formations and hoping the kids could figure out the right blitz. We also found out that kids were thinking too much and not blitzing aggressively or not blitzing at all, there was a classic case of paralysis by analysis.

Rain/Lightning

Just to be clear, we are not blitzing every down or having an automatic to every formation. We are using a buzzword to mean we want to blitz this down. Based on formation or hash the players would perform the blitz that we wanted for that week. Let the kids come up with the buzzword. This year the word for us was NASA. Come up with a word that means blitz and the formation will dictate what type of blitz you will be in that week. To create a blitz-on-me system, you need to have a good idea of what teams will try to do based on formation, down and distance and hash. Film study and use of data is invaluable in determining this information. Once you have a good idea of what offenses’ tendencies are in certain formations and down and distances, you can go ahead and make your pressure system based on what the offense is doing and their protections schemes in those formations.   

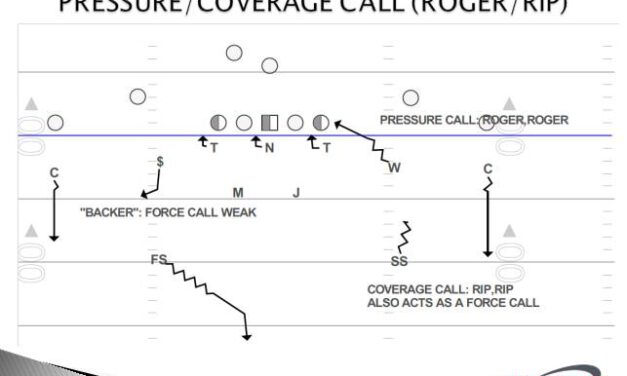
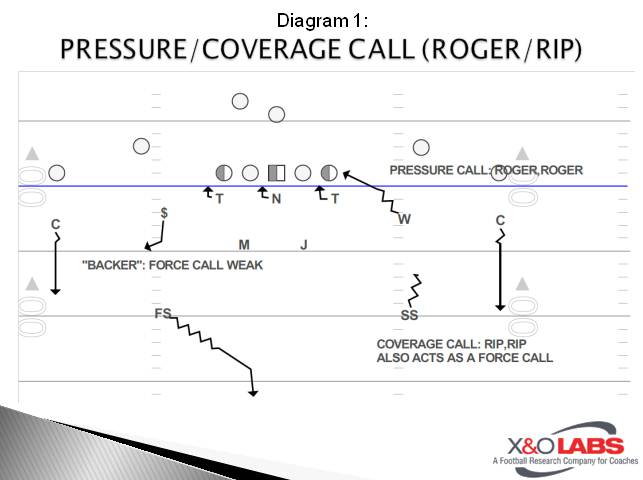
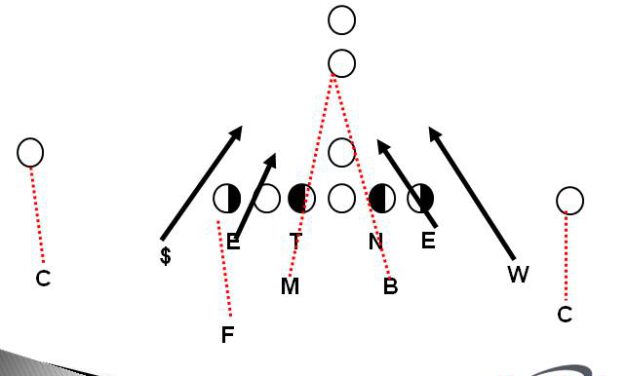
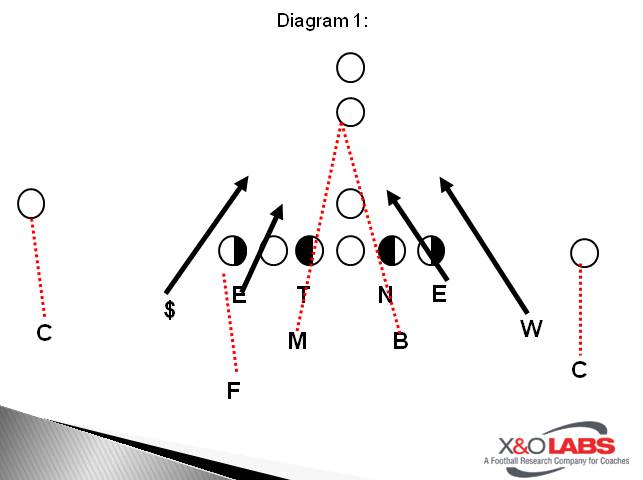
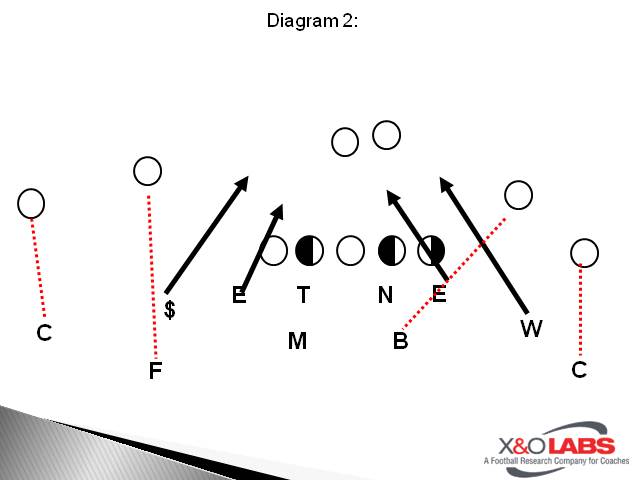
Against teams that predominantly sprint out from a two-by-two look, we would send an outside backer and an inside backer off of the same edge always to the side of the back. The defensive end to the call side would slant inside also. Most offensive tackles would just lock onto that slanting end and leave two edge rushers vs the back.     

Slide3

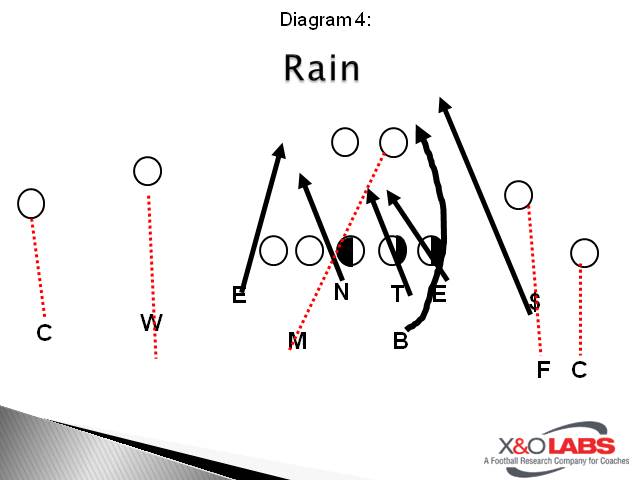
Rain meant the blitz was coming right and the defensive line slanted away from the call. This is a very important point, the defensive end opposite the call had to really get a good up field pass rush because the QB would see two rushers off of the edge and try to scramble opposite. 

Slide5

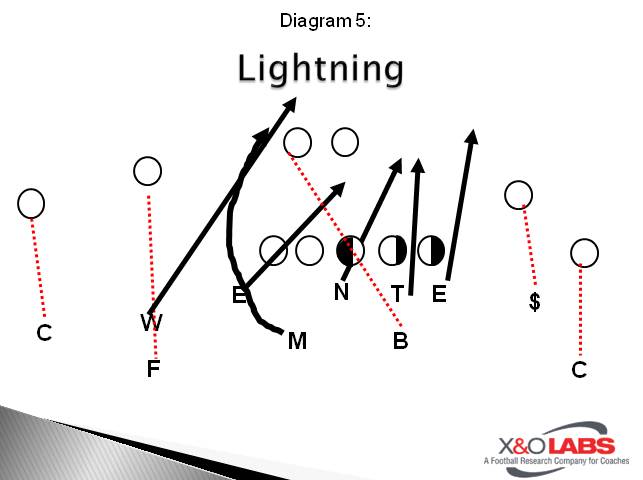
Lightning was two off of the left side and the defensive line slanted opposite. We would also have a word that meant the blitz was also coming from the field. We would also do this vs. teams that we knew from film study would use a six-man protection with half slide and half man protection. The alignment of the back usually showed which side was the man side of the protection and would be the side we send the two off the edge from. Teams have struggled to account for four rushers from the same side. 

Read More

4×1 Triple Post Concept

By Rich Holzer
Head Football Coach
Mount Saint Joseph High School (MD)
Twitter: @CoachRichHolzer

Introduction:

Here at Mount Saint Joseph High School, we as a staff adapt our version of the “Air Raid” offense to what our personnel dictates on a yearly basis. However, one of our new concepts just installed this year, is our version of the Triple Post concept. It was developed off of a similar concept run by the well-known Head Coach of Pulaski Academy in Arkansas Kevin Kelley. This play is adaptable to beat any and all coverages. Since it is run primarily out of 4×1 it places a lot of stress on defenses. It has been my experience that when aligning in 4×1 offense are either trying to isolate the single receiver, execute QB runs or throwing quick game/ fast screens to the 4 receiver side. We use this concept to counter act those tendencies.

Base Concept

Slide1

The Triple Post concept can be expensive to teach because of how we adjust our route running based off safety structure. However, our staff feels it has been worth the investment. We start with the outside routes we call a “Bail Out” route. We always have one to each side of the field represented by the Hitch routes of the X and F in the above diagram. We then have our three Posts coming from one side of the field usually the wide side.

Slide1

Against a single high look or MFC, we are going to have the QB read the MOF safety. The general rule of thumb for us is whenever the FS crosses the ball regardless of the SS alignment we treat it as 1 high and he becomes the read.

Slide3

Whenever we get a 2 high or MFO, we read the strong safety. Our QB operates under the premise that the inside post will pull that backside safety as he works across his face.

Read More

Fitchburg State’s Shoulder-Leverage Tackling Progression

By Matthew Popino
Former Linebackers Coach
Fitchburg State University (MA)
Twitter: @CoachPop2015


Introduction

Our tackling philosophy is based off of rugby tackling and shoulder-leverage. Rugby tackling affords our players a safer and more efficient tackling method. It enables players to play fast, physical and fundamentally sound defense without the fear of injuries. This tackling philosophy doesn’t just address the tackling in itself, but gives a simple and clear understanding of where players fit into the defense. Shoulder-leverage tackling communicates how force and scrape players work together. No matter what defense you may run, there are players who are forcing the ball outside-in (force) and inside-out (scrape). We break up these fundamentals into four categories:

  1. Leverage
  2. Tracking
  3. Fit
  4. Finish

Coaching Leverage

We first teach our players leverage and understanding how their leverage fits into the defense. They must understand the importance of keeping their leverage on the ball carrier. Most missed tackles are caused by players losing their leverage. This is seen when an inside-out (scrape) defender over runs the ball carrier and allows a cutback or an outside-in (force) defender goes inside and allows the ball carrier outside. These common mistakes can be eliminated by the use of shoulder-leverage.

We preach near foot and near shoulder of the defender to the near hip of the ball carrier. Everything is predicated on the near hip. The near hip is our target and their eyes must be locked in on this point. Our players must keep their eyes on their target as they approach. We preach to keep the ball carrier on your near shoulder and to force him to the help, creating a vice. As you can see below in diagram #2, we have a right shoulder tackler and a left shoulder tackler or a force and scrape player. This now puts the ball carrier in a bind.

Read More

Kansas Wesleyan’s Sprint-Out Concepts


Matt Drinkall
Head Coach
Kansas Wesleyan University (KS)
Twitter: @DrinkallKWU


Introduction 

Every offense is looking for a package that serves a wide variety of purposes. Any play series that provides multiple resources for your offense is a package worth looking in to. Sprint out passing is an extremely valuable component to offensive production. This report will detail the value of carrying a sprint out series, our base sprint-out concepts, variations, and complimentary plays.


Why Sprint Out?

Our sprint out package is one of the most critical components to our offense. The reason I have chosen this package to detail in this clinic report is because I believe any offense can incorporate this series into an already-existing system and benefit from it. Our sprint out package facilitates an offense in a number of different ways:

  • Multiple personnel groups
  • Multiple formations
  • Easy to shift & motion to
  • Flexible to personnel
  • Fits any down & distance
  • Useful in any field zone
  • Excellent against pressure
  • Changes launch point of QB by moving the pocket
  • Excellent against zone or man coverage
  • Efficient form of passing
  • Outstanding in the Red Zone


Base Sprint Out Package 

Our sprint out series is a “Practice #1” install and it is carried throughout the season. We carry this in every game we play.  Our base sprint out package has a couple of staples that never change:

  • Call-side is a two-man “Smash” concept (dictated by call)
  • Back-side is a single receiver running a “Pig” route
  • Protection is always protected with a seven-man “Waterfall” protection 


Our base sprint out series is a two-play series that are both “Smash” concepts. We define “Smash” as one route is occupying the flat and the other route is running a corner route. We differentiate the two concepts by defining who is occupying the flat. This is communicated by the name of the play. Essentially, we are telling the “Outside” or “Inside” receiver on the call-side which needs to end up in the flat. If you are the receiver not working to the flat, you must run the corner route.


Outside Sprint Out 

“Outside Sprint-Out” is our first install. We prefer this versus zone coverage. This tells the outside receiver to occupy the flat and the inside receiver to run the corner route.

Read More

The Bunch Red Zone Package

By Chris Parker
Head Football Coach
Pickens High School (GA)
Twitter: @PickensFootball

Introduction:

parkerLike a lot of people, we run RPOs and try to take advantage of what the defense gives us.  As we get into the Red Zone, we have found that the RPOs can be a little less effective.  To work against this, we have utilized our Bunch package more in the Red Zone to create favorable matchups when the spacing is not as helpful as it is in the middle of the field. 

Establishing the Flank

When utilizing a Bunch formation, you should start by understanding how to attack the flank and force the defense to defend the flank. Some people do this through the run game and others through passing. The quickest ways to establish the flank for us in the running game is to run Power Read or Buck Sweep. In the passing game, we establish the flank by running Scat.

Power Read

Slide1

Power Read is a base play for us.  We like it in space in the open field but as the defense get closer in the red zone, the secondary force becomes a problem.  Running the play out of bunch can create different alley runs for the secondary and cause confusion that will allow this play to still attack the flank.

Assignments & Coaching Points

Y: The Y should crack the 1st inside linebacker.  If he gets up-field before the Y can get there, he should go on to the next most dangerous man on that same path (backside backer, safety, etc.). His block on the ILB only matters if we give the ball on the Flank run. Getting this block is key to getting big yards on this play.

H: He is responsible for the outside linebacker. This is the hardest block. When we executed this block we have always gotten an efficient play. He should attack the defenders outside shoulder and keep running his feet. Ideally, he will hook him and we will run outside, but if the defender stretches the play, he should push him out and allow cutback by the runner.

Z: The Z is responsible for the Corner or whoever is the outside force defender. He needs to attack wide and be ready for quick support from the Corner. If he gets quick support, he has to take the same approach as the H and try to hook him but stretch him if he can’t hook him. If the corner sits, he can use a traditional WR stalk techniques.

To study game cutups of this concept, click on the video below:

Editor’s Note: Coach Parker provided commentary and coaching points on each clip below:

Read More

Tulane’s Push, Point, Pull Tech to Teach WR Breakpoints

By Derrick Sherman
Offensive Analyst
Tulane University (LA)
Twitter: @CoachSherms


Introduction:

Each offense has dozens of different routes and there is never enough time to get all the necessary reps to perfect each one. Luckily, there are enough similarities in the routes and concepts that we do have enough time to focus on the fundamentals then put it all together on the field (90 degree cut, 45-degree cut, speed cut). Here at Tulane, we use a series of drills to become better route runners by concentrating on the different breaks that are common throughout our route tree.

We are very away that all of our receivers are different. That means that these breaks will be different from man to man. It is up to us as a coach to make sure each individual is efficient, quick, and explosive as he can possibly be. Our goal is to master the technique and do it faster each day.

The 3 P’s Push-Point-Pull

Everyone has their own buzz words. Here at Tulane, we use push, point, and pull in every break to create a common language that gets the players focused on the keys to running great routes.

PUSH: The receiver will push his plant step into the ground while dropping his hips. He will need to keep his shoulders over his knees, and his knees over his toes. This helps to provide proper balance in the cut.

POINT: The next step in the progression should point the receiver toward his next destination. This ensures that there are no wasted steps going somewhere other than exactly where he should be aiming.

PULL: Lastly, the receiver should pull his inside elbow to pull and turn his hips, shoulders and head around all in unison. This ensures that we are efficient and explosive while ready to make catch

The drills that follow all help us rep and prefect these techniques on a daily basis. Each of these drills requires 4 cones and footballs.

Box Drill

Process/Coaching Points

  • Start with cones in a square 5 yards apart. (Work to get them further apart as your group progresses)
  • Simulates any routes with 90 degree cut
  • Shoulders over Knees over Toes
  • Push, Point, Pull
  • Violent Arms
  • Don’t turn shoulders early
  • Don’t over extend trying to reach the cone

Slide1

Read More

Drill Work to Teach Spot Drops in Cover 3

By David Mastroianni
Defensive Coordinator/Secondary Coach
Hand High School (CT)
Twitter: @DMastro79

Introduction

In the age of man coverage and cover 4, the concept of spot dropping has gone by the wayside in favor of pattern reading.  While pattern reading has its merits; we have found that it has slowed our players’ ability to react quickly and break on thrown balls, thus defeating the purpose of playing zone coverage. We have experimented with coaching cover 4 more than once but, have found that it just doesn’t suit our skill or our defensive philosophy. Our head coach summed up our pass coverage philosophy best by saying, “We need to be willing to trade a catch for a headache.”  Meaning, we are willing to give up a completion and then deliver a blow that will deter the receiver from wanting to catch a ball later in the game. By coaching eyes, body placement, and drop zones, we aim to create a player who is clear on his assignment thus allowing us to play multiple coverages without having to teach new concepts and allow for quicker reactions to the thrown ball. 

Identifying Zones of the Field

The first step in being a spot drop team is identifying zones of the field. We are a cover 3 or a quarter quarter half team so we teach the hook/curl, curl/flat, deep thirds concept to start.  Linebackers and secondary alike are responsible for knowing each zone on the field (Diagram #1). The benefit to this is that when we teach various coverages it allows our players to quickly grasp their piece of the puzzle in the grand scheme of the coverage itself.  This allows installs of cover 3 and most of our ¼ ¼ half coverages to be done in a two day install period.

Slide1

Establishing Awareness

The next phase of teaching spot drops is by establishing “threat awareness” as well as a basic understanding of pass route depths. Before the start of each snap (both in practice and in games) we ask all second and third level defenders to identify their nearest “threat,” or WR that can get into their zone the fastest, pre-snap. By getting their minds ready to address a potential quick threat, we believe we can encourage a sense of focused urgency in our pass drops. The other piece of establishing awareness in our players is by reminding them the 3 most common levels (in yards) of pass route depths (5, 15, 25). This will come into play later when we discuss our actual pass drops.

Intersecting Routes

Language in coaching is everything. If you tell a player to “collision” a receiver, he will go out of his way, usually at the expense of an effective drop, to hit that receiver. A few years back we decided that we were going to change the verbiage to “intersecting” the route. The way we explained it was that we did not want to go out of our way to collision a WR because it could be sacrificing the integrity of our coverage. Instead, we wanted to intersect a WR on the way to our drop zone. This change in wording accomplished two things for us:

  1. It helped control the tempo of our drops. Instead of our LB’s buzzing to their zone too quickly or too slowly, they have learned to drop at the speed of the WR. If the WR released quickly (i.e. any type of vertical routes), then our LB would drop to his zone quicker in order to disrupt four verticals. If the WR released more slowly (i.e. Out/Drag/ Hitch) then our LB’s would drop to their zones in a more deliberate fashion, all the while looking to “intersect” the route and disrupt timing.
  2. It helped our second level defenders get hands on WR without having to pattern read. This helped to keep our defenders eyes on the QB as much as possible while still affecting the timing of the pass game.

Zone Depth & Responsibility

Read More

Adjusting Fire Zone Coverages to Defend 2×2 and 3×1 Pass Concepts

By Steve Erxleben
Defensive Coordinator
South River High School (MD)

Introduction:

The ability to utilize Fire Zone Blitz concepts on any down and distance allows a defense to be multiple and defend numerous formations and blocking schemes without checking out of most calls. In our league, each of our opponents present diverse formations, motions, run schemes, pass protections, and pass combinations out of a variety of personnel packages and tempos. As a defensive staff, we feel being a heavy zone pressure team gives us an opportunity to dictate the game and concern ourselves more with what we are running versus having to have a litany of checks per formation, motion, personnel, etc.

As a 76% blitz team, we primarily use a 3 under 3 deep coverage scheme behind our zone blitzes. We feel it is the most important part of our blitz scheme in that it allows us to blitz while focusing on eliminating big plays and dictating how the ball will be leveraged from the outside-in as well as creating turnovers to get the ball back to the offense. Unfortunately, a 3 under/3 deep scheme is sometimes referred to as a “cheat” coverage because it is relatively unsound in the immediate flat areas, the deep seam, and in the middle of the field between 15 and 20 yards. We stress match up principles in our fire zones and getting our eyes eventually back to the QB to give our back 6 defenders a fighting chance if the ball is thrown. We believe that defending route combinations and not grass eliminates some of the “hot” throws that we have to rally to. It also ultimately improves the effects of our pressure schemes and eventually the success of the offense. Having a vertical line rule, like in quarters schemes, rerouting and physically delivering receivers, and the communication between the hole player, seam players, and corners are everyday skills we stress to strengthen our fire zone coverage.     

Base Front/Secondary Calls

In our base defense, we will set our front either to the field or the boundary, to or away from the multiple receiver side, to or away from the TE, or to or away from the back in the shot gun. Where we are setting the front is a weekly game plan decision. Every snap we make either a “Roger” or “Louie” call which dictates where the 4th rusher is coming from and, if we are in a 3 deep situation, where safety support is spinning. Our interior linemen always slant away from the front call (Roger/Louie) as the 4th rusher (our call side OLB) becomes the C gap player/5 technique call side. The reduction side call correlates with a coverage call to establish who the force player is to the reduction side as well as who the seam player will be. All of our same-side ILB/OLB or “edge” blitzes correlate with a Roger or Louie call, which we feel makes it easier for our players to identify and gives them a chance to focus more on disguise and triggering the blitz from a proper depth and angle.

We align in a 2-high shell with our safeties leveraging #2 to their side at 10 yards and our corners aligned 2 yards deep and on the inside eye of #1 every down. Before or after every snap, depending on the alignment of #2 and the game plan for the week, we will roll our secondary and bail our corners to create a 1 high MOF when we get into our odd or MOF-closed coverages.

We feel that pre-snap movement is key to effecting the calls and execution of the protection. It also has an effect on the decision making of the QB if he is in a situation of having to find some sort of hot read in a limited amount of time. We like the spinning and bailing of our Secondary in a no-huddle or tempo situation because it could eventually effect a check from the sideline and a possible delay of game, unwanted timeout, or lack of execution by the 11 players on offense. Additionally, all of our pre-snap movement helps our players play faster due to they are not sitting “static” and are ready to trigger as soon as the play develops.  

If we roll our coverage and set the reduction and down safety right we will echo the “Roger” call from the front with a “Rip” call (Diagram 1). This tells the front that the safety aligned to the right will be rolling or “spinning” to the right and is now the force player and Seam Player to that side. If the front is setting the reduction the left, we echo the “Louie” call with a “Liz” call to set the force player/seam player to the left (Diagram 2). We feel like making 2 calls gets everybody talking and communicating so that we have gap integrity and the 3 underneath defenders are aware of who is playing what.  

Slide1Slide2

Base 3 Under/3 Deep Zone Structure

As was stated earlier in the article, a 3 under/3 deep zone structure is what is sometimes referred to as a “cheat” coverage due to the fact the 3 underneath droppers are responsible for more than 1 underneath zone. In effect, we are “cheating” players either inside or out to play more zones than we have players for. For sake of argument, we do split the field into zones however within our match up principles, we do not spot drop into these areas, which will be discussed later in the article.

We assign our 3 underneath droppers to three underneath zones (Diagrams 3-4). Our two seam droppers are assigned the curl/flat areas that stretch from just inside the hash, roughly 2 yards, all the way to the sidelines at a depth of 12-15 yards. Our hole player is assigned the immediate hook to hole area favoring the side and release of #3 at a depth of 12-15 yards. Any route under 5 yards is in what we call “no cover” which means we will leverage and only jump when the ball is thrown.

Read More

Drilling Zone/Bubble Concepts


By John Sexton
Offensive Coordinator/QBs Coach
Central Catholic High School (MA)
Twitter: @JohnSexton20

Introduction:

As a Hurry-Up, Spread offense the inside zone run is our bread and butter. We feel we can run IZ into any front or any call that the opposing defense gives us and have a successful play. Our entire inside run game catalog and the majority of our perimeter screen game are predicated on our ability to run some variation of inside zone.

That said, we understand that it does not make sense to continue to try to run the ball into a loaded box. We must have a way to counteract defenses who have loaded the box with personnel to take away our inside run game. The perimeter screen game forces a defense to widen and remove players from the box. Once they remove defenders to play the bubble (or Hitch/Stay/Smoke), we go back to running the ball between the tackles. It’s a never ending cat and mouse game.

We made the decision 4 seasons ago to tag the bubble screen onto all inside zone runs and it has transformed us as an offense. Our inside zone now is truly a triple option football play:

  1. QB hands the ball to the tailback and he runs the ball
  2. QB pulls ball and runs it himself
  3. QB pulls ball and then throws the bubble screen out to the perimeter.

None of this is earth-shattering or revolutionary but it is effective if done properly. We just needed to find an efficient and effective way to practice these things. That is what this article is about.

Drilling the Bubble

They say necessity is the mother of invention and in this case it certainly rings true. As an offensive staff, we loved the idea of tagging the bubble onto these runs full time but at first we were having a hard time executing the whole play, particularly the bubble portion. It just wasn’t timing up well and we had to come up with a way to work on it and fix it. What we came up with is a drill that we have done 1-2 times a week for the last 4 seasons (more than that during preseason camp) and it has been an enormous part of our offensive success. Here is how the drill works:

We set up a center with a football in each A gap. We run the drill to both sides, alternating back and forth. You’ll need 4 scout team guys on each side to play the role of defenders: a C gap defender, a Flat defender, a cornerback and an Inside Backer who holds a bag that the TB can make a cut off of when he is handed the ball.

Slide1Slide2

I stand behind the offense and give the C gap defender and then the flat defender hand signals. Basically, it’s either a crash or stay signal for the C gap defender and a crash or cover signal for the Flat defender. If I give the C gap player a Stay signal, he either stands still or comes up the field which tells the QB to hand the ball to the tailback. The QB carries out his run fake, the slot carries out his bubble and the X/Z blocks the corner. If I give the C gap defender a crash signal, the QB pulls the ball. The tailback still explodes into the LOS to hold the interior defenders.

Read More

QB Run Game From Empty Sets

By Coach Matt Burleson
Head Football Coach
Telfair County HS (GA)

Introduction:

At Telfair County High School we are a shotgun, no-huddle offense. We will run a good amount of inside zone and jet sweep with the various passes off of each concept. Our personal philosophy about being in the shotgun is our quarterbacks have to be able to run the ball. They don’t have to be game breakers, but they do need to make the defense account for them in the run game.  This past season our quarterback, who runs in the high 4.7s, rushed for nearly 700 yards and 12 touchdowns.

One of our favorite ways to get our quarterback the ball is in our Empty formations. We have several different ways to get to an empty formation, but we feel this is a great way to thin out the middle of the defense. We can do this with our without our jet action, but we have two main variations that we use to run the quarterback up the middle to keep the linebackers honest and keep those chains moving: the dive and the trap. As you will see it is essentially the same play for our quarterback and it doesn’t cost us anything extra with our lineman as we already run these variations with our running back.  This approach is simple, but effective.

When we arrived here four years ago we were a Hybrid Double Wing offense primarily under center. Everything was built around the Jet and Rocket Sweep. Just as in every offense, you have complimentary run and pass plays off your bread and butter; ours at the time were play action pass, fullback dive and trap. As we have moved more towards exclusive shotgun formations we felt our complimentary run plays needed to change a bit for our jet sweep. In turn, we added the quarterback dive and trap. Year two, our quarterback was more of a pocket passer, but we would run him 3-5 times a game off of our jet sweep just to keep the defense honest. The young man was actually fairly successful when his number was called (averaging 6.8 yards a carry) and it made our jet sweep more effective. Years 3 and 4, we have been fortunate to have more athletic quarterbacks so we have been able to be more frequent with the QB Dive and Trap and with much success. In fact, our two quarterbacks combined for nearly 1000 yards this year off these two plays. In our playoff game, we rushed for over 300 yards with 200 coming from our quarterbacks.

QB Dive

The first variation of our QB inside run game is our bread and butter QB run play out of Empty.  We will use this play in any area of the field and in nearly every down and distance situation that we encounter throughout a game.   If we come out in empty and the defense is giving us some form of a 5 man box we typically will not even use motion as we have the numbers we like to run the QB Dive (Diagram 1). If we are encountering a fast flow defense we will run this play as a complimentary off our Jet Sweep action to widen the play side LB and DE, this makes for an easier block for our play side OT up to the LB. We will not block the DE to the motion side. We will allow the threat of the jet sweep take care of him. Now we are back to a 5 on 5 situation (Diagram 2).

Read More

Best Practices: Defending the Wing T Buck Sweep

By Mike Kuchar
Senior Research Manager
X&O Labs
Twitter: @MikekKuchar


Editor’s Note: The following research was conducted as part of XandOLabs.com special report on “Defending Unconventional Offenses.”


Defending Buck Sweep:

Slide97

Reader Responses:

“We will start with a twist with the 7-technique and the strong side linebacker in our four-down front. The defensive end is to rip through the outside shoulder of the tight end with a quick, short step of his outside foot and then he steps through with his inside leg and inside arm to the outside shoulder of the TE (a rock technique). We normally run this tech with DTs to the left or right from a 2- or 2i-tech on the guard, but it can also be run with a 7-technique to his outside at the outside shoulder of the tight end. We stress to them to not avoid contact with the tight end. In fact, we would rather he make contact with the tight end’s outside shoulder with his inside shoulder. With a 3-technique to that same side, who usually draws a down block by the offensive tackle, it can open the C gap for the outside linebacker. The outside linebacker will fire hard to C gap from his alignment over the wing. We usually play Cover 2 to that side, so the corner will have pitch, toss, etc. The strong safety aligns over the tight end at eight yards depth and has deep half on pass and alley fill on run to his side.”

“Attack the inside shoulder of the wing with outside linebacker. If not blocked by the wing, squeeze and burst into the inside leg of the pulling guard to make the runner bounce deep and wide.”

“The main concept we have worked is the outside linebacker on the wing must get his hands on the wing to prevent a clean release onto the MLB. Then the outside linebacker must be prepared to take on the pulling guard on the line of scrimmage keeping outside leverage and force the ball carrier back inside.”

“We have had success defending Buck Sweep by attacking the pulling guard with the strong safety. When he reads the Wing blocking down inside, the strong safety will attack the inside shoulder of the pulling guard forcing the ball even deeper. The aggressive play of the 6-technique defensive end should have already forced the play deeper than intended.”

Read More

3 Necessities in Defending RPOs from 4-2-5 Structures

By Marty Albert
Defensive Coordinator                                                                       
Laguna Hills High School (CA)

Introduction

RPOs have been a the most recent challenge for defenses across the country. To address this, we worked to adjust our base 4-2-5 defense with split-field coverage to not allow the offense to manipulate our defensive reaction. The key was to create a simple game plan that would protect the defender that the RPO is trying to put into conflict. To succeed against RPOs, we need to take our talent and do two vital things to succeed; play fast and play with confidence.

Making The QB’s Read Difficult

Through extensive RPO study, we have determined that the side where the running back is set is the read side for QB. Our game plan concepts were to set the front away from the running back and Split-field coverage away from running back. To disguise that, the outside backer to read side could play B gap quicker because of our coverage call of Red Lock (Man to Man) to # 1 & # 2. Which means the QB is throwing into man coverage and outside backer has no pass conflict.

Slide1

In diagram 1, the running back set on right side call is Liz to front. Side of running back coverage is Red Lock. The Hawk is considered the conflict for QB, but because of Man coverage he has no conflict in run or pass.

Alignment:  Corners start in man press alignment and slowly shuffle to 6 Yds. The FS calls Red to the two detached receivers. We will pattern read #2. The Rover safety calls Lock (man to man) coverage to the two detached receivers. This doesn’t allow them throw Bubble/Screen/ Slant patterns to #1 or #2.

Read More

Implementing Man Blocking Fundamentals in Gap Runs

By Alex Roy
Offensive Line Coach
Don Lugo High School (CA)
Twitter: @CoachARoy76


Introduction

In our first meeting as a new staff, the first thing the head coach said was “If you want to win it all, you got to run the ball.” We bought into that philosophy at Don Lugo and it has brought us tremendous success. We nearly doubled our production on the ground in rushing yards, yards per game, carries and touchdowns. With our change to a man blocking scheme, it ignited our run game that took us from six wins to ten wins and a CIF semi-final appearance.

The man blocking scheme allowed our players to just fire out and play, without all the clutter and adjustments. I gave our lineman four pre-snap principles to remember:

  1. Know the play
  2. Identify your blocking rule
  3. Identify your defender
  4. Fire out and play!

With these four things, it made our blocking schemes simple, to allow our players to play fast and block the defender as fast as you can. We want to step on their toes before they can make a read. We do not want our players to think too much.

We have four main blocking rules with variables attached to each, but the principles and scheme is the same. These four rules apply to all of our run plays, most especially our bread and butter plays (the blast, power g and reverse).

  1. Drive
  2. Lead/Post
  3. Angle
  4. Pull

Drive

Our Drive rule is “G-O-L.” This stands for is “Gap-On-Linebacker.” The lineman go through this three-step process when they are about to execute their “Drive” block.

  1. Is there anyone in their INSIDE GAP? 
    1. Yes? Block the man
    2. No? Question 2
  2. Is there anyone ON you, as in a head up defensive lineman?
    1. Yes? Block the man
    2. No? Then…
  3. Block the LINEBACKER (
    1. First Linebacker HEAD UP to INSIDE of you.

Slide1Slide1Slide1

There are a few adjustments to the Drive rule, and those include “Drive Out” and “Drive Away.” This enables our players to adjust to a specific run play. For instance, on “Drive Away” our center will apply the same “G-O-L” rules to the gap away from the play. Another example is our play side tackle will follow the “G-O-L” rules for “Drive Out” to the outside as opposed to the inside.

Our focus for executing the Drive block is aggressiveness like a board drill. We want them to take a play side drive step out and up 6 to 8 inches. From there, we want movement up the field and no lateral movement. Their hips are still parallel to the line of scrimmage and their helmets to the play/hole side. If the play is going right, we want their heads on the right side and vice versa. This type of block should look like a sled drill if executed properly.

Lead/Post

Slide4

Our Lead/Post is essentially a down block, but the rule is that he will Lead onto a defensive lineman only, not a linebacker. Post is where he will block the defender that is head up on him. This sounds similar to the Drive blocking rule, but this helps our players to differentiate between the going to the Linebacker and only blocking the defensive lineman. I use the word Post to help describe a possible situation in our run game, where the play side tackle will Post up his defender, only to be set up for the lead block coming in from the tight end. Like in basketball, when you post up a defender, you are taking them 1 on 1 and setting them up for a variety of things such as a post play or a post move for the score.

Read More

20 Personnel Gap Schemes from Slant/Stack Formations

By Mike Kuchar
Senior Research Manager
X&O Labs
Twitter: @MikekKuchar


Introduction:

The following research was conducted as part of XandOLabs.com special report on “Spread Gap Schemes,” which can be accessed in full by clicking here.

20 Personnel Groupings

Stack Formation:

We found one of the more prevalent formations used to run the single pull Power concept has been what most coaches are referring to as the Stack formation (Diagram 21). It’s a 3×1 formation with the sniffer (or H back) aligned in the B gap to the trips side. The name “Stack” is derivative of Auburn University head coach Gus Malzahn, who ran the same formation while he was at Shiloh Christian High School (AR) in the late 1990s. Jeff Conaway, a Malzahn disciple who is now the head coach at Shiloh Christian is still using it to run Power with a great deal of success. In Coach Conaway’s system, the Stack is a 20 personnel grouping that puts the H, slot and A back to the right side. The H in “rip” alignment, which he calls in B gap and in easy arms reach of the offensive tackle while the back is aligned in what Coach Conaway calls a 1.5 alignment, which is six yards deep straddling the inside leg of the guard.

Read More

Backside Tags and RPOs to Protect the Stick

By Jacquez Green
Offensive Coordinator
Godby High School (FL)
Twitter: @JacquezGreen


Introduction

The stick concept is a versatile and effective concept as it can be run out of many formations (2×2, 3×1, 2×1 and Empty Formations) and a variety of offenses from pro-style to the spread offenses and even the Wing T. It works because it places a horizontal stretch on your underneath defenders and it’s a short distance throw. We also use this concept because it’s a high percentage throw for the quarterback, slows down an aggressive pass rush, a great play versus the zone blitz. In addition, this concept also gives us a chance to create personnel mismatches with our athletic receivers on linebackers.

As with any concept that you run a lot, you must find ways to protect it. There are various ways to protect it, choose one that goes along with your personal philosophy on offense.

There are several ways to protect the stick concept:

Backside Tags

  • Empty –Double Slants, Slant w/ Flat, Quick Out w/Go)
  • 3×1-Hitch, Slant, Slows Screen
  • 3×1-HB Choice (RB on an option route vs the Will LB)
  • 3×1 & 2×1-Spot (Snag with wide route)
  • 3×1 & 2×1-Spill (Snag with wheel route)

RPO

  • Draw
  • Tunnel Screen
  • Slow Screen
  • Lock Stick

HB Choice

Read More