“Sniffer” Alignment Methodologies in Spread Gap Schemes

By Mike Kuchar
Senior Research Manager
X&O Labs
Twitter: @MikekKuchar

Introduction:

The following researcher was conducted as part of XandOLabs.com special report on “Spread Gap Schemes” Scroll down to read more on this report.

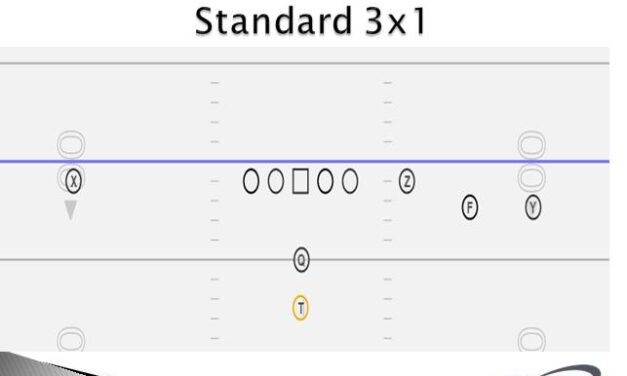
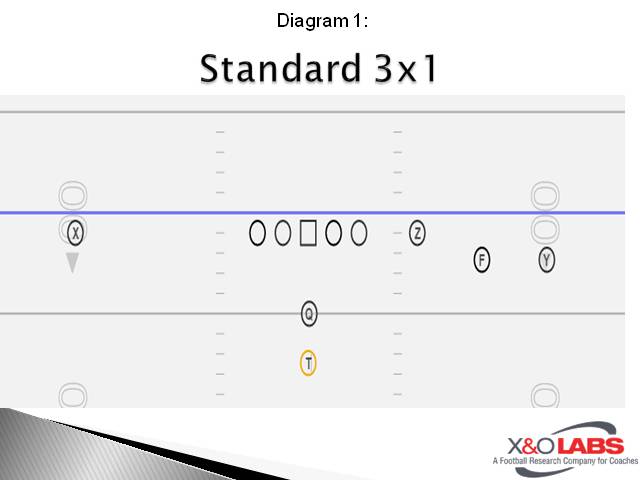
Alignment of Sniffer (Y/H):

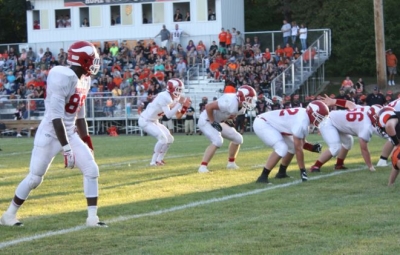
To these Spread coaches, the alignment of the H/Y (or the player executing the kick out block) is crucial in the Power concept. For most coaches we spoke with, the H needs to be in a B gap alignment in order to get the kick of the defensive end executed correctly. While the consensus is that he needs to be at that point by the time the ball is snapped, how he gets there could be left open to the imagination. So, we polled only those coaches who averaged over 5 yards per carry this season on the power concept to ask them the verbiage they use to get the H in the right snap for the post-snap kick out. Their responses are recorded anonymously.

Reader Responses:

“We use the toe to heel of the offensive tackle and about a yard away from the tackle’s butt. He is two yards off the line of scrimmage.”

“We call him a butt sniffer. He needs to be so tight to the guard that he’s almost taking the snap from the guard. We talk about the sweat of his chinstrap to drop on the guard’s back. That’s how close he needs to be if we want the kick out.”

“We’re a little different than some guys might be. When we put you in motion, you need to end up where you need to be to execute the play. We have two motions for him. One that takes him across the formation and one that bring him into the edge. That’s it. He just needs to know where he is going to be. I don’t think you need to tell them where to be. They will learn where they need to be. Don’t screw up your own play we tell him. We are more multiple than some Spread teams, so we sacrifice some tempo for that.”

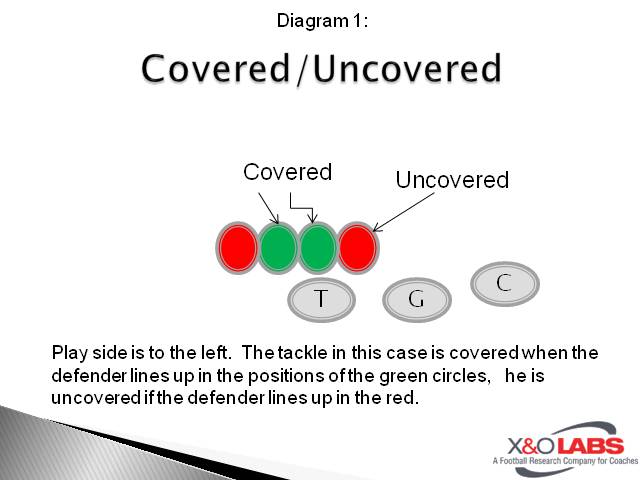
“The sniffer needs to be no wider than B gap because he can’t get inside out on the defensive end.”

“Regardless of his alignment pre-snap, he will need to end up behind the play side guard at the snap to have a good enough angle to kick out.”

“We have a formation name to get the Y in the backfield. Axel means he is behind the right tackle and we align in a 2×2 set. If he is on the line it is Ace. Ram means he is behind the right tackle in a 3×1 set. If he is on the line the formation is Reo.”

“When we run power he is on the play side. When we run counter he is opposite.”

“Our pre-snap read precludes or affords the F, H or Y the opportunity to vary their alignment according to assignment. If H kicks out, we cheat foot-to-foot alignment with inside leg of tackle. If H, carries or reads the end, then he may align even with QB but must adjust first step on run route.”

“We would like to have the F/H with his toes a yard behind the offensive line, and we would like him to align behind the play side guard (vs. even fronts) or on his outside leg vs. odd fronts). We cheat him much wider when we are running perimeter runs, maybe two gaps if there is a tight end. When the F/H must arc to opposite side, he cheats slightly tighter there.”

Read More

Developing a QB Drill System

By Nick Coleman
Offensive Coordinator
Itawamba Community College
Twitter: @QB_CoachColeman

Introduction:

Quarterback individual is the most crucial aspect of developing a young athlete. The key to any QB coach is to have a daily, weekly, and seasonal plan for drills. Every aspect of coaching a QB starts with his feet and works up from there. Our offense has our everyday drills along with drills we do once a week and situational based on weekly game plan. The most important aspect of coaching QB drill work is to have drill correlation between drills, group work, pass skelly, and team periods. If the drill does not correlate, do not use it that day or week. 

Note that in all of our drills QBs must have active and hot feet. Every offense is built on timing and anticipation within the scheme. The active feet allow the QB to be ready for any type of disruption with the receivers’ routes. Every drill that you will see, the QB will have active feet and his base the width of his shoulders. 

Drills

Noose Drill

PURPOSE: First thing we do at practice. This is how we warm-up. Emphasizes stance, release, getting over top, sticking cuts, noose, exaggerating look and tuck, dipping and turning straight down field. QB will work on drop, reads, slides, fast feet, and accuracy of throw. QB should see reads in his head.

TEMPO: ¼ – ½  MAX

ORGANIZATION/SET-UP: Set two cones on sideline three yards from a yard line. QB aligns on yard line, can use center to work on exchange. The WR align as shown (below). He will work the release, gets back over top, sticks 2-3 times, settles closer to one cone or the other, forms noose, and works slightly back to QB. On catch, exaggerates look, tuck, and turns straight downfield, ball high and tight. QB works a drop and a play read, slides in pocket on 3rd read, waits for WR to settle, places throw away from the nearest cone on R1’s shoulder, which simulates a defender.

COACHING POINTS: 

  1. Coach with tremendous detail.
  2. Emphasize developing perfect techniques and habits.
  3. Everything must be perfect.
  4. QB- Work on throwing away form nearest defender.

Slide1

PAT-N-GO: SHORT

PURPOSE: Fundamentals drill where QB and other skill players perfect techniques at less than full speed as they continue to loosen up. Catches over shoulder.

TEMPO: ½

ORGANIZATION/SET-UP:  Basically a circular drill with two groups. Player will align on either the right or left numbers (1 side a day).  QB will align just inside the player line.  Players will dummy down to work release as in noose drill.  On QB command, player will execute outside release and get back over top (which is the top of #s).  QB will take one-step drop, fire feet, and make a short throw with slight air over outside shoulder of receiver.  Receiver runs ball to other line, careful to stay out of QB’s way.

COACHING POINTS: Emphasize all details of receiving as in noose (stance, release, noose, exaggerate look & tuck). Do not allow QB to over throw receiver or leave ball inside numbers. Drill should move quickly with little down time.

Slide2Slide3

SIDE WAYS STEP OVERS DRILL

PURPOSE:  Condition QB to have fast feet in pocket while keeping eyes downfield and going through read progression. Working on keeping front should open so you don’t close down field

TEMPO:  Full

ORGANIZATION/SET-UP:  Straddling a line

COACHING POINTS: 

  1. Provide QBs with a play to read during  drill
  2. Get ball to proper placement at throat level or where every comfortable
  3. Feet should be hip to shoulder width apart
  4. QBs feet should be working extremely fast and he should begin moving over and back across the line simulating moving side to side in pocket
  5. Keep front shoulder open so you can see whole field
  6. Do this between 8-12 seconds.
  7. Coach should be in front watching feet, eyes, ball placement and sometimes trying to knock ball out.
  8. Two hands should be on ball at all times

FRONT TO BACK STEP OVERS DRILL

Read More

Square Drag/Skip-to-Hip Technique in Outside Zone

By Austin Emerson
Offensive Line Coach
Morrilton High School (AR)

Introduction:

The concept of our outside zone blocking technique is to stretch the defense to get them running sideline to sideline. This allows for us to either out run them to the sealed edge, or if they contain the edge, we are able to make a cut that can hit anywhere due to the over pursuit of the defense. The techniques discussed in this report are derived from Coach Steve Rampy and Steve Wells who are at Pittsburgh State in Kansas as well as a mixture of a technique that I learned from Coach Greenwood at Jenks (Oklahoma).  

Covered/Uncovered:

The first step is critical to the covered /uncovered approach we use when teaching the outside zone. This is the simplest format to teach at our level because there is either someone directly in front of you, play side of you, or you are uncovered. Our covered lineman is only covered if the defender is head up to play side shoulder of him. If the defender is on his backside shoulder, we leave him for the next man. The uncovered lineman is someone who has nobody covering him head up to play side shoulder.

Slide1

Covered Technique:  Square Drag

The square drag technique is one that Coach Rampy and Wells have been using at Pitt State for several years. They use it for covered and uncovered linemen. My uncovered linemen were too slow to make it to the hip of the covered lineman therefore I had to change the uncovered lineman’s technique. The square drag is a simple technique that works to gain leverage on the defender first before getting movement. The step is a 6-8 inch lateral step with the play side foot to gain leverage on the defender. The backside foot “drags” the same distance as this foot is the one you are driving off of to gain the lateral leverage. 

Slide2

Covered Hand Placement:

 The backside hand goes immediately to the defender’s chest. The power of the punch is not as big of a deal as it is to get the placement of the hand correctly. Once the backside hand gets to the middle of the defender’s chest the play side hand works to the hip of the defender. If the backside hand misses and goes to the shoulder, then they are likely to get beat outside. The hip landmark helps keep the shoulders square and it lowers the pad level of your offensive lineman.

Read More

Okie Pressures to Defend Flexbone Option

By Mike Kuchar
Senior Research Manager
X&O Labs
Twitter: @MikekKuchar


Introduction:

The following research was conducted as part of XandOLabs.com special report on “Defending RPO and Triple Option.” Continue reading for more information on this new study.


Grizzly Pressure:

Clay Iverson, Mukwonago High School (WI):
Coach Iverson likes to call his Grizzly pressure to the motion if there is time to do so. He will also call it to their best linemen, quarterback’s pitch hand, or the field. “It’s a great zone pressure against option since it does change look on reads without you having to put in a new scheme,” said Coach Iverson. “It’s important to note you are not dead in the water if you call it the wrong way.” Coach Iverson points out that blitz paths may change on scheme and unless you’re rotating with motion, don’t spin the secondary too soon. “If you call it wrong and they run the option the other way you will loose your safety to that side and be a man down,” said Coach Iverson.

Rules:

Pressure Side:

DE- Long stick (read guard) to take away dive
ILB’s- Search (read tackle) and play first threat
OLB’s- Seal (beat wing) and play first threat
Safety- pitch player, flat defender on pass
CB- Deep third technique

Read More

Modifying Your RPO Package Based Off Defensive Alignments

By Dustin Beurer
Assistant Head Coach/Offensive Coordinator
Albion College (MI)
Twitter: @CoachBeurer

Introduction:

Here at Albion College, we have utilized a spread, no huddle, and up-tempo offense over the last two seasons to improve how we do things offensively. Part of our offensive over haul has included implementing Run Pass Options (RPOs) to enhance our running game.

We try to keep things basic with our run schemes. Our two main run schemes are the Inside Zone and the Pin and Pull concept. 

  • If we are running Inside Zone, in which we leave the end man on the line of scrimmage unblocked, we will run screens on the back side of the run play.
  • If we are executing a run scheme, such as Pin and Pull where all of the down defenders are blocked, we will pair that with quick game and pops.

We have found that our run scheme is very difficult for opposing teams to defend. One goal is to put certain defenders in conflict so they have to make a quick decision to defend the run or the pass. A second goal with the Albion College offense is to keep things simple so we can play fast. We want to run the same schemes, while only changing the formations and looks we run them out of (i.e. change the presentation, not the play).

Inside Zone Paired with Quick Screens:

Our Inside Zone paired with quick screens is the first thing we install on day one. For our offense to be productive, it is imperative that we are able to run the Inside Zone. Our base rules are as follows:
Inside Zone Base Rules:

QB – Count the box and check the safeties. See if we have the numbers advantage to the screen side. If numbers are advantageous to the screen and we are outnumbered in the box, he will catch and throw. If we have the numbers advantage in the box, he will hand the ball off.

RB – Toes should align on the heels of the QB with legs splitting the outside leg of the back side guard. Footwork should be a slight bucket step to play side, cross with back side foot and get his shoulders pressing the front side. This forces the LB’s to play front their side gaps. His eyes should be reading the “A Gap” defender. As OL displaces the “A Gap” defender, he will attack that gap that develops.

PST – Shuffle reach the front side defensive end. His back side hand will work to the near side breast plate and his front side hand will attack the defenders sternum. He must not let the DE cross his face. If blitz shows off the edge, he will make an alert call, which tells all linemen to push one defender over.
PSG – He will do one of the three following options against different techniques:

  • Against a front side 3-technique – Over and up reach step to a play side 3-technique. His back side hand will reach the near side breast plate and his front side hand will work to the defenders sternum. He must displace the defender.
  • Against a front side 1-technique (shade) – Flat step with front side foot and drive up with second step through the defender’s crotch. Uppercut the defender, allowing the center to come in on combo. He must keep shoulders square and stay on the down defender until the LB invades his space. We want there to be four eyes on the LB.
  • Against an odd front – Combo with the front side tackle to the play side LB in the box.

Center – He will do one of the three following options against different techniques:

  • Against a front side 3-technique – 3 step course (bucket step, 2nd step on course to play side, 3rd step working square) to protect the front side A gap in case of slant. After 3 steps, he will work shoulders, square up to Mike or front side LB.
  • Against a front side 1-technique (shade) – Attack the near side breastplate and combo with front side guard to front side LB or Mike. Stay on combination until the LB invades our space.
  • Against an odd front – Flat step and take most of nose. Combo with back side guard to back side LB.

BSG – He will do one of the three following options against different techniques:

Read More

Quick Combo Route to Beat Quarters Coverage

By Mike Dovenberg
Offensive Coordinator/QB Coach
Gavilan College, CA
Twitter: @CoachDovey


Introduction:

gavilanWe are a spread, no huddle team, and we like to go fast. Our offensive philosophy is to use the defenses’ alignment and angles to our advantage, and while it sounds simple, attacking where they are weakest. Our personality as an offense is very aggressive, finding and exploiting a defense’s problem areas at a breakneck pace. While we are a run-first team, we had a group of very fast and talented receivers in 2014, and as a result we had a constant vertical threat.

As a result, we saw a lot of defenses attempt to answer our tempo and vertical threats with a 6-man box and quarters coverage behind it. We saw both 4-2 and 3-3 fronts. We used several concepts against this coverage, but the following formation/concepts were the most consistent.

Using Trips

The first thing we do, when we play a quarters-based team is to get into a trips alignment. This gives us some favorable angles and creates assignment difficulties for the defense. Trips specifically binds the backside safety and the strong side backer.

Cover 4/Quarters Basics

To maximize our chance for success with any coverage beater, it is important for us to have a basic understanding of coverage rules. In Cover 4/Quarters, we teach our QBs the basic principle that the CB and FS are reading the #2 receiver. If #2 stays vertical to the defense’s “breakpoint”, the FS will take him in what essentially becomes man coverage, while the CB is responsible for the #1 receiver’s vertical route. If he #2 breaks out early, the CB will jump him (depending on individual teams’ rules), and the FS is responsible for getting over the top of #1’s vertical.

In trips and to the field, the SS is the flat defender, giving underneath support for the CB and FS. The next LB inside is responsible for collisioning a vertical route to the opposite hash (4 verts from trips) (Diagram 1). If the weak safety rolls too far to the middle of the field, we essentially have a one-on-one matchup with the weak side corner (Diagram 2). We coach our QB that one-on-one is not covered, because ball placement and timing can win every time, so we often take shots at the back side of trips in this situation. The back side route is given in the play-call based on our strategy for attacking a one-on-one situation that week.

Slide1Slide2

Read More

Bear Defense vs. Speed Option

By Mike Kuchar
Senior Research Manager
X&O Labs
Twitter: @MikeKKuchar

Introduction

Editor’s Note: The following research was conducted as part of XandOLabs.com special report on “The Virginia Tech Bear Package,” which can be accessed in full by clicking here.


Defensive End/Backer Play:

Read More

No Huddle: Wrist Cards With Multiple Systems

By Tom Lewis
Offensive Coordinator
Plymouth HS (OH)
Twitter: @Shortpunter


Introduction:

CaptureThe no huddle can be run many different ways, but we have found great success using the wrist card method. Getting to that point was a process, but I think the process validated the results. So for that reason, it is important to start by looking at how we got to where we are with our wrist card no huddle system.

I have always run multiple sets and styles of offense, whether it was single wing based, triple option style or variations of the wing-T. When I returned to Plymouth as the offensive coordinator, I began to blend my newer offenses with series that were already in place. This created many word and number combinations. To call a play, I would often need to use five or six words to get the formation, motion, action, and blocking scheme. My first attempt to simplify this vast offense was to create a series using a three digit number system. The first number would indicate the series; the second number the ball carrier and the third the opening or hole.

Although this system did cut down the amount of information the players needed to process, it did not solve the whole problem. We quickly found that there were wrinkles and variances of certain plays that we wanted to run. To solve this issue, we added a key word or series of words to the numbers system. This defeated the purpose and caused a lot of confusion especially for our linemen.

From there we still felt we needed to take advantage of our athletes in space. Running a spread offense was the obvious choice. We also wanted to control the flow of the game by using tempo, so we developed a no huddle offense using three panel wrist coaches that every player wore. While this is not exactly unique, it was what we eventually did with the insert cards that made all the difference.

The Rational for the Multiple Wrist Coach System

Our first adjustment was to simplify the massive amount of offense knowledge on the wrist coaches was to create a separate set of cards for the line. The linemen traditionally had to learn what to do on every play or listen to a string of words and/or numbers trying to pick out the one piece of information that applied to them. The solution was to eliminate all the non-essential information on their cards.


We block our Outside Veer (reading the end man on the line) exactly like we block our Blast play (kick out the end man on the line with the running back). So on the wrist coach for the line, it simply says “Base” which is our name for the scheme. This base scheme has the play side block down and the backside guard pulls and funnels to the inside of the hole. We use that same scheme for the inverted veer, QB power sweep, and jet blast play. The end result was the line has the same assignment on their wrist coach for all the plays and nothing else. The backs’ cards have the series and play direction, but no scheme.

Trial and Error

In our first attempt at using wrist coaches, I simply numbered the boxes and signaled the number. We found that players found the box, but often struggled with the signal. We used a body clock like many coaches, but found that some players got confused by the number of the box and the play number. I would signal a 3 and a 4 which was a toss sweep and some players would try to run 34 which was an ISO play at the time. It never occurred to me that this would be a problem, but apparently some players see 34 and would think 34 instead of finding the box 34 on the card.

A second problem was fitting the box number and the plays on the cards so they could be read easily. The solution was to create a three column by ten row card that was color coded. This eliminated the need to search for the number all over the card, but only in the column of the signaled color. (Diagram 1)

Slide1

The Signals

We developed a hand signaling system for the colors and a type of body clock for the number to get the information in. The color narrowed the card into a third and the number dictated the row number. We signal in color number plays in all group and team practices. Coaches will walk and talk the actual series names, descriptions and play technique during individual coaching periods, but never during team. 

Read More

Training RBs to Use Their Off-Arm as a Weapon

By Mario Price
Running Backs/Special Teams Coordinator
Davidson College (NC)
Twitter: @CoachMarioPrice


Introduction:

Running backs in most offenses, regardless of the scheme, must truly be the “X” factor because they are an integral part of every segment of the offensive attack. A complete back must be able to function at a high level in multiple areas:

  • Zone Scheme Run Game
  • Gap Scheme Run Game
  • Perimeter Run Game
  • Pass Protections
  • Receiver In The Pass Game
  • Special Plays (Screens, Reverses, etc.)
  • Special Teams Contributor

There is much skill development that goes into grooming a “complete” back due to the multiple skill requirements with the position. It is vital that pre-practice, post-practice, and individual time are utilized efficiently to develop these skills.

As you organize and plan drills for your running back group it is important that you keep a few things in mind:

  • DO NOT practice drills that do not directly correlate to what the back will be asked to do on the field, even if it is a really good drill.
  • Frequency of the drills should correspond directly to their relevance in the offense.
  • Drills should be designed in a format that will enable your RBs to work several fundamentals during the course of a drill.
  • Commands for all drills should correspond with the offensive cadence and should be stopped by the whistle.
  • If a player is injured during drill, then it may not be a good drill.

As we train our backs to be consistently productive and have the ability to create explosive plays for the offense, one important skill set that is important to develop is “Yards After Contact” (YAC). Today’s athletes are bigger, strong, and faster than ever and many backs are able to naturally create YAC with their physical toughness, but the ability to use the off-arm as a weapon (stiff arm, ripping, etc.) is becoming a lost art.

Stiff Arm

A great stiff arm can ward off a defender and limit a defensive player’s ability to wrap up the back for an effective tackle allowing for more yards after contact.

Technique: Extend the arm into a slightly bent, rigid position (don’t lock arm, to eliminate hyperextension).  Aiming at the defenders helmet, shoulder pad, or extended arms.

Read More

Marshall University 4-2-5 F.I.B. (Formation Into Boundary) Run Fits

By Mike Kuchar
Senior Research Manager
X&O Labs
Twitter: @MikekKuchar


Introduction

marshall1The following research was conducted as part of XandOLabs.com special report on “4-2-5 LB Play.”

Read More

Punt Block Unit and Scheme Development

By Jamison Bisch
Former Defensive Coordinator
New Mexico Military Institute Junior College, Roswell, NM
Twitter: @coachbisch

Introduction:

Since 2012, we have blocked/disrupted 31 punts with 3 TDs and multiple safeties. This success is not an accident. We believe that these results are directly connected to the detailed skill development approach that we use here at New Mexico Military Junior College.This clinic report will cover a few fundamental techniques used by players in our punt block unit. Those techniques include the Rush Technique, Catching Technique, Hold-Up Technique, and Blocking Technique(s). We will also examine our Base, Overload, and Hold Up schemes. 

Punt Block Mission Statement

It is important to note that we work hard to combine multiplicity and simplicity to find an optimal balance for our freshman and sophomores to be able to execute at the highest level. Over time, we feel we have found a good balance in that regard and that should be obvious through this report.Here is the mission statement that we base this concept on:

“We will force mistakes and turnovers on this unit. It’s a race to the block point, don’t be last! We want our opponent to fear that if they don’t have a perfect snap, great protection, and a quick kick by the punter, then the result will be a blocked punt. Since 2012 we have blocked/disrupted 31 punts with 3 TD’s and multiple safeties.”

Unit Objectives

  1. Disrupt 1 kick per game
    1. Block a punt
    2. Force a poor punt
    3. Force a timeout
    4. Explosive return (>20 yards)
    5. We will place the best players who can block punts on this unit.
    6. We must have the Attitude, Desire, and Effort to get it done.
  2. Obtain and keep the football (100% possession)
    1. Field all catchable punts
    2. “Peter” calls from the returner to the rest of the unit when necessary.
      1. Obnoxiously Loud
      2. Visual Signals
  3. No Penalties
  4. Allow No Successful Fakes
  5. Average 10 yards per return

Unit Techniques

Rush Technique

While there are certain situations where I have players align in a 2-point stance, the majority of the time everyone except our CBs align in 3-point rush stances. We give our players a number of coaching points for rushing the punter and much of this is covered during the first week of fall camp. During this time, I do not even install any type of schemes. Instead, I focus on teaching the technique and finding out who can rush. Coaching points for rush technique include:

  1. Concentrate on the ball with near hand down, near foot back (heal to toe), get off on the snap.
  2. Run over the leg of the blocker staying low. Pick up your feet.
  3. Take proper angles to the block point.
    1. Outside rushers must clear the blocker and drop the inside shoulder (dip/rip), and take the proper aiming point. Aiming points will vary depending on how deep the punter is aligned and how long his steps are. We must practice proper angles.
    2. Inside rushers must control momentum and beware of angles. Each week, we give our players a scouting report on the opponent’s punt unit and this report has a block point on it each week. We then build our practice around that block point. Things that go into the block point scouting report include:
      1. Depth from line of scrimmage (typically around block point is 10-11 yards).
      2. Horizontal location. In other words, if the punter ends up behind a guard, tackle, etc.
      3. Whether the punter is right or left footed.
  4. Never leave your lane. In other words we should not cross each other.
  5. The technique for blocking a punt involves putting your hands together in the shape of a diamond with index finger touching index finger and thumb touching thumb. Players are coached to look through the diamond to the ball and to keep their eyes open and hands together. It amazes me how many times guys get to the block point, form the diamond, and close their eyes!

Read More

Formationing the Stick Draw Concept

By Jhett Norman
Offensive Coordinator/Quarterback Coach
Levelland High School (TX)
Twitter: @jhethronorm

Introduction:

Stick Draw has become a staple for most everyone who runs an RPO offense these days. Here at Levelland, it has become a staple of our system as well. We look to throw the ball on every single play, and the quick hitch route has become our go to in short yardage situations. It is important to mention that we take the RPO concept and flip the letters into PRO as we always look to pass first and run second. With the defense keying on our hitch receivers, we have had to add in a few wrinkles to keep the stick/draw concept working efficiently.

Formations:

We primarily base our offense out of trips, but we have the ability to run the play out of doubles. The play is called differently depending on the formation. We also can change the linemen blocking rules, as well as, who the ball carrier for the run option. All of these things help us find a way to keep running the same basic scheme over and over throughout a game and a season.

3×1 Formation

Slide1

To study game film of the stick draw in this formation, click on the video below:

Read More

Odd Front DCs: Scenarios for Two-Gap Technique

By Mike Kuchar
Senior Research Manager
X&O Labs
Twitter: @MikekKuchar

Introduction

The following research was conducted as part of XandOLabs.com special report on “Odd Front vs. the Run Game,” continue reading for more information on this report.

Instances to Two-Gap the Nose

Mark Segina, Unadilla Valley High School (NY): “I use two gap techniques for mainly three reasons: if I have a kid who can two-gap, if a team is mostly running read option/outside zone stuff and to keep the center off my inside linebacker.”

Dino Kaklis, Defensive Coordinator, University of Virginia-Wise: “We two-gap unless we have some sort of movement going on. We are flexible due to who is playing the position for us.”

Brandon Staley, Defensive Coordinator, John Carroll University (OH): “We believe in playing two gap because the whole idea of run defense is to slow the run fit down and create as many one-on-ones as possible. That’s what you get when you use two-gap techniques. The whole concept of offensive football, whether it’s zone or power, is to get double teams at the point of attack. Our big goal is getting movement off the line of scrimmage will get you beat on double teams. The whole purpose of playing two gaps is to create one-on-ones at the point of attack. We want to be in a three-down front because you are defending two-back football. It’s easier to do in three down than in four down because you don’t give the offense angles. Every body wants to block an over front. The edges are firmer for the read game and the counter game because you have overhangs.”

Tom Bainter, Bothell High School (WA): “For us, it depends on the player. The better the player, the more freedom we give him to play two gaps. The inside linebacker will fix the open gap. We’ve had some great NT’s so we play two gap nose most of the time.”

Jason Faulk, Cecilia High School (LA): “We mainly two-gap our nose against double tight end formations. We often have trouble with our outside linebackers being physical enough to play on the line of scrimmage. We are fortunate enough this year to have a big enough nose to play a two-gap technique however, if the center is crossing us and pinning us we will check to a Diamond Front where the nose shades strong and an inside linebacker will get in a four point stance and shade weak.”

Dale Sprague, Defensive Line Coach, Southern Virginia University: “In our base fronts, we have the nose two-gapping whenever he is in a zero technique and we are not stunting or zone blitzing.”

Jeff Larson, Defensive Coordinator, Chadron State College (NE): “We rarely two gap the nose, but when we do it is usually vs. open sets. The main reason we did two-gap our nose vs. open sets was because the lack of the extra gap created by a tight end, so we felt our backside linebacker could make the nose right and not have to worry about leaving an extra gap open.”

Alvin Smith, Defensive Line Coach, Wagner College (NY): “We have bigger body than an attack 4-3 defense that have some athleticism. 3-4 defensive ends and 3-4 nose’s are starting to be bigger than offensive lineman. You don’t want to give up more than 10 pounds to your opponent.”

Douglas Godwin, Gulf Breeze High School (FL): “We two-gap our nose in our eagle look to help defend against heavy run teams. We want to take away any type of inside run that teams will give us. We will also do this in short yardage situations.”

Read More

Southeastern Louisiana University’s One-Step Variants in Zone Blocking

By Mike Kuchar
Senior Research Manager
X&O Labs
Twitter: @MikekKuchar


Editor’s Note: The following research was part of X&O Labs’ larger study on the Middle Zone and Outside Zone Concept, which can be accessed in its entirety by clicking here


Near Hip Progression for Uncovered Linemen

sela
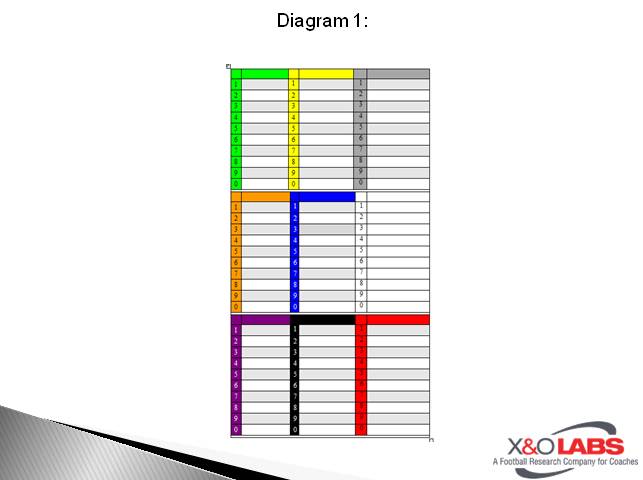
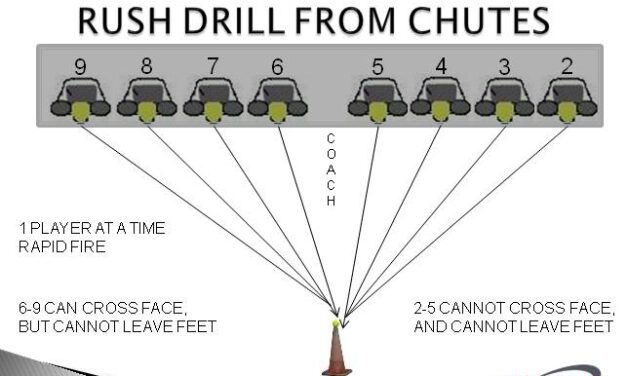
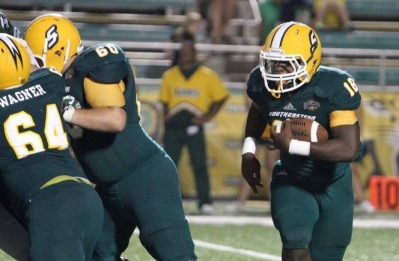
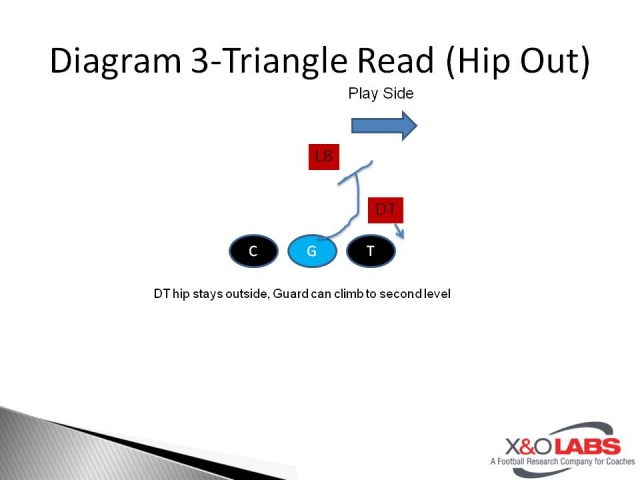
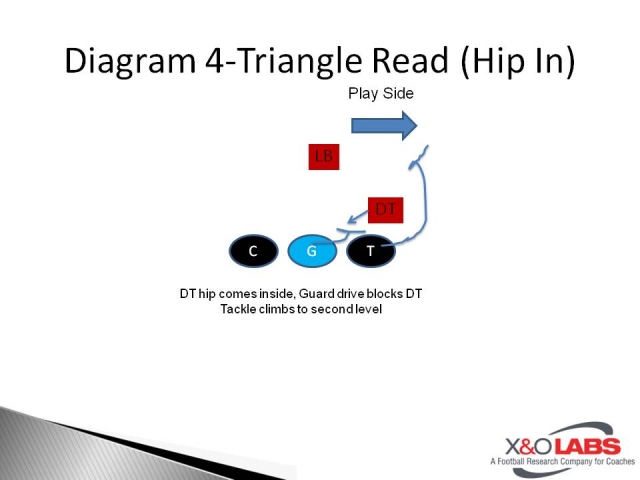
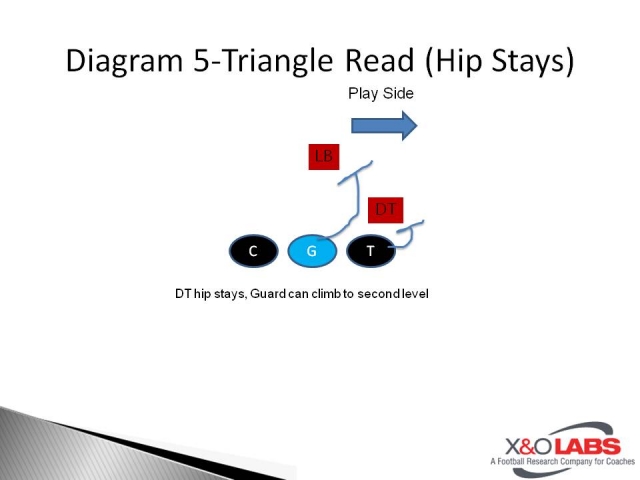
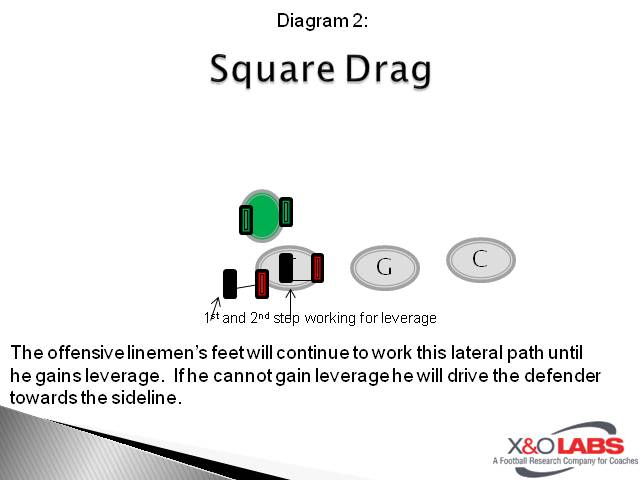
Travis Mikel, the offensive line coach at Southeastern Louisiana University, teaches a hip Aiming Point and what he calls a “Triangle Read” to his offensive linemen. The triangle read is to keep their eyes on the following (down lineman hip, play side linebacker, then back to their track).

According to Mikel, once the uncovered lineman diagnoses their read, he makes the following adjustments:

  • Hip Out- Climb to second level (Diagram 3)
  • Hip In (to him)- Drive block defender (Diagram 4)
  • Hip Stays- Drive to linebacker (Diagram 5)

Slide3Slide4Slide5

Read More

4 Phase Teaching to Cover 2 Corners

By Will Davis and Brad Garrett
Defensive Backs Coaches
Clewiston High School (FL)

Introduction

The hardest part to teaching Cover 2 is training the eyes of the corner. A lot of DBs will align correctly and look inside on the snap of the football and when that ball is snapped. We are physical with the receiver to their side, but a lot of the important key details seem to fall out of place after that. Corners think that cover 2 is just a defense where they have to be more physical and not let anyone outside of them, but they’re not grasping how much more goes into the coverage itself.

We keep the concept of our coverage as basic as we can for our 2 corners. The drills we use do have a lot of different parts that we try to put together. This is done to help the corners understand  how dominant Cover 2 can be if they can understand the importance of leverage, play quick and aggressive with their hands, and most importantly, play just as fast with their eyes. 

We try to break down the defense into 4 phases. Each phase gives the DB an opportunity to see how important training your eyes can become to a well trained Cover 2 corner. Depending on the number of receivers and down and distance, that will determine how we play the technique of cover 2.

Alignment

We like to align our DB with his inside leg just inside the outside leg of the #1 receiver, especially if they come out in any 21 personnel with 1 receiver to each side. We play more of a press technique by being really handsy and punishing. This is to disrupt the quick passing game.

If the offense tries to spread us out in a 2×2 set or 3×1, we will loosen up to about 5 yards with our alignment on the receiver being the same. The DB’s eyes always remain inside. If they have a #2 receiver to the side they are playing, that receiver will be the first key and he will keep his eyes to see through that receiver to the QB. Note that we are not reading the end man on the line of scrimmage in this drill because this is built to help with the passing game aspect of Cover 2. That way our DBs can keep their hands on, eyes wired, and feet hot, so that they can be ready and alert if they anything comes at them. We really try to focus on the importance of the QB and how he will tell us where and when the ball is coming our way.

Phase 1: This phase is the first step in the progression. We like to run in the spring and the early parts of fall camp to give our guys an idea of how important reading the QB is. A lot of the time, they get so caught up in focusing on the receiver in front of them that they cannot keep the control they need to be both aggressive and relaxed enough to break on any pass plays that comes to their side. Phase 1 combats that by concentrating on the simple, short game concepts such as Hitches, Slants, Quick Outs, Q-screens and of course, the fade route. 

We will use a coach as the QB in the beginning stages along with a cone and a normal 1 receiver to each side alignment. We have each DB focus on their eye placement of the QB the entire time, and nothing else. There is not a receiver in front of them, so they shouldn’t take their eyes back.  We teach the DBs to read the front shoulder level of the QB, so that they know in which direction he wants to throw the football. For example, if the front shoulder is up, flat and relaxed to determine the depth of the pass. They also pay attention to the attitude of the QB in order to see when he wants to throw it. This is from the non-throwing hand coming off the ball to deal it. We also teach the DB to read the drop and placement of the non-throwing hand as well in this drill. 

This may seem complicated, but we walk through everything before the drill so that they can get a visual understanding of what we are talking about. Reading the drop is the tough part as the DBs want to be aggressive and that tends to stop their feet. We say that “when our feet and eyes die, we die.” When the QB is under center, we show the DB the difference of the drop. A quick pass from the QB under center will be a quick 3 step drop, this tells our corners that something quick is coming at them so they better keep their feet hot and be ready to break and drive at any second. If the QB is in shotgun, then the type of pass and play is easy to read because the QB will just catch the snap and then be ready to deal immediately. The first step of the DB on the snap of the ball will be with his foot closet to the outside. This takes away any extra leverage the receiver may have to be able to get outside. Next, the DB will begin to buz his feet; this allows the DB to keep his feet moving so he doesn’t allow himself to be dead in the water. 

The DB will keep his eyes on the QB and then break and drive depending on the position of the QB’s front shoulder. The level of the shoulder, if it’s up in the sky, relaxed and level. Then, finally, they will read the attitude of the QB to see when he wants to get rid of the ball. When the off-hand begins to come off the football, they begin to break and drive on the direction in which the shoulder is pointed. The DB will break on the QB, and then catch the ball and finish through a cone 10 yards behind the drill. This helps the DB understand the QB can tell them all about a pass play without even knowing where the receiver is. Coaches can use the routes that they want to run or mix and implement them any way they want.

Slide1

Drill Focus:

  • On the QB cadence, the DB will key the first three steps of his drop to determine the depth of the routes.
    • Under center- 3 step drop
    • Shotgun- Catch, Flip, Throw
  • After the DB determines the 3 step drop of the QB, his eyes will stay on the QB to become familiar of the QB’s body language(“Attitude”) before throwing the ball and his off hand released from ready throw position.
  • He will read the shoulders of the QB to help him break on the direction of the route as well as the trajectory.
  • Do not chase routes. The QB tells him where to go.

Coaching Points:

Read More