By Mike Kuchar
Senior Research Manager
Special Reporting by Adam Hovorka and James Woods
X&O Labs
Twitter: @MikekKuchar
Introduction
The difficultly in implementing RPO concepts seems to be the selection process. Once coaches understand how to design them, creativity can take over resulting in an endless amount of concepts. Case three in this report had over two dozen alone. So the following question arises: How much does one need in an offensive system? We were curious to see if there was a specific number tagged to installation. We found that number ranged from 5 to 15 total pass tags off various run actions. While we realize that is a broad base to work with, we did research how coaches were devising their installation both in the spring and fall to get to the end goal giving their offense the confidence to be able to run these efficiently. We segmented our research into the following methodologies:
- Whole/Part/Whole
- Three Day Installations
- Segmented Teaching
Whole/Part/Whole Methodologies
One of the most thorough responses on the whole/part/whole teaching methodology came from Jake Olsen, the offensive coordinator at Loras College (IA).
He describes his process in details below:
“When installing these concepts, or any RPO for that matter, we use whole-part-whole installation. In the meeting room, we introduce the play with all components as a whole. It’s imperative our coaches outline the reasons why we are pairing particular runs with specific quick screens or passes. Based upon what we expect to see from our opponent, we devise the specific run(s) that we believe will work against the opponent’s front and pair up exterior schemes that can get our athletes the ball quickly in space.
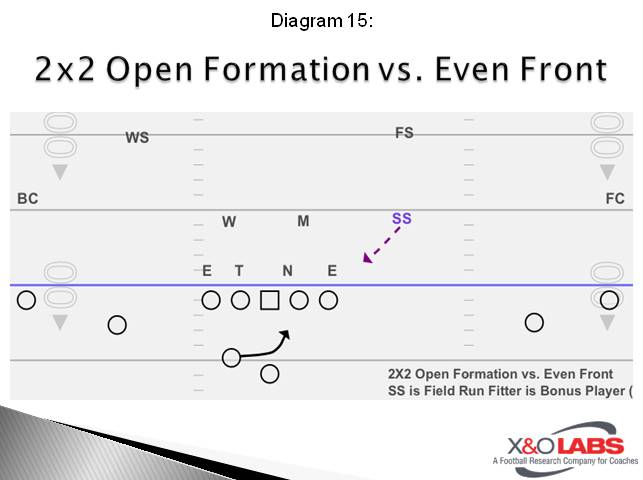
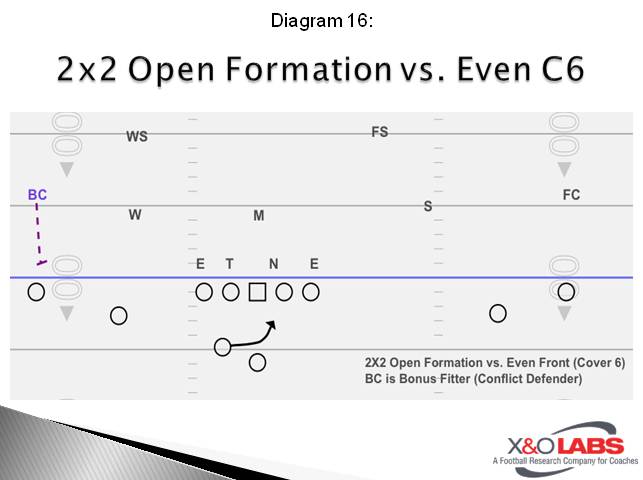
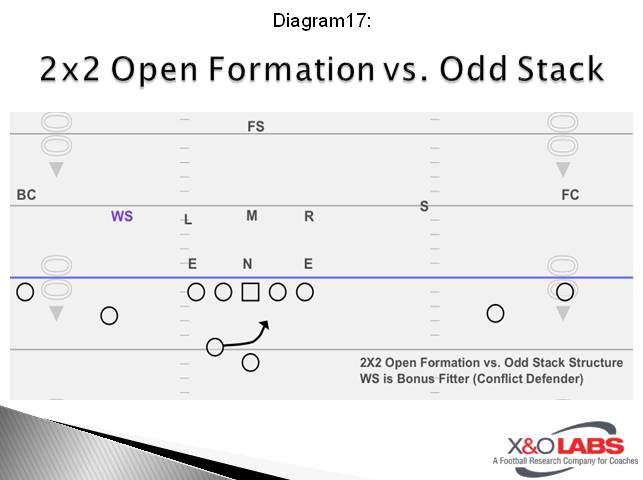
Once we have put the RPO play together, we begin to discuss with the quarterback the objective. We’ll diagram up the base defensive look against the play and then begin to go over the ways the run portion could be stopped. We will then discuss how the ‘conflict defender’ relates to the third level and its coverage, thus providing our quarterback base knowledge about the run portion of the RPO. Finally, we will converse which match-ups in relation to our formation, will give us the best chance to have success.
Once we are on the practice field, we will work specific parts of the RPO during early individual periods. For example, we work two different five minute run mesh portions each day. One takes place before our team stretch to work particularly on the motion mesh or ‘jet’ mesh on our outside runs. Our centers, quarterbacks, slot receivers, and running backs are involved during this period.
The second five-minute period is a traditional run mesh between the RB and the quarterback. We work all the variations and mesh angles of our game plan at this time. In both five-minute periods we train the quarterbacks eyes by placing a coach in the area of where we believe the ‘conflict defender’ would be and flash numbers using our fingers during the mesh. This is similar to what we’ll do with quick game reads or other pass concept reads where we’re forcing the QB to focus on a defender. As he becomes comfortable with the mesh, we’ll begin to move the coach ‘conflict’ defender around on the snap, which simulates a bit more of a real look.
Regarding the exterior pass parts of the RPO, we use several individual or group periods to work out timing and routes. We split our receivers and quarterbacks into two different sides and work different quick game/quick screen concepts. Once again, we’ll place a coach as the ‘conflict defender’ requiring the quarterback to train his eyes toward the second level on the snap or mesh.
The final portion of teaching the RPO is putting it back together as a whole. There are several ways we believe this can be done. Our favorite is to bring all the offensive components back together, excluding the offensive line. We line up the entire formation and place one coach on the field as a defender. He will represent the ‘read’ defender for our quarterback to play against. As the season progresses, and our Quarterbacks become more comfortable, we add defensive backs into the equation. We have corners present press technique/soft technique on the outside receivers or safeties roll from 2-High down to 1-High in conjunction with the ‘conflict defender’. We’ll play this 6-on-1/6-on-3 drill for a number of reps with all our game plan RPOs. We feel this has been a great drill to gain the necessary reps we need to become smooth without creating long, drawn out team periods in order to get all the scenarios.
We’ve found the best way to get the quarterback to play fast and confident is to break the RPO down into is basic parts. We rep them individually on air, put them back together, and approach is much like a 3-on-1 fast break in basketball. Our quarterback is the point guard with the ball and he is looking to distribute quickly. In most of our drill work with our quarterback throughout practice, we place some sort of body in the area where his eyes should be and flash numbers or move creating a subconscious trigger which relates to what he should do on game day.”
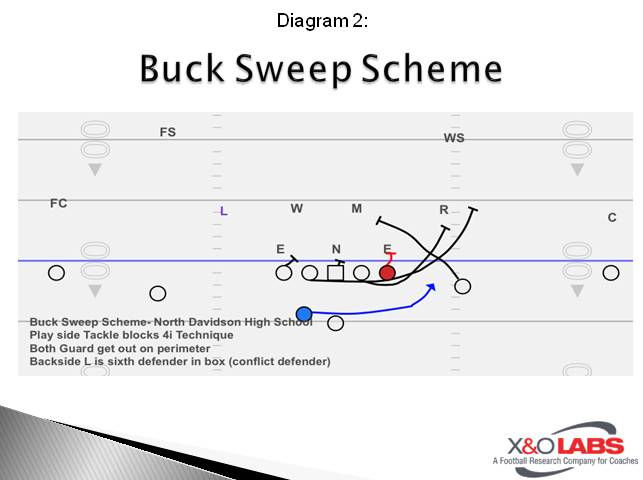
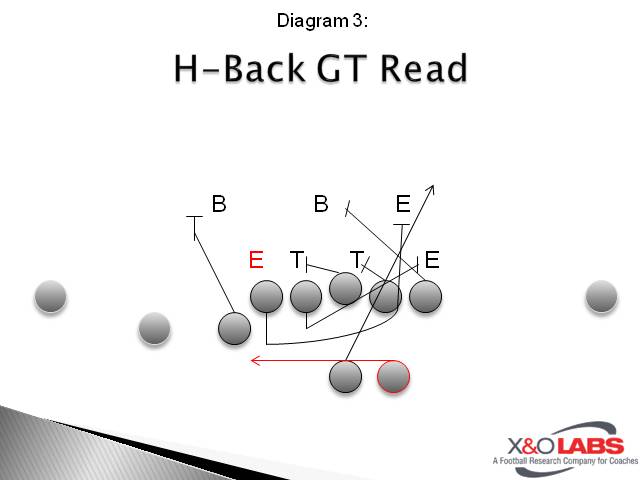
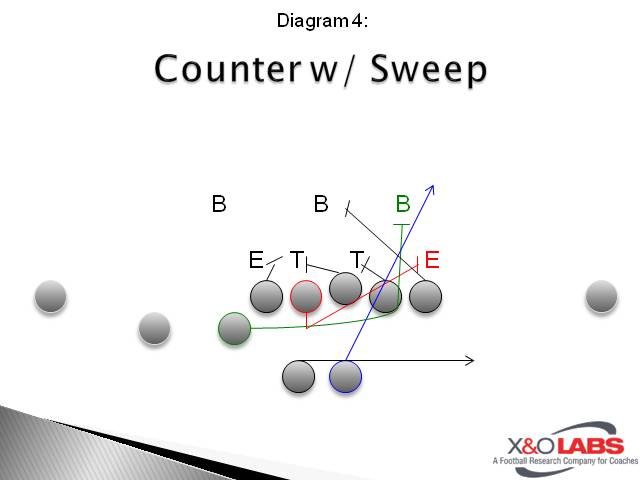
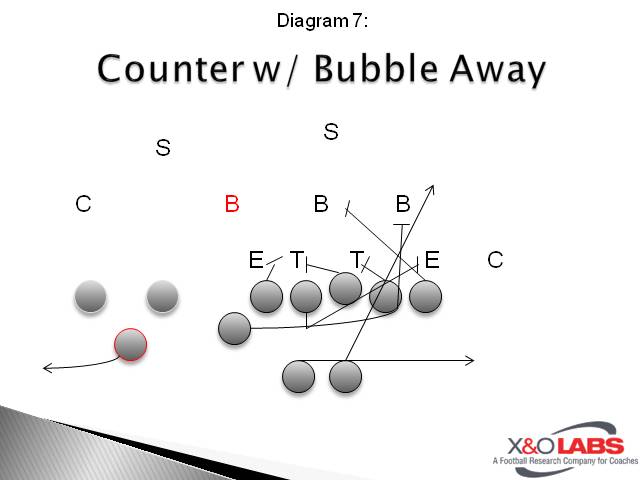
Jesse Montalto, the head coach at Ellsworth Community College believes in teaching the entire concept together, but admits the biggest challenge is getting the quarterback to know who he is responsible for. So he teaches this in the most simplistic way possible: Equating it to numbers. “If it’s a five man box, the line has the four down and Mike or the three down and the two inside backer, which means the quarterback has number six,” Coach Montalto told us. “In a six man box, the quarterback knows he is responsible for the defensive end and be ready to triple off him. It’s installed in everything we do from the beginning; whatever the run game is in the RPO is in. If zone is day one, then all the run pass options with it are in with it. If power or counter is in, any RPOs off these run action are automatically in. We do it all the time.


306")


 Quick question to all those RPO coaches: Are you designing these run/pass options in order to run the ball more effectively or just to throw it around the lot?
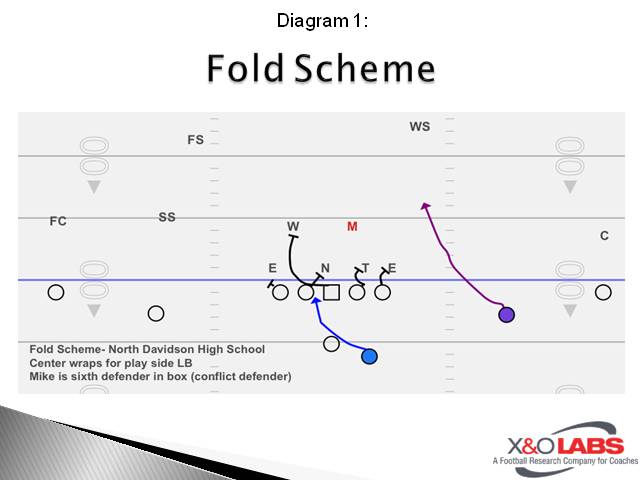
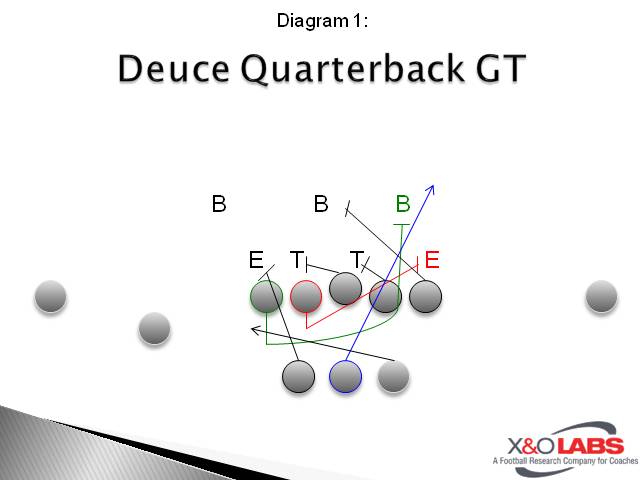
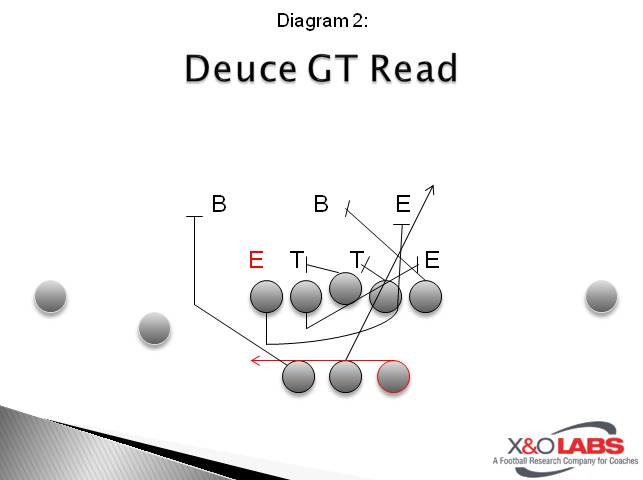
 Once the pre-snap thought process has been ingrained in your quarterback, now it becomes necessary to start designing your RPOs based off the personnel groupings and formations you already have in your system. As an underlining rule, we’ve found that most coaches take the run concepts they use with the most success and protect them formationally by using structures where they can get a hat on a hat. Then, once the extra hat falls in defensively, the run/pass option is added.
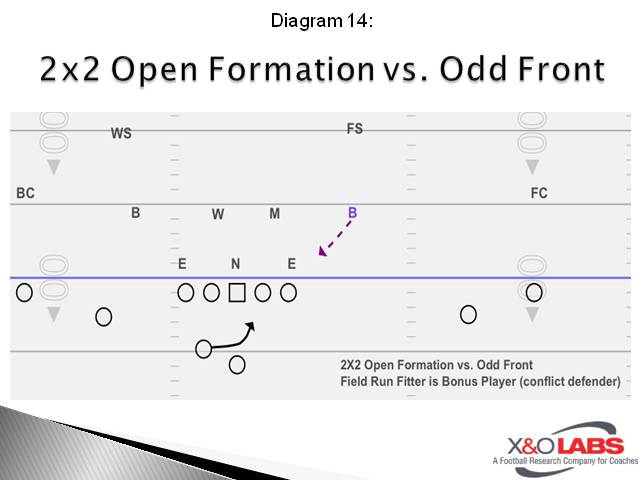
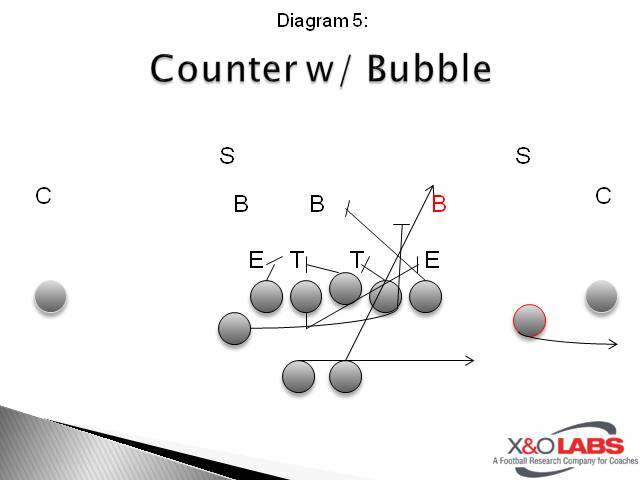
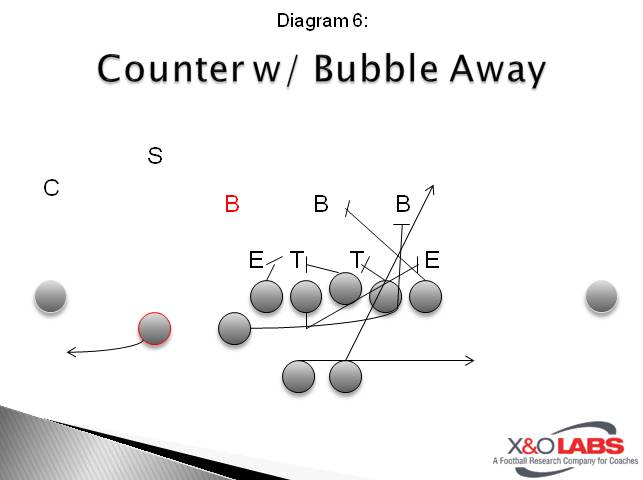
 In this case, we detail which pass concepts coaches are using to stress conflict defenders. But before we start reporting on which run concepts are married with the pass game, there is one important denomination we came across in our research: Interior runs such as zone, power and counter are tied more to horizontal pass concepts while exterior runs such as pin and pull and outside zone are tied more to vertical pass concepts.
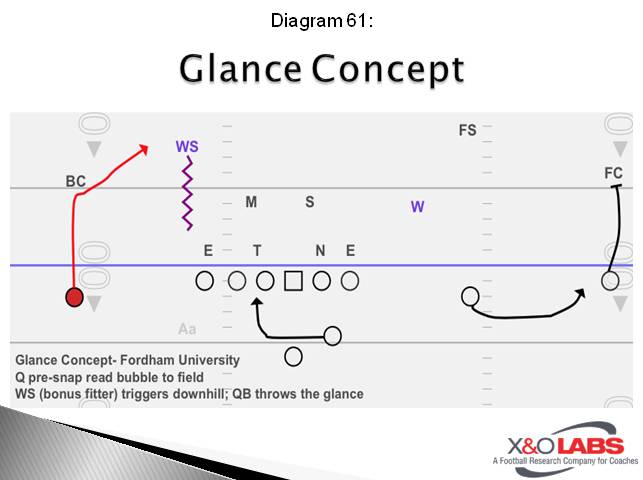
 The talk around the clinic circuit this off-season was that man coverage provides a viable answer in defending these RPO schemes. We have the research to back it up. We found that 46 percent of defensive coordinators either use pure man coverage or a version of split field coverage (which essentially turns to man post snap) to defend run/pass option concepts. So this case serves as the pure counterpoint to the topic, how offensive coaches are attacking man coverage in their RPO game.
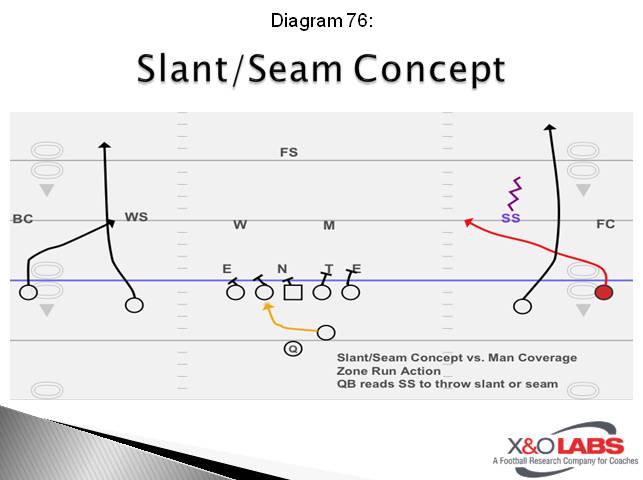


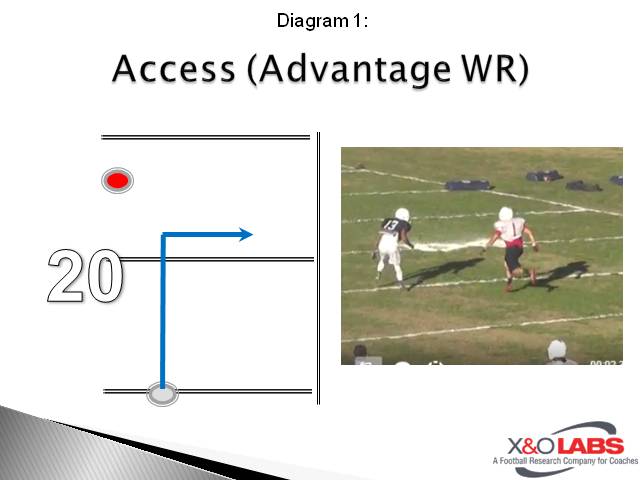
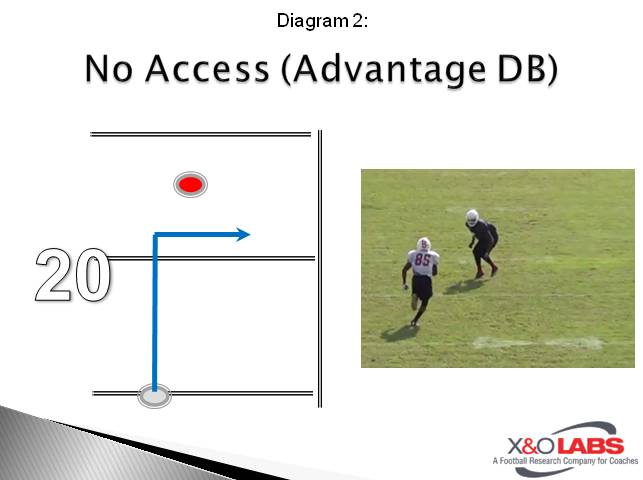
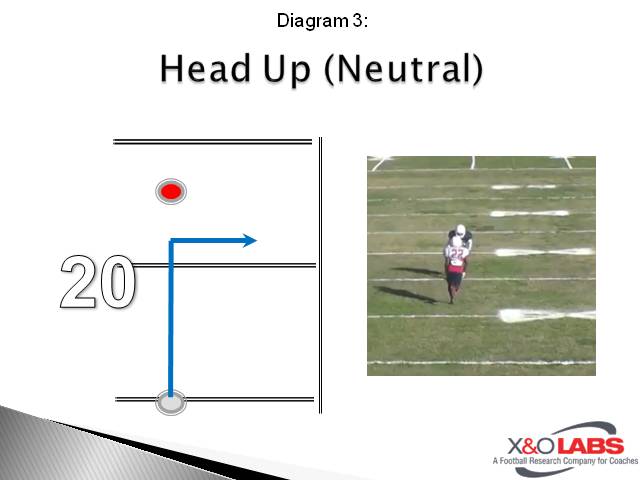
 Getting open or creating separation at the wide receiver position, in one form or another, is often relegated to three simple factors; size, strength, or speed (indeed, those do help). Unfortunately, all of us in the coaching world realize, you are not always fortunate enough to have guys that were born with, or have been able to create, those traits. Today we are going to discuss how coaches who may not have the personnel they desire can still have a chance to win with whoever, whenever by using my systematic approach.