Using Video Replay During Games

By Mike Kuchar
Senior Research Manager
X&O Labs
Twitter: @MikekKuchar


Introduction:

CaptureOne little-known rule change from the NFHS two years ago has gone virtually unnoticed… and it could be one of the biggest opportunities for high school coaches in 2015.

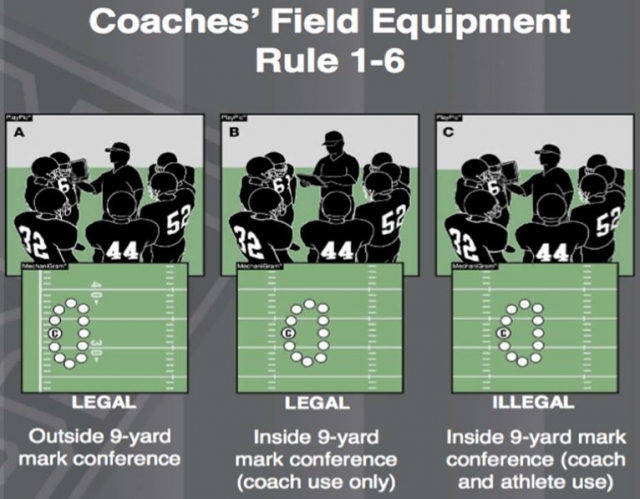
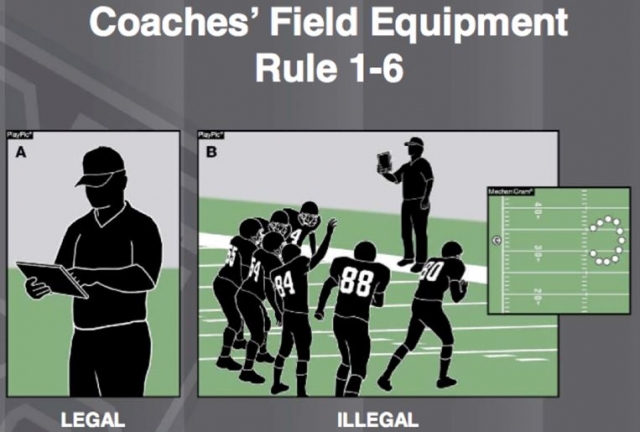
In 2013, the NFHS changed its Football Rule 1.6.1.2 to allow the use of video during games. The change allows the use of video on iPads and other tablets by coaches and players.

Specifically, coaches can use iPads and other tablets during games to communicate with players when both players and coaches are on the sideline (off the playing field); to communicate with players when the players are between the sideline and 9-yard marks; and during a conference with players inside the 9-yard marks, but only coaches are allowed to use the tablets.

However, it is illegal for coaches on the sideline to use iPads or other tablets to communicate with players inside the 9-yard marks; and, it is illegal for coaches to use iPads or other tablets to communicate with players during a conference inside the 9-yard marks.

See the NFHS’ illustrations below for a clarification and continue reading to see how to do it…

Capture1

Capture2

In the Real-World…

So, here’s what this rule change means in the real-world…

  • Seconds after a play, you can watch the video replay and make immediate corrections.
  • After a series, you can immediately show your players video replay and, again, make immediate corrections.
  • At halftime, your first half of film is already broken down, so you can review the video with your coaching staff, decide which corrections need to be made, and then, meet with your team to watch film and discuss the changes.

Capture3
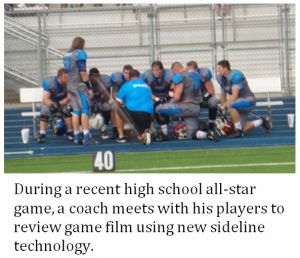
With this rule change, gone are the days of watching film on Saturday only to discover the one or two changes you could have made to win yesterday’s game. And, our favorite, you’ll no longer have to “get on” a kid on Monday due to a blown assignment, because you’ll be able to immediately show him the mistake and make changes during the game.

You can see now why we’re excited about NFHS Football Rule 1.6.1.2. This rule change allows us as coaches to be more efficient, timely and it quickly improves player performance.

But Here’s the Big Question…

Read More

Quarters Coverage: 4 Footwork Variants of Safeties

By Mike Kuchar
Senior Research Manager
X&O Labs
Twitter: @MikekKuchar

Editor’s Note: The following research from X&O Labs’ special report, The Quarters Coverage Study, which can be accessed in full by clicking here.


Safety Pre-Snap Reads:

msu234
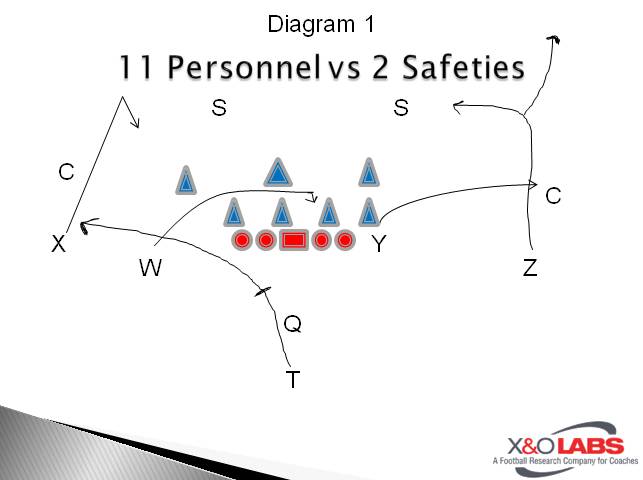
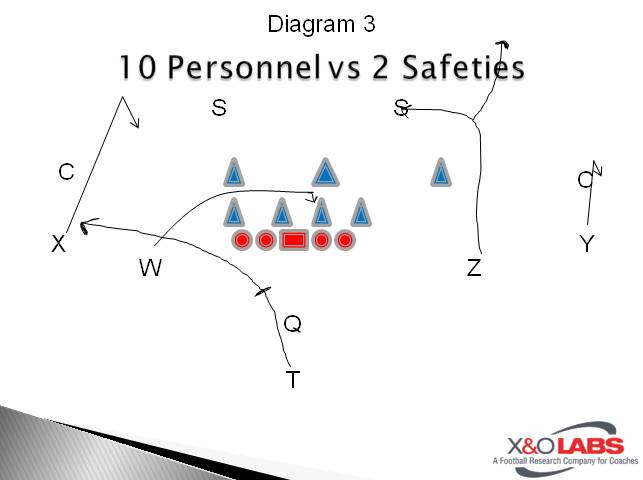
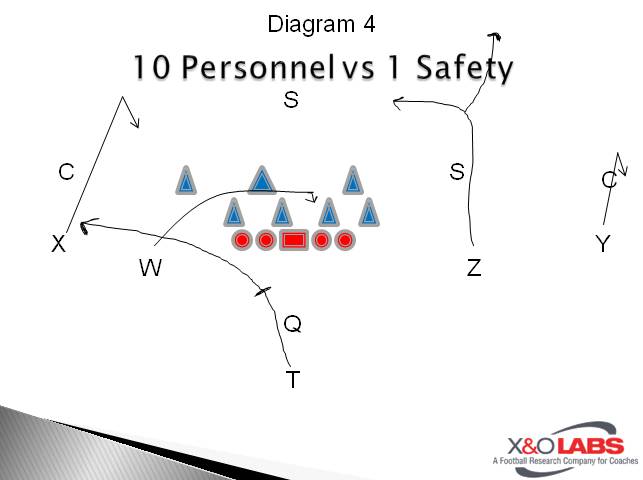
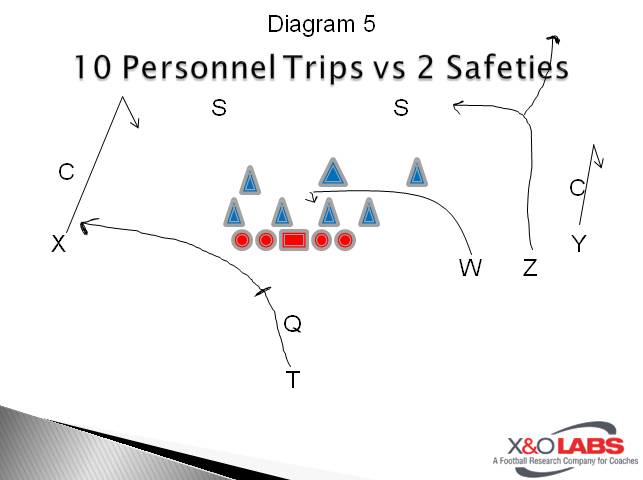
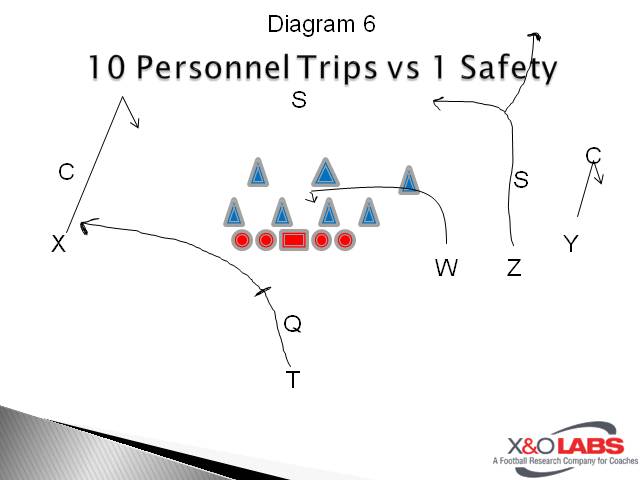
It’s important to note that the alignments of safeties in Quarters Coverage will depend on how many receivers are to their side of the formation. Remember that Quarters coverage is a “mirrored” coverage, where one side of the secondary is working independently of the other side. Because the offense can present various looks to each side of the formation, we will detail the changes in alignment in Case 2 and Case 3 of our report. Here, we’ll start with fundamentals and techniques of those safeties and how you can get them more involved in the run game.

When we conducted our research, we found that 63.4 percent of coaches teach their safeties to read the EMLOS (End Man on the Line of Scrimmage) for a pre-snap read, regardless of the formation. According to these coaches, the EMLOS will dictate whether its a run or pass concept by firing off the ball with a low hat (run) or extending off the ball with a high hat (pass).

Adam Waugh gives his safeties the allusion of “a pane of glass” that will indicate whether it’s a run or pass scheme. “He looks through the ‘imaginary’ pane of glass that rests along the offensive line,” says Waugh. “If that offensive tackle breaks the pane of glass, the safety plays run. If that offensive tackle only ‘bumps’ the plane of grass, then he plays pass. The ‘don’t go if you don’t know’ philosophy tells the player to play pass if there is any indecision.” Waugh did mention that he would change the reads with his safeties sometimes on a weekly basis depending on whom they were playing. “When I was at Army, and we used to play some monstrous offensive linemen at Boston College, we would pick the 6’7″ tackle who can’t bend and say that he was our read,” said Waugh. “But with these quicker, more athletic Spread teams it became difficult to decipher.”

But, while conducting our research, we’ve found that the high/low hat philosophy can become convoluted, particularly with the technique of offensive linemen in Spread offenses. Often times, it’s difficult to decipher whether or not safeties are getting run or pass reads because linemen do such a good job of “selling” the run on pass concepts. This is why we’ve found many coaches starting to read more than one linemen in deciphering their run or pass reads.

Read More

Using the Mesh Drill for Multiple Read Schemes

By Jim Good
Associate Head Football Coach/Offensive Coordinator/QBs
University of Redlands, California
Twitter: @UR_CoachGood

Introduction:

redlandsThe majority of our run game contains an option component. Part of our offensive philosophy is to “Protect the Defense.” It is imperative we maintain possession of the football and either score or set the defense up with great field position. The Mesh Drill has been critical in helping us achieve success in this area.

Drill Details:

The Mesh Drill will involve only the QBs and RBs at the base level. Later we add TE/Hs and offensive linemen as schemes become more complex. A high number of repetitions are demanded in our practices. The drill will allow us to focus on the QB/RB mesh, each player’s “reads” and the spatial relationships between players on each run play within our offense. We will work the Mesh Drill for 5 to 10 minutes per practice depending on the following variables:

  • Time of year (pre-season vs in-season)
  • Day of the week (more time spent early in the week)
  • Game plan (play selection for the week)
  • Number of players involved in the drill (TE/H’ and/or OL)

Spacing is imperative in this drill. We use an “offensive line strip” to maintain consistent alignment and landmarks for the players involved. To keep a quick pace, the quarterbacks will rotate from center to quarterback to defensive end to out. The running backs will rotate from running back to linebacker to out. If we have a TE/H involved, he will rotate from TE/H to safety or outside linebacker to out. See below for position descriptions for the drill:

Quarterback:

Read More

Montana State’s Top Run Pressure

By Mike Kuchar
Senior Research Manager
X&O Labs
Twitter: @MikeKKuchar

Editor’s Note: The following research was part of XandOLabs.com special report on “Developing an Effective Pressure Check System.” The full length report can be found here.


Introduction

mtstA two-man surface clearly eliminates an extra gap in the run game, which is probably why many coaches prefer to blitz the two-man surface in passing situations. However, we did find that some coaches are using a two-man surface pressure to affect the run game, but not the weak side run game. Montana State defensive coordinator Jamie Marshall uses what he calls “backer” check, which tells the bubble linebacker in his four-down front to pressure the B gap. It’s a solid first and second down call in the run game and fits well against 11 personnel run game. It’s a three-deep, three-under pressure out of the four down front.

Read More

Drilling QB Escape Mechanisms

By Sam Nichols
Managing Editor
X&O Labs
Twitter: @SNicholsXOLabs

Introduction

uclaqbThe article is centered around how to properly escape the pocket when things break down.  After the quarterback has worked through his initial progression and is overwhelmed by pressure, he will have to escape to keep the play alive.  Before we get into the different drills that coaches use to teach these escape mechanisms, lets take a look at how coaches are teaching players to know when to escape.  Here are some approaches that were shared with us as part of our survey. 

For us there are two words trouble and pressure. If you are in trouble (being touched or about to be hit) get out of trouble escape and keep the play alive. When our QB is under Pressure(people at his feet, defender being blocked by him) they need to hang in the pocket and deliver an accurate ball. Avoiding pressure and delivering an accurate ball is the most important part of playing QB for us. – Steve McNeely, QB Coach, Mt. Union College

We have a built in escape plan on every pass so it is up to our quarterback. If our QB sees blitz he must attempt to make the hot throw if it is taken away he will escape through B-gap, but making sure his eyes stay down field. – Mike Rowe, Head Coach, Rocori HS

At Anderson, we on average can get the ball snapped and thrown in our pass game in roughly 2.5/3 seconds. So anytime we are doing 7on7 or Routes on Air I try to always have distractions for our QB’s. I will throw hand shields at them or take a broom out to practice and swing it at them. I want them constantly having distractions in there face. This way when we get into a game they do not have to worry about being distracted.  Typically this is one of the hardest aspects of playing QB. Some QB’s can feel pressure and others cannot feel pressure. This is one aspect that I try not to over coach if we have a QB who can feel pressure. If the QB is savvy and can get out of the pocket I am going to let the QB be an athlete and make plays. – Brian Pitzer, Anderson HS, (OH)

Drilling Escape Mechanisms

There were a variety of drills that coaches submitted to address this part of the progression.  Here are some that stood out to us:

Chow DrillTaylor Mazzone, Quarterback Coach, UCLA and member Championship Coaching Systems (www.championshipsystems.com)

OBJECTIVE:  This drill teaches the quarterback how to use his back foot when sliding away from pressure in the pocket while keeping his eyes downfield. 

DESCRIPTION:  The quarterback will take a 3- or 5-step drop, and once set into his punch stance, will slide 1 lateral step, leading with the back foot followed by 1 shuffle up to make a throw to his target.  The QB must be balanced and compact with two hands on the ball at all times.  There are two ways to run this drill either “1 over 1 up” or “1 up 1 over.”

Read More

4 Game Planning Mistakes Offensive Coordinators Make

By X&O Labs
Twitter: @XandOLabs

Introduction:

gameplanDoes this scenario sound familiar? You spend all week studying film, opponent tendencies, drawing plays, teaching your players in the film room and on the field; you have put together what you thought was the perfect game plan only to see your team fall short. The next day you study the film and all you do is ask yourself why did I do that? Why were we trying to be something that we are not? Your film session is filled with players making mental mistakes and not playing like they are capable of playing. This article is designed to highlight some of the mistakes that are common in the game plan process.

Mistake #1:

It never fails, you are watching game film on your opponent and the other team is just moving the ball up and down the field at ease, and you think to yourself, “we could do that.” The problem is, their team is making a living throwing the ball 60 times a game and your team is built to run it 60 times. You watch the passing schemes that they are having success with and you immediately run to the dry erase board to draw them up and install them in this week’s game plan. It is okay to borrow one or two plays from someone else but you don’t want to change your offensive identity week to week. You get good at what you do by committing to it and practicing it over and over. As a coach you get a better understanding of what defensive schemes may give you problems and how to make in game adjustments because you know your offense inside and out. A new scheme might look good on film and even in practice against the scouts, but you might know the true ins and outs of it to make it successful on a consistent basis and there is no way your players will not know it well enough to execute it against any defensive package that they might see.

Mistake #2:

The next mistake that you could run into is trying to add too many wrinkles to a play. You are watching film and your offense is moving the ball extremely well and then you get greedy. Instead of just lining up and running a play and trusting that your players will make the right decisions, you try to give them too many checks. It always seems to start off very simple, if they give us a certain coverage, we should throw a quick screen. If they give us a certain front, but the LB is out of place, we should check the run to this gap. So what starts off as one play, now has two or three different components to it. The offense is now at the line of scrimmage thinking about what they might have to do on three separate calls instead of just one. It’s going to slow them down and they will not be as successful as they could be. Remember all eleven players have to be able to execute it, not just the quarterback.

Read More

Central Connecticut State Drill Catalog

Here is a look at the complete OL drill catalog from Central Connecticut State.

Read More

University of Miami OL Drill Catalog

Below is the list of drills shared with us by the University of Miami.

Read More

Storm Speed Sweep Concept: Attacking the Flank

By Gerald Hazzard,
Assistant Head Coach/Offensive Coordinator,
Lake Erie College
Twitter: @CoachHazzLEC

Introduction:

lefbThe Storm Speed Sweep is a concept that we have incorporated to attack the flank of the defense. When we designed it we wanted it to be different than the other Speed Sweeps that people see on a weekly basis. We feel our version gets the flank faster, is highly efficient, and forces the defense to adjust on the fly to defend it. The results were a play that was 64% efficient, which means it gained 4 yards, or converted the situation, and averaged 6.7 yards per carry. The Speed Sweep also produced 6 big plays (runs over 20) and 4 touchdowns in 2014.

This concept works wonderfully against the run blitzes that we see. As a heavy Read Zone team, defenses will often call their blitz game to the side of our tailback, or an interior blitz that can give a Zone play problems. Since we have the ability to run our Speed Sweep out of the same formations that we run our Zone, defenses are forced to guess which play we are running or abandon their blitz strategies in fear of getting out flanked.

Another advantage of this concept is that it is very basic from an assignment stand point. We feel that we do not have to practice it a ton to have it ready for game day. This allows us to spend extra time during the week correcting mistakes and gives us extra reps running our weekly game plan plays.

Blocking Scheme Offensive Line:

The success of our Speed play begins and ends with the front side tackle. His assignment is to “reach cut” the front side defensive end. He will take a 3 o’clock step or lateral step and cut the outside leg of the end. It is important for the tackle to gain enough ground on his first step to gain leverage and put himself in the best spot possible to execute his assignment.

If the end aligns wide or moves out on the snap of the ball our tackle has two options. First, he can use a technique we call “three steps to the cut” which means he will take his 3 o’clock step at the snap then take two more steps to make up the ground. After his third step he will throw his inside shoulder into the outside thigh of the end and cut him down.

The second option he has is to stay high on the defensive end. If the tackle stays high we want him to work to get his inside hand to the center of the end’s chest and his outside hand on the outside hip. His footwork remains identical to when he goes “three steps to the cut”. If the tackle can establish this position he should have the end reached. If the defensive end makes an inside move, the tackle will let him go and climb to the second level.

It is important to note that in our scheme we never block a first level defender that is in the B gap or tighter. We will also not block an interior blitz. The action of the play will handle inside moves and blitzes. Since we are not worried about anything past the B gap, our front side guard, center, and back side guard are going to take a 3 O’clock step to the play side and climb immediately. They will not block first level defenders. I want them to cut off the first second level defender that they can reach.

We teach our guys to never chase at the second and third level. We give our linemen a “license to miss” when blocking in space. I want them to run full speed at defenders in space. The thought is they will either get their block or the defender will get out of their way. We do not want our linemen trying to juke with defenders. The backside tackle is going to “run to cutoff”. Cutoff for us is seven yards deep on the opposite sideline. I want the tackle to take a sharp angle and block the first second or third level defender he can “cutoff”. A tight end on the back side will perform the same role.

Read More

Teaching Zone Eyes to Defensive Backs

By Zach Turner,
Defensive Backs Coach,
Kenton High School (OH)
Twitter: @Zach_Turner1

Introduction

screenshotOffenses are evolving year after year and are finding ways to put defenses in a bind. We are starting to see a lot of offenses use a variety of motions, zone fakes and misdirection to confuse and put the defense in a bad position. All of this “eye candy” can take your players out of position and create an edge for the offense. At Kenton High School (OH), we have incorporated a number of drills that help teach our defensive backs the eye discipline they need to more often be in position to make a play.

Keys

A lot of players especially at the high school level are aware of their initial (run/pass) key or secondary key when they enter our program. The first day of camp is when we teach our players how to determine and interpret their keys. This is a crucial part and must be done prior to any drills.

Determining Initial Keys

Defensive backs must have their eyes on their initial key at the snap of the ball. This is going to give them an initial read and identify if the play is a pass or run. We distinguish keys based on our defensive backs alignment. If a player’s alignment is outside, or on the hash, they will read the end man on the line of scrimmage. We tell our players that it could be a tight end or a tackle depending on the team and personnel grouping. If a player’s alignment or landmark is inside the hash they will be reading the guard to the tilt side.

Teaching Initial Keys

We teach our players two different ways to interpret their keys. We introduce both concepts in two-a-days so our players are familiar with them. Then during the season, based on the players’ technique and the scheme, we will go over how we want our players to interrupt their keys during the game. These two different concepts help our kids read the linemen who are high firing out or the lazy tackles who do not get off the ball well.

The first way we teach our players to interpret their keys is the common “high hat vs. low hat” read. If the player reads a high hat, he knows it is a pass. It may be the tight end releasing for a pass or a tackle pass setting. If the player reads a low hat, he knows it is a run. It may be a down block, drive block, reach block or even a pull by the tackle.

The second concept we use for teaching pre-snap reads is by determining “aggressive vs. non-aggressive.” If his key is aggressive and fires out with intent to block someone it is a run. If their key is non-aggressive and is either looking to release for a pass or is not firing out to drive the defender off the line of scrimmage it is a pass.

The only time these keys change is if you are reading the uncovered guard then you have to introduce guard pulls. To teach guard pulls, we tell our safeties if it is a tight pull it is a run; a wide pull is a pass.

Read More

Attacking Soft Coverages with the Bend/Hook

By Ryan Hain 
Offensive Coordinator
Franklin High School (MD)
Twitter: @coachhain


Introduction:


jac picWe are an uptempo offense.  Due the the speed and effectiveness that we have both running and throwing the ball, we tend to see a lot of 6 man boxes with very generic coverages. In order to attack these coverages, Coach Dave Brock, now at the Head Coach at Delaware, introduced me to the Z bend, X hook concept that he had been running for years at UNC, Kansas St, and Rutgers. I saw how successful guys like Hakeem Nicks, Jordy Nelson, and Brandon Banks were, just running this play alone and wanted to try it with our guys.

This past year the Bend / Hook concept or “Bend” as we call it on the field was a staple in our offense and a key to our run to a Maryland State Championship.  In 2013, we ran 56 times this season and completed 39 of them. So that is almost 70%, while we were 65% overall on the season. We gained 702 Yards on this concept at 18 yds per completion (12.5 yards per play). And we had 7 Td’s on this concept, 6 of them to the Z. In addition, we also earned 27 first downs on this concept.

Since we rarely saw an exotic blitz or rolled coverage against us, we found that this pass concept that made the defense defend sideline to sideline and deep as well as underneath. It also allowed us to line our top 2 receivers on opposite sides of the formation and make the defense choose which one to key on.  


Formations

We have been able to run it out of a variety of formations and personnel groups, as well as with and without play action. 11 personnel has been the most used formation for this play (Diagram 1 and 2). Our system uses a “W” slot receiver instead of the more common “H” because our guy is typically more of a smaller scat type kid.

Slide1Slide2


We also run it out of 10 Personnel (2×2) which is Y split for us, because our TE is also our outside receiver. (Diagram 3 and 4)

Slide3Slide4


Trips has also been used for this play (Diagram 5 and 6).

Slide5Slide6

Read More

Throwing Uncovered in Your Run Game

By Will Compton 
Head Coach
Rudder High School (TX)
Twitter: @CoachWCompton

Introduction

NortonYou look down at your call sheet and look for the perfect run play for 3rd and 3. You talk through the headphones and signal the play in to the QB. He walks to the line and the first thing he does is see if he can throw it. This is the basic process in all of our run game that doesn’t involve a jet motion. Using the philosophy of throwing uncovered in your game is a great way to add an option aspect to your offense. It is an easy way to help you call your run game because your QB will make your call a great play.

Throwing Uncovered

We use the idea of “uncovered” on all of our inside run plays. When the Defense begins to play heavy on the run and crowd the LBs close to the box it creates an uncovered skill player. When walking to the line we ask our QB on all run plays to look at the OSLBs. If they are playing tight to the box then he has the green light to throw uncovered. We teach our WR to identify which of them is uncovered based on the Defense. The WR will talk to each other and check on and off the ball based on who is covered or uncovered. This lets the QB know if he wants to throw the ball which WR will be running the fast screen. They do not have to understand coverages. They only need to understand grass. If the Defense is playing loose coverage across the board. The #2 WR will always run the fast. It is an easier and quicker throw for the QB.


Slide1Slide2

Why would you throw uncovered on run plays?

  1. Spread the ball around to all your athletes on the field.
  2. Make the Defense accountable for every Offensive skill position.
  3. It helps in making your play call the right one.

In today’s game players want to be involved in the game on every play. They want to feel that they are contributing to the Offensive success by doing more than just blocking. We use “uncovered” as a way to include them in our run game. Our WR do a great job of understanding grass. We spend time at the beginning of the season explaining to them that every called run play is still a possibility for them to catch the ball. This helps in keeping the WR committed to the run game. It also makes the Defense account for every skill player on the field. If they are going to play loose cover 4 and have 7 players tight to the box, you have to make them pay. If thrown several times a half the LBs will start to get out of the box a little more and more so that they can stop the fast screen. This gives you the numbers game that you want.

Read More

8 Ways to Cover Trips with Quarters

By Mike Kuchar

Senior Research Manager

X&O Labs


Editor’s Note:  The following report is an excerpt of the Quarters Coverage Research Report.  To view the entirety of that report, click here.  


Three-Wide Adjustments:

Defending unbalanced trips formations could be difficult regardless of the type of coverage, but there are some options with Quarters.  The main concern for any defense is to defend four vertical threats with the presence of four defensive backs gives a defense that option in Quarters Coverage.   Not surprisingly, we’ve found several answers to defend trips formations in Quarters coverage.  We’ll start with a typical 3×1 open set.  But before we do, below are some interesting figures we discovered in our research:

  • 49.3 percent of coaches will play Bronco (outside linebacker) force against the weak side of trips formations.
  • 38.4 percent of coaches will play their Safety to the trips side 1-2 yards inside of the number two receiver.
  • 50.6 percent of coaches will play inside leverage on the number one receiver to the side of trips formations assuming he has no help.

Formation:  3×1 Trips Open (Diagram 44)

When we asked coaches how best do they defend 3×1 formations, 64.3 said they will man the back side corner on number one away from trips and tie in the back side safety to play #3 vertical (Diagram 45).  Boyd is one of those coaches, and he calls this coverage his “Gilligan” coverage, which is self-assuming, considering the backside Corner is on “an island all by himself.”

To the front side of the play, many coaches prefer to play what was referenced above as an “Alert” call against two wide receivers.  The Corner to the trips side will still handle any flat breaking routes by number-two, while the safety will leverage any vertical threat by number-two.

The key to this scheme, according to coaches, is the play of the apexed outside linebacker.  That outside linebacker must be able to hold inside leverage against number-two to protect the front side safety of any vertical routes (Diagram 46).  The Mike linebacker is a low hole player, who must work to #3 and not come across his face (Diagram 47).  The backside safety reads the front side number three receiver and picks up #3 vertical.  If number-three goes out, he looks for a new number-three, which can be coming from across the formation (Diagram 48).   Speaking from experience, one of the most challenging things to teach backside safeties (particularly young ones) in this Gilligan concept is to train their eye discipline in making them understand that number-three doesn’t always have to be number-three pre-snap it simply refers to the number-three receiver post-snap whomever that determines to be.   In the video clips at the end of this segment, you will see examples of back side safeties who did not play number three correctly.

Read More

Disrupting Protections Using First Level Twists

By Ben McKaig
Defensive Line Coach
Utica College
Twitter: @McKaig_Ben

Introduction:

As defensive coaches, we are constantly looking at ways to attack weaknesses in protections without losing coverage options in the back end of the defense. I believe that a properly executed twist can give both man and slide protections trouble, providing pressure on the quarterback without bringing an extra defender. We have worked our twists over the past several years to try to obtain maximum effectiveness against both types of protection.

Benefits of Using a Twist:

We look to twists to do several things for our defense. First, we can attack a protection with a properly executed twist and almost always generate additional pressure and stress on the quarterback and offensive line. We also incorporate our twist game to defend against screens and draws, as late moving defensive linemen are able to see the play happening in front of them and redirect. Finally, twists can cloud quarterback throwing lanes and help to defend against a quarterback looking to step up in the pocket or scramble. That said, the lion’s share of this article will focus on attacking offensive pass protections.

Maximizing the Effectiveness of Your Twists

Our twisters are divided into two primary jobs: a penetrator and a looper. Our defensive linemen understand that depending on the type of protection we face, either member of the twist may come free to the quarterback. So there is a shared responsibility in executing our twists and all of our guys can benefit from a well-executed stunt. The basic twist movement is shown in Diagram 1. The penetrator is labeled P and the looper is labeled L.

Slide1

The Penetrator must execute the following:

  • Attack his aiming point which is either the ear hole or nose of the OL.
    • The penetrator is the catalyst in the twist. He must break the line of scrimmage and get the opponent offensive line off of the same plane or “off level.” This is the most important part of the penetrator’s job. Getting the offensive line off of the same plane ensures that they will not be able to pass off the twist without pressure on the QB. We also aim for either the ear hole or to “break the nose” of the OL so that we can penetrate the gap. These two aiming points allow us to work half of an offensive lineman even while we are executing the twist.
  • Strike the offensive lineman with their face and hands.
    • The OL should be looking to engage the “looper” in the twist. This is a free shot for our penetrating defensive lineman to strike an OL and to knock him “off level.” This will also help to deny OL the ability to pass off the twist.
  • Shed and Ricochet. Get vertical to the QB.
    • The penetrator must not become engaged when he strikes the OL. It is important to ricochet off of the strike and get vertical into the QB’s face. We call it a pinball technique. Bounce off of the OL and get moving to the QB.

The Looper must execute the following:

  • 2 vertical steps to make the OL believe he is about to engage the looper.
    • Best case scenario, we can get the OL to focus his eyes and even open his hips toward the looper. When his hips are pointed to the looper, it ensures that our penetrator will get a great strike and will be free to ricochet to the QB. The OL will not be able to flip his hips faster than we can move. Occupying his eyes will ensure a free shot for our penetrator to take him out, eliminating him from the protection.
  • Stick and go. The looper will stick his foot in the ground and nod, similar to a WR break.
    • Sell the movement and continue to occupy the eyes of the OL. Loop to find open space. Work a move off of any additional blockers. In a man blocking situation, one of the two will come free.

Types of Twists

Read More

Blocking Problematic Fronts in the Spread Power Scheme

By Justin Iske
Offensive Line Coach
Southwestern Oklahoma State University
Twitter: @justiniske

Introduction:

swosu
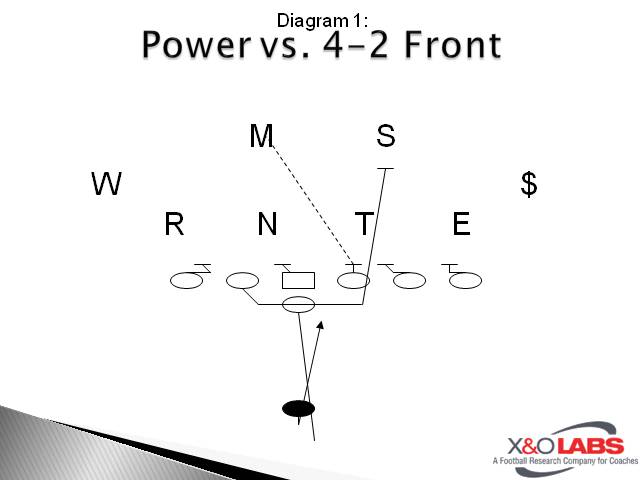
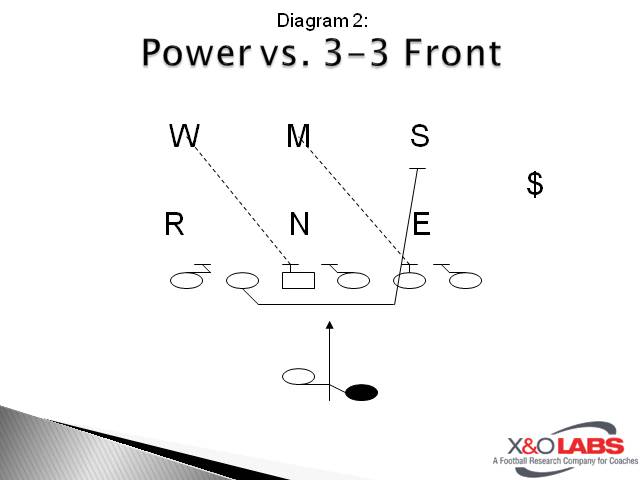
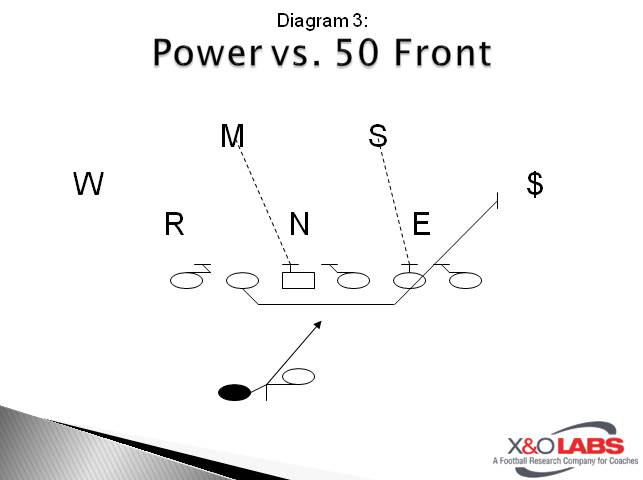
The One-Back Power play is a simple scheme that is easy to teach assignment wise and can be adjusted to account for any defensive alignment or post-snap movement. This play and our Counter play are taught in tandem as they are both gap schemes that are very similar, especially on the front side. The game film attached to this clinic report shows all of the techniques discussed below done improperly and properly.

Base Assignment Rules for Power:

Tight End: C Gap – Man if covered by a down lineman. C gap to second level if uncovered. Must account for any C gap run through.

Play Side Tackle: B Gap – Create a double team if possible with either the tight end or play side guard. Account for any B gap run through.

Play Side Guard: A Gap – Create a double team if possible with either the play side tackle or center. Must account for any A gap run through.

Center: Back side A Gap to second level. Must account for any back side A gap run through.

Back Side Guard: Skip/Square Pull to play side linebacker. Read the play side double team and/or tight end’s block for entry point. Work for a kick out on your linebacker but don’t pass by opposite color.

Back Side Tackle: Back side B Gap to hinge. Must account for any B gap threat first and then hinge to the back side C gap if no B gap threat.

Slide1Slide2Slide3

Tight End Coaching Points

Man vs. Nine Technique: First step is a six-inch power step (forward) with the play side foot. The second step mirrors the first step with the inside foot. Two-hand punch to the inside number of the defender. He must stay square to the line of scrimmage and keep his butt out of the hole. At no time can the tight end let the defender cross his face.
Man vs. Seven or Six Technique: First step is a six-inch step for width with inside foot. The second step mirrors the first step with the outside foot. Two-hand punch to the inside number of the defender. Stay square to the line of scrimmage. If defender fights inside, he must cover him up and wash him down the line of scrimmage.

Having a tight end that can base block a defensive end is the number one factor for having a consistent Power play. If you aren’t blessed with that type of player at the tight end position, you have some options besides deciding to scrap the play altogether. Those options are as follows:

  1. Run Power from a two-back set and assign the fullback to kick out the front side defensive end.
  2. Put the Y off the ball either aligned in the B gap or in motion to the B gap in order to give him an angle to get a kick out on the front side defensive end. This also has the advantage of being able to flip the play based on alignment and/or matchup.
  3. Flip the Y and back side tackle’s alignment to get a better blocker at the point of attack. This will result in an overload formation and will also force changes in the secondary.

Double Team Coaching Points

Read More