Inside Zone: Varying Roles for the Slot Y

By Ben Malbasa
Head Coach 
University School (OH)
Twitter: @BMalbasa

Introduction:

IMG 0481Those of us who run variations of the Spread offense are well aware of the potential drawbacks of this offensive approach. They include a lack of physicality at the point of attack, the difficulty for defensive units when they face power-oriented teams, and the inability to run the ball with a lead in the fourth quarter among others. While my experiences have taught me that these criticisms are not without merit, I believe that the benefits of an up-tempo, wide-open approach have always outweighed these occasional frustrations.

During the past two seasons, we have utilized a slot-style tight end (some would refer to him as an “H-Back”, and we call him the “Y”) in order to have the flexibility to create additional gaps for the defense to defend, and to make our running game more multiple. This has addressed some of the issues listed above and provided more options for us in all facets of our offensive game.

Personnel

Choosing this player is an important part of allocating offensive personnel. The ideal Y in our system is strong enough to successfully kick out opposing ends, fast enough to threaten the deep middle of the field, and skilled enough to be an effective pass catcher. In other words, our Y is a hybrid of a fullback, tight end, and inside receiver. If we have a player who fits this mold, we consider ourselves especially fortunate because it means we do not have to change personnel to alter our formations. If such a hybrid is not in your program, our objectives in the run game would dictate playing the linebacker or fullback type in the role.

Base Inside Zone Scheme

Like many Spread teams, our base run play is the Inside Zone and the Zone Read has been part of our first practice installation plan every season. In our version of Inside Zone, we teach our back to aim for the near hip of the center and read the back side A gap. If it is open, he explodes through the hole; if it is closed, he bends back to escape through the back side B gap (Diagram 1). Our running backs and quarterbacks practice the mesh and read almost every day, and we position a defender for the running back to read while attacking his aiming and escape points.

Slide1

Read More

How Champions Disrupt Routes

By Mark Bruns 
Defensive Coordinator
Coldwater High School (OH)
Twitter: @coachBruns


Introduction:

From a defensive perspective our goal is to disrupt the offense as best we can, allowing time for the rush to connect, and making the quarterback throw something they are not comfortable with.  Our philosophy at Coldwater High School is to collision receivers at different points in their routes, thus making the timing of the offense disrupted.  By getting our hands on receivers we are hoping to also create a smaller completion window for the quarterback to try and fit his pass into.  If we can disrupt the read, and get some time for the rush to get the quarterback to move his feet and reload then he is also not going to be as accurate. 

We try to accomplish our goal in several ways and techniques.  We have a press technique that many teams use, especially when they have superior athletes to their opponents.  We have the typical off technique where the secondary players give cushion and react to what is happening in front of them.  However, our favorite technique is the “catch” technique, where we wait for the receiver at 5 yards and then let them turn us into the route.  This has been most effective at stopping offense from using any kind of short game, and also intermediate routes timing is off as well. 

Slide1Slide2

Alignment

Disrupting reads is a big part of our defense, but we don’t let it be a detriment to our scheme.  We do not walk all the way out on a receiver that is lined up 5 yards or closer to the sidelines, that receiver can only do 2 things.  Most likely come and block you, which is why he lined up that far out in the first place.  Or because he is trying to create some space for his route that he is going to run inside somewhere in the first place.  We have seen too many teams concerned with getting their hands on receivers that they will take themselves out of plays simply by alignment.  Or they will chase a receiver and take themselves out of position to make a play in their area they are designated.  If a receiver wants to run out of his way to avoid us, or the offense wants to put multiple people in a zone then we will cover those guys with one defensive back.

We want to play the receiver from the “top down” by disrupting the easy pass first, and working our way into deeper routes.  Once we are past 5 yards we don’t have to worry about quick game, at ten yards we are looking for outs, flags, an in, or a post.  Then if the receiver hasn’t committed to breaking their route after fifteen yards it is likely a fade or vertical route.  Having inside leverage we want to take away the easy pass inside first.  But also by having inside leverage we want the quarterback to have to throw to the outside, hopefully putting the sideline (our 12th defender) into play, and it also makes the throw longer, thus reducing accuracy.  I think all defensive backs coaches have to worry about giving up the deep ball first, and work everything else off of that.  By taking on just half of the receiver, because he turns us, we are “catching” him at 5 yards, it has to slow down the receiver.  The aiming point for contact is the near pectoral with our close hand.  Never want to come across and gamble on a big hit, because our momentum has to be backwards and ready to run in the hip pocket of the receiver.

Slide3

Read More

Concept Blocking: Case 1 – Simplifying Schemes

alercio2By Rich Alercio
Offensive Line Researcher
X&O Labs

In a 25-year career as an offensive line coach and clinician for youth, high school and college coaching staffs, I have come to one conclusion: Teams have way too many running plays with varying blocking schemes in their offenses. They block one play this way and another play that way. For example, they think if the 3-technique shifts to a 1-tech a different play must be called. I have always subscribed to the K.I.S.S. (Keep It Simple Stupid) methodology, especially for the big guys up front. The offensive linemen do not care about all the creative ways you can get the ball to your best player and all the window dressing used to do so. They just want to have great confidence in knowing what step to take and where to take it.

Regardless of the offense, most running plays can be categorized into one of three offensive line schemes: Zone, Gap or Man. Instead of having a dozen running plays with a dozen different blocking assignments, consider grouping all of your running plays into one, two or all three of those schemes. Once the offensive lineman understands the scheme, he can easily adapt his technique to the play. For example, if Iso and Lead Draw are both Man schemes, the playside tackle just needs to know he has #2 on the LOS (which is mainly the defensive end). The assignment is the same, but the footwork may change. For example, if it is an Isolation play, he takes a run step with his inside foot. If it is Lead Draw play, he will pass set with his inside foot first. Its two different plays blocked the same way with the same leverage with just a change in technique. Basically, it’s two plays for the offense that the defense has to defend but only one scheme for the O-Line to learn.

Before I begin grouping running plays into the three “run families,” I’ll define the 5 run steps that the offensive linemen will use on the plays. Although this may sound elementary, it’s essential that coaches teach all footwork techniques first so that players can identify their technique based on the play concept. The first is a “Base” step. A base step is a vertical step straight ahead where the heel of the foot you are stepping with will replace the original alignment of the toes of that foot (“heel replaces toe”).

The next step is “Reach” step. A reach step is a vertical step as well but with lateral displacement. With a reach step, the offensive lineman gains ground vertically and laterally. The vertical distance of the step is the same as the Base step: heel replace toe. The lateral distance will depend on the alignment of the defender Base and Reach steps are both vertical steps. The shoulders of the offensive lineman will stay square to the line of scrimmage.

The third step is an “Angle” step. Angle is a 45° angle step forward. Again, the heel of the foot taking the Angle step does not go further than the original alignment of its toes.

The next step is a “Bucket” step. A bucket step is a backward 45° angle step. After the step, the toes of the foot taking the Bucket step will be at the depth of the original alignment of the heel of that foot. Both the Angle and Bucket steps get the shoulders of the offensive lineman turned at a 45° angle.

The last of the run steps is the “Pull” step. The Pull step is a 90° step towards the sideline. The alignment of the heel after the step should be directly behind its original alignment.

Concept Blocking the Man Scheme

Following the example used in the opening paragraph, we will begin with a Man scheme. Each offensive lineman is assigned a defensive player which allows for the most accountability. There can be no excuse of “your man” slanting to someone else’s gap. It also allows the coach to tell the RB with great certainty where the hole is going to be. In a Man scheme, the Guards will block #1 on the line of scrimmage (DT) and the Tackles will Base step with their inside foot to block #2 (DE). The Center has the Middle Linebacker aligned over him (4-3, 3-3) or the back-side ILB vs. a two Inside Linebacker front (4-4, 3-4).

Man Concept vs. Even Front

Man concept vs. Even Front

If the Center is shaded by a #1 (DT/NT), he must combo with that Guard to his LB.

Man concept vs. Even Front

Read More

Concept Blocking: Case 2 – Man Schemes


By Rich Alercio
Offensive Line Researcher
X&amO Labs

Man blocking schemes are the easiest for coaches to teach and for linemen, and backs to learn. All they need to do is be able to count. Man schemes also allow for the most accountability, if there is a breakdown a coach and the player should know where it occurred. There are some combination blocks associated with a man scheme; but for the most part, one offensive player is responsible for blocking one defender. The man scheme also allows the coach to tell the running back, with a high level of certainty, where the hole is going to be.

As discussed in Part 1: Grouping Plays into Concepts and Matching Corresponding Footwork, we will utilize 5 Run Steps:

  1. Base
  2. Reach
  3. Angle
  4. Bucket
  5. Pull

In the Man scheme, Guards are responsible for #1 on the line of scrimmage (LOS), the Defensive Tackles(Diagram 1).

Concept Blocking Man Schemes - Diagram 1

A head up Nose Guard with both Guards uncovered is #1 on the playside. The back-side Guard is a free player. He can be part of a 3-man combo on the Nose Guard with the Center and playside Guard to the back-side ILB vs. a 3-4 (Diagram 2).

Concept Blocking Man Schemes - Diagram 2

Versus a 3-3, the playside Guard and Center combo the Nose Guard to the Middle LB. The back-side Guard can combo the Nose Guard but will be responsible for the back-side OLB stacked on the DE at the edge of the box (Diagram 3). Tackles are responsible for #2 on the LOS, the Defensive Ends. The Center is responsible for the Middle Linebacker (in a 4-3 or 3-3) or the back-side Inside Linebacker (4-4, 3-4) vs. a two Inside Linebacker front and must call the combo with the appropriate Guard when he is covered. If the offense utilizes a Tight End, he blocks #3 on the LOS or a walk-up Linebacker. If there is no #3 on the LOS, he arc releases to block the alley defender. The alley defender could be an outside linebacker, a safety or a rolled Corner to a nub tight end. The first Linebacker to the playside is blocked by a lead back.

Concept Blocking Man Schemes - Diagram 3

This report will address three common running plays that are associated with the Man Scheme. They are:

  1. Iso
  2. Lead Draw
  3. Counter

Counter is sometimes referred to as Tackle Trap. These three running plays can be utilized by almost every style of offense.

Iso

Let’s begin with the Iso play. To avoid the big collision of lead back on Linebacker, it is best to run the play through the B-gap (between the Guard and Tackle). A good Linebacker may get a split read from the Guard and Tackle and fill the gap, but he will not have a direct path to collision the lead back as he would if the play were run to the A-gap (between the Center and Guard). Now let’s address the big guys up front and start with the playside Guard’s block on #1. If the DT is aligned in a 1-tech (inside shoulder of Guard), the playside Guard will take a Base step with his outside foot (Diagram 4). This step insures that the defender does not beat him on a slant to the B-gap. He should NEVER step with the near foot to the defender when he already has positional leverage to the hole. The visual aiming point for the Guard is the outside bottom of the defenders facemask. That aiming point allows the Guard to maintain horizontal leverage to the hole and vertical leverage on the defender (under his pad level).

Read More

Concept Blocking: Case 3 – Gap Schemes


By Rich Alercio
Offensive Line Researcher

X&O Labs


Among all run schemes, a Gap scheme is the most complex, time consuming yet rewarding run schemes. It combines playside linemen blocking to their back-side gap with situational double team blocks with one or more back-side lineman pulling to the playside. The two most common gap scheme running plays, and the two I will cover are the Power and Counter Trey schemes.

We will utilize the 5 Run Steps discussed in Part 1: Grouping Plays into Concepts and Matching Corresponding Footwork:

  1. Base
  2. Reach
  3. Angle
  4. Bucket
  5. Pull

In the Gap scheme runs, every lineman (Tight Ends included) is responsible for a Gap unless he is a “puller.”

Let’s begin by identifying the gaps. The area between the Center and Guards are the A gaps. Between the Guard and Tackles are the B gaps, the C gap is between the Tackles and Tight Ends and the D gap is the area outside the Tight End (Diagram 1). Below is the basic list of player responsibilities in the gap scheme. PS stands for “playside” and BS stands for “backside.”

Concept Blocking Gap Schemes - Diagram 1

Gap Scheme responsibilities:

  • PS Tight End: C Gap
  • PS Tackle: B Gap
  • PS Guard: A Gap
  • C enter: A-B Gap
  • BS Guard: Puller
  • BS Tackle: C Gap or Puller
  • BS Tight End: D Gap

The Power and Counter Trey plays are blocked exactly the same for the Center and playside Linemen. They will all take their first step with their back-side foot (the foot in their gap). On a gap scheme run to the right, they all will take a first step with their left foot.

The responsibilities of the all the playside linemen, including the Tight End, are the same. With a defensive lineman aligned on our inside shoulder, (man on in their gap) (Diagram 2) such would be the case with a guard against a shade technique, a tackle against a 4i technique and a tight end against a 4-technique, we will take a Reach step with our inside (gap) foot with a visual aiming point of the center bottom of the defenders facemask. If the defender works to maintain his inside leverage, we will drive him down through the gap. If he slants cross our face to the next gap, we will get help from our play side lineman.

Concept Blocking Gap Schemes - Diagram 2

Versus a defensive lineman aligned in your gap but on the man to your inside (Diagram 3), we will take an Angle step with a visual aiming point of the center of the defender’s body to cover him up.

Concept Blocking Gap Schemes - Diagram 3

If there is no defender aligned in our gap and no one aligned on you (Diagram 4), we will angle step to our gap with a path through our gap to the Middle or back-side Inside Linebacker.

Read More

Concept Blocking: Case 4 – Universal Pass Pro


By Rich Alercio
Offensive Line Researcher
X&O Labs

It’s my thought that one pass protection scheme can be used for both 3 and 5 step drop back and play action schemes. In fact, it can also be implemented into a 6, 7, 8 or 9-man protection scheme.

Sound too good to be true?

It’s not. It is called Slide Protection but not a full slide. We want Linemen blocking Linemen.

Slide protection will combine the two schemes discussed in previous run blocking articles:

  • Man
  • Gap

One side of the Line of Scrimmage will block Man protection. The Guard will block #1 on the LOS (Defensive Tackle/Noseguard). The Tackle will block #2 on the LOS (Defensive End). The Center, other Guard and other Tackle will block a Gap protection scheme (Diagram 1). The Center has the A gap on the Gap side while the Guard has the B gap, and the Tackle has the C gap.

Universal Pass Protection Schemes - Diagram 1

The Running Back(s) block any Blitzing Linebackers on the Man side. This allows the protection to account for 6-man (1-back) or 7-man (2-back) pressure. A Tight End on the Man side can either go out into a pass route or block #3 on LOS (Linebacker) just like he did in man blocking schemes. A Tight End on the Gap side can stay in and account for D gap or run a pass route. Having a tight end in the protection allows for an 8 or 9-man protection scheme (Diagram 2).

Universal Pass Protection Schemes - Diagram 2

Pass Pro Fundamentals

Before going any further with the protection scheme, let’s discuss the steps and demeanor the linemen will utilize in pass protection. Any offensive lineman blocking or setting to a defensive lineman to his inside will use a Power step (Diagram 3). The Power step is a lateral step with the inside foot. The step works inside parallel to the LOS. No ground is gained or given on the step. The width of the step is determined by the alignment of defender.

Universal Pass Protection Schemes - Diagram 3

If the offensive lineman is setting to or blocking a defender to the outside (Diagram 4), he will take aKick step. The Kick step is executed with the outside foot out backwards at a 45 degree angle.

Universal Pass Protection Schemes - Diagram 4

Now let’s discuss the body demeanor of the offensive linemen upon taking their first step. All offensive linemen will get feet outside knees and knees outside hips. Their outside foot will be staggered back with a big butt and big chest square to the LOS with weight on the inside foot, regardless of the first step. Their hands should be at chin height creating a triangle with the forearms. The offensive lineman should see the target through his hands.

The Pass Set is the combination of the first Pass Step (Power or Kick), the demeanor and the subsequent steps that lead up to the Punch.

The second step is a Slide step with the opposite foot of the first step. The slide step does not gain nor give ground. It just slides in the same direction as the first step. The third step is a repeat of the first step and is called the Brace step. The Offensive Lineman braces on the third step to deliver his pass punch to his target.

Read More

Concept Blocking: Case 5 – Zone Schemes

By Rich Alercio
As told to Mike Kuchar

Editors Note: The following material was presented by X&O Labs’ offensive line researcher, Rich Alercio, on how he blocks his zone schemes.

Many coaches teach the inside zone (an interior play that will hit within the tackle box) and the outside zone (a perimeter run scheme) in two separate ways, but I try to combine the same blocking schemes in both runs. In theory, both zone plays rely on a vertical stretch by the defense in which it is the running back’s assignment to find an opening in a gap and explode through it. I teach both plays the same exact way to the front side, the only difference is the back-side of a stretch play when lineman need to work across the body of the defender to their gap. The play looks and feels the same to a defense, which is what makes using the two in combination so effective. The only difference is the path of the running back. On the inside zone, the running back pushes to the heels of the offensive lineman reading the first down defensive lineman to the playside. In the stretch scheme, the back’s aiming point is the defender on the outside of the tight end. Although this report will focus on offensive line play, the back is just as important, as he must take the same steps and move in the same manner.

Displacing Defenders on the Inside Zone

The inside zone is a play that works off the displacement of defensive players, with the intent of getting them moving laterally down the line of scrimmage and cutting up into a gap where they have vacated. The common misconception about the inside zone is that it’s a straight ahead play and that’s entirely false. You rely off the displacement of the defensive lineman or linebackers to find the spots that are vacated. It’s anything but a downhill play. It’s a slow-to-fast play where we’re taking a look and seeing how defensive linemen have displaced themselves laterally. The whole idea of the play is to get the LB to run in the direction that we are running, hold lineman with combination blocks and find the spots in-between.

But it’s the lineman’s job, not the back’s, to displace the defense. Whether the called play is zone or stretch, all offensive linemen must take the same exact steps. The critical thing is everyone is stepping with the playside foot, right or left. We actually make a “Ricky” or “Lucy” call denoting the right or left foot. What makes it simple is playside linemen will either take a reach or a base step (the same steps addressed in Alercio’s man blocking report) depending on if a lineman is covered or uncovered. Regardless of the type of step each lineman is taking there are two components of executing the play effectively:

  1. Never let the heel of that second step cross the toe of the first
  2. Keep your shoulders square to the running back

Everything nowadays is about covering guys up, that’s all you need to do. The days of putting your head on this or that side and steering him in a specific direction are over. There is no more drive him back for five yards and put him on his butt. When that happens, it’s a special thing. It’s just cover him up and let him run; eventually he’ll work himself out of the play. You can’t turn your butt to the hole. Stay with him and stay square, your heel cannot pass your toes.

Four Blocking Scenarios on the Playside of Zone Runs

To me, there are four main scenarios that a player has to ask himself when determining what block to execute in a zone scheme:

  1. Covered playside
  2. Covered back-side
  3. Uncovered open gap
  4. Uncovered closed gap

For clarification purposes, we talk about “covered” as when a first level defender (walk up linebacker or defensive lineman) is aligned over any part of the offensive lineman. Playside and back-side in individual zone principals do not refer to the playside of back-side of the LOS but rather the playside or back-side of the individual offensive lineman.

Covered Playside (Diagram 1)

Concept Blocking Zone Schemes - Diagram 1

Definition: Covered playside indicates that the offensive lineman has a defensive lineman aligned on him and on his playside shoulder.

Read More

Concept Blocking: Case 6 – Instructional Videos

X&O Labs’ Rich Alercio takes you on-field to present the Concept Blocking System.

On this page you’ll find two videos:

  1. Run Blocking Techniques for the Concept Blocking System
  2. Pass Blocking Techniques for the Concept Blocking System

Due to length, we’ve separated each video into two segments – Part 1 and Part 2. All four of these videos are available below – on this page.

These videos are enabled to play on any computer and most mobile devices such as smart phones and tablets. To watch these videos with your coaching staff or players, we recommend you connect your computer to a projector.

To maximize your viewing experience, we recommend you close all programs and windows you are not using prior to watching these videos. If you experience any buffering issues, just “pause” the video for a moment and then press “play.”

Read More

Using Stick and Spacing Play-Action Pass as Triple Option Schemes

By Darrell Sutherland
Head Coach
Bartram Trail High School (FL)

Introduction:

bertrumThe Triple Option is known for making defenses play “assignment” football. Play action success within a triple options offense is based on the advantage of knowing the defensive assignments. Most perimeter defenders assigned to primary or secondary run support are placed in a run/pass bind; this conflicted position leaves them vulnerable to play-action passes.

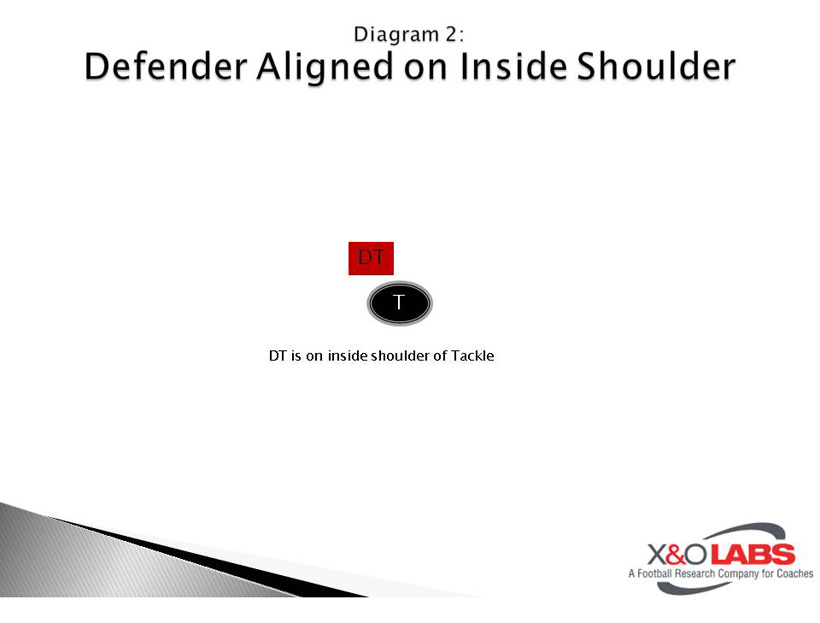
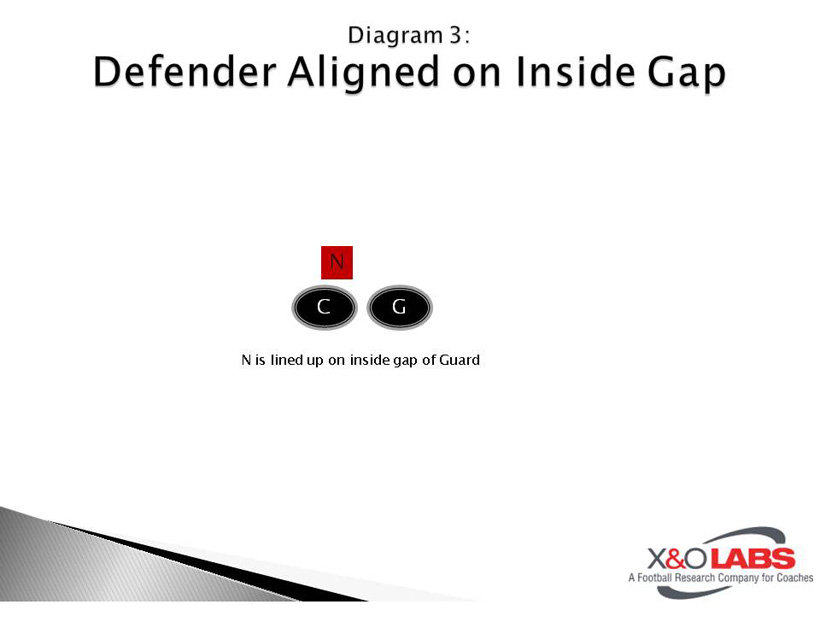
The result has been increased efficiency for all of our concepts. This past year, our Inside Zone Triple (with a variety of blocking tags) was 70% efficient (4+ yards or gained a 1st down) and averaged over 6 yards an attempt. The 3-step play-action passing concepts, like Spacing and Stick shown below, were 65% efficient (7+ yards or gained us a 1st down). Lastly, the 5-step play-action concepts were 42% efficient (10+ yards or gained us a 1st down) and accounted for a number of our explosive plays, averaging 27 yards a completion.

Play-Action Basics

In our system, the Play-Action Pass serves the same function as manipulating the Option portion of the play or running Counters and gadgets. That is that they are all ways to protect our base play. It’s like life: our actions should reflect what we truly value. As the old adage goes, “show me your day timer and your checkbook, and I’ll show you what you value.” The Triple Option is what we want to be great at, so most of our practice play, much like a day timer, should reflect that. With the larger percentage of our daily practice routine dedicated to perfecting the Option, we must be very efficient with our complement plays. We can’t afford those “expensive” plays that eat up practice reps and don’t get results or even get called in games.

To economize reps, we use our existing 3 and 5 step concepts as the patterns we incorporate in our Play-Action Passes. This is an easy way to practice two things at once, and allow our players to play fast in concepts in which they are already confident.

Spacing Concept

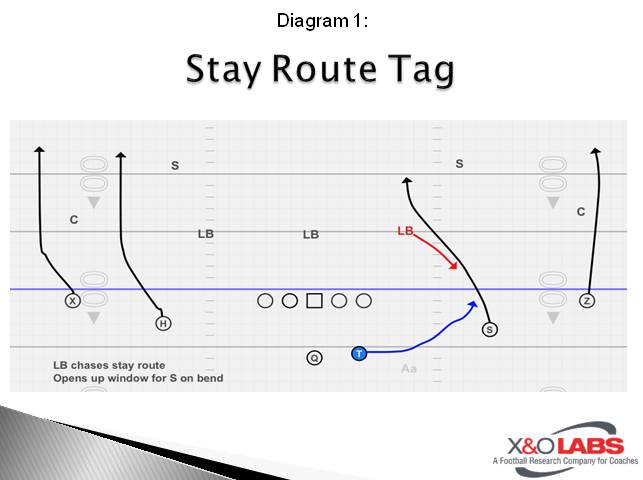
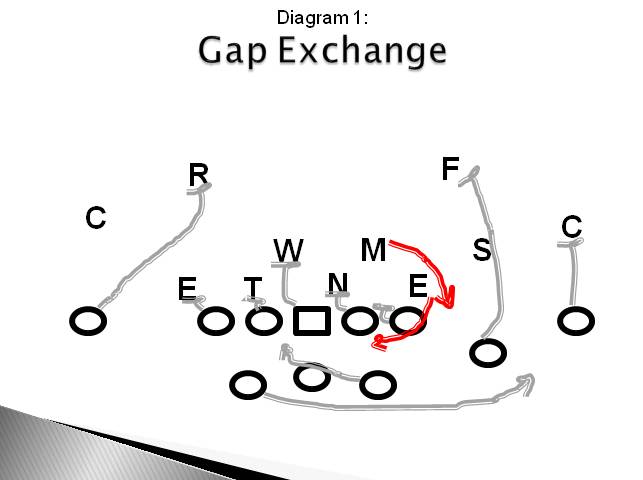
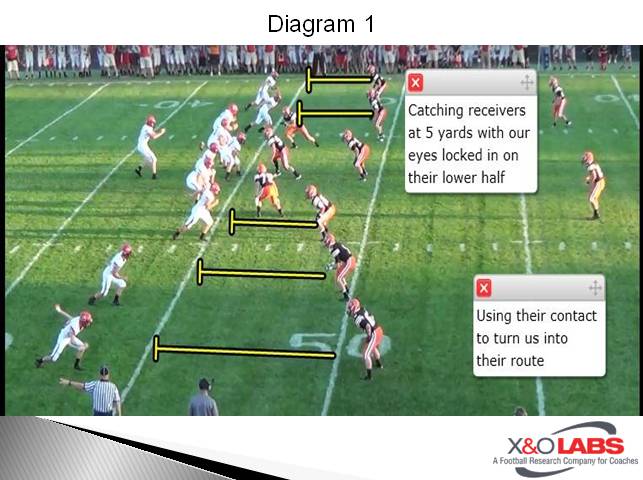
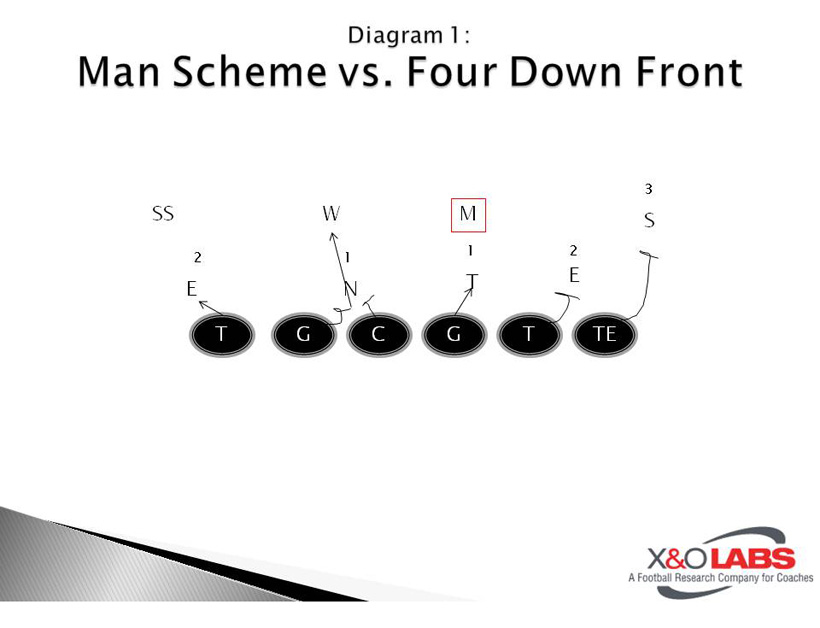
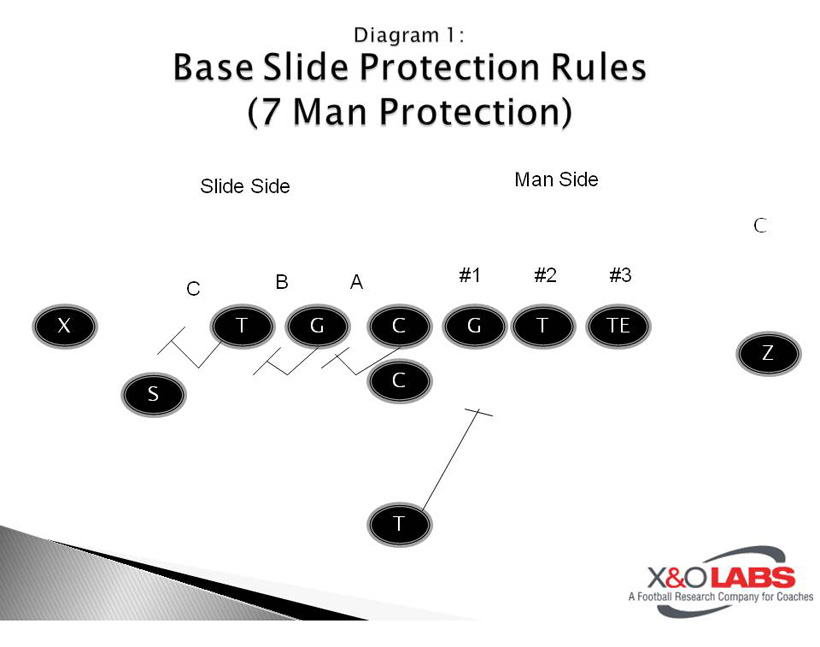
A Horizontal Stretch, like the Spacing concept, is one way to take advantage of the voided underneath zones created by primary run support defenders aggressively attacking their assignments. Many defenses employ a Gap Exchange scheme or some other means of trying to dictate to the offense who will carry the ball (diagram 1). This can potentially compromise the flat defender and the ILB assigned to scrape outside to the QB.

Slide1

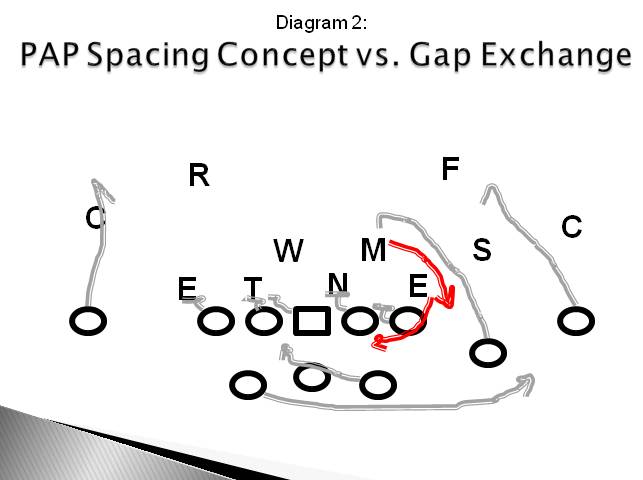
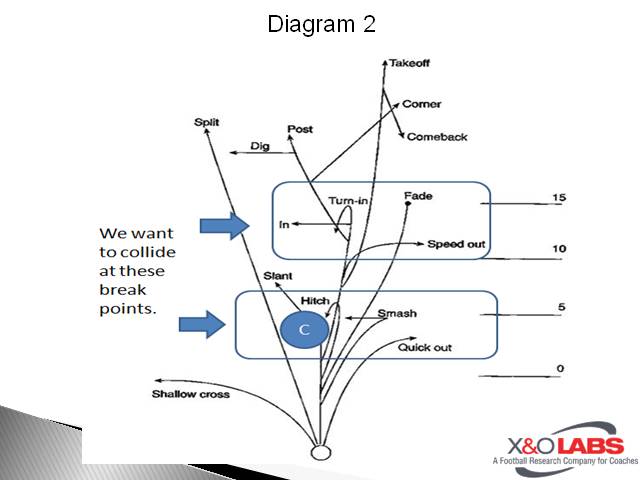
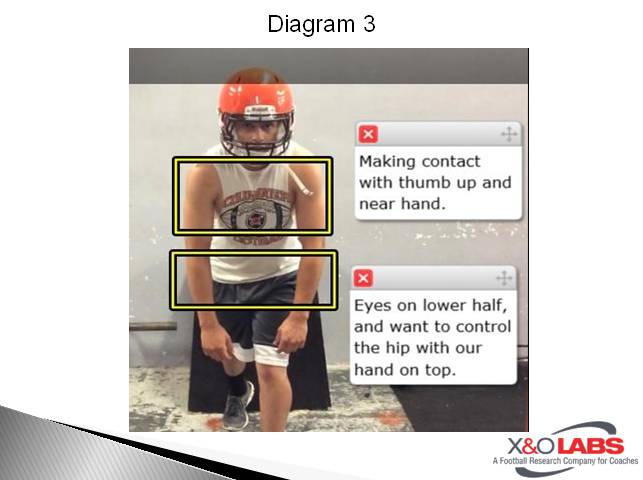
By selling the Inside Zone up front and flash faking to the RB crossing the QB’s face, the offense can influence the defensive end to scrape hard, the zone side linebacker (danger player) to stay zone side, and the triple side linebacker (movement key) to step out. One of the great things about the Triple Option Play-Action Passing concepts is that the QB can read his movement key while meshing with the RB. Our Spacing concept (diagram 2) takes advantage of defenses attempting to add LBs to the option side. It also provides an easy way to tag the backside receiver to counteract when defenses drop the safety into the box to fill for the sliding linebackers (diagram 3).

Slide2Slide3

Here are a few coaching points for running the Spacing concept:

#1 Receiver Play Side – Run a Slice route. Take an inside stem, climb to 8-10 yards behind the flat defender (1st underneath defender), and settle in the open space voided by the flat defender covering the Bubble route.

#2 Receiver Play Side – Run an Over-the-Ball (OTB) Route. Take an inside release on the 2nd underneath defender, climb to 6 yards, and present your front numbers to QB. If the 3rd underneath defender is over the ball, post him up play side (level with, not in front of) so your play side shoulder is “open”.

Back Side Back – Run the option track into a Bubble route. Open and crossover with your chin on your shoulder then drive for width to replace the #1 receiver’s original alignment.

#1 Receiver Back Side – Run the backside Hitch. This is a 6 yard Hitch route with 3 big steps and two little steps (3 big, 2 little). He will convert this route to a fade against press coverage or a hole route against cover 2.

Quarterback Pre Snap Read – Check backside window for a gift hitch. Take it right away if it is there.

Quarterback Post Snap Read – Read the concept from the inside out. The 2nd underneath defender is 1st movement key. Here is how we want him to respond to different movements by the movement key:

  • In the case of a blitz, the QB will throw the ball right now to the slot player.
  • If the key widens, hit the slot who is now posting up 3rd defender.
  • If he brackets the slot, he needs to reset his feet and read the flat defender (1st underneath player) for a high low with the bubble and slice routes.

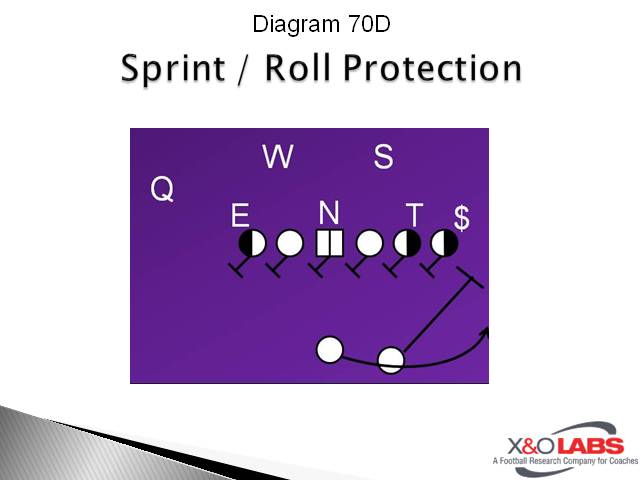
Protection – To keep things simple, we use the same Will Slide protection as we use in our drop back pro, but with “low hats”. The RB will flash fake, crossing the QBs face, and block from #1 to #2 to check down. The backside tackle is man, the back side guard is man if he is covered. If he is uncovered he starts the slide to the zone side.

Stick Concept

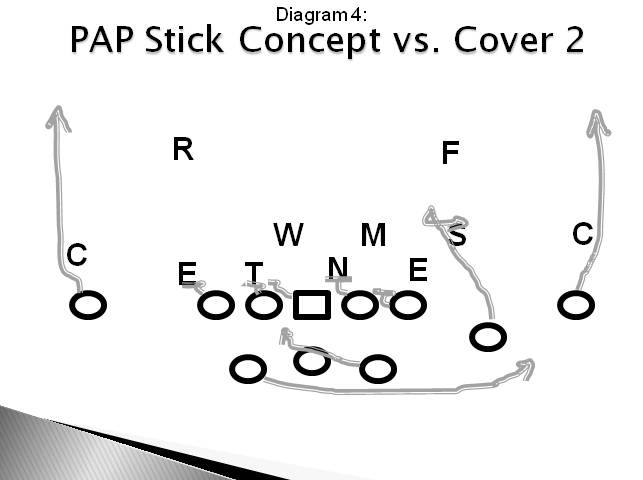
Another benefit of incorporating your existing 3 and 5 step concepts into your Play-Action Pass is the fact that the play has validity even if the defense doesn’t “bite” on the run fake. The Stick concept (diagram 4), is one of our most efficient 3 step concepts, and by also tying it to one of our base runs, we can call it even more often. As a “reaction” play, it is a great way to expand the sideline hole because the corner is now a primary run support defender.

Slide4

Read More

3 Solutions to the Rocket Sweep’s 3 Biggest Problems

By Allen Oh
Offensive Coordinator
Krum High School (TX)
Twitter: @okstate62

Introduction

unnamed 1Our offense is a multiple formation offense. We like to use a variety of looks to help us get in the best situation to run our base plays. The Rocket Sweep is a big part of our attack as we believe it gives us many advantages. With that said, we have also learned that you have to commit to running the play to get the advantages of the motion.

Once the Rocket is a staple of your offense, the defense will run specific schemes to disrupt your game plan on the edge. The purpose of this clinic report is to explain the common defensive schemes to attack the Rocket Sweep and the solutions we use to attack those schemes.

Advantages of the Rocket Sweep

Krum started its football program in 2008 with 7th and 8th grade teams and then built to a successful varsity program in the years since. In the beginning, we were a big Jet Sweep team. As the scheduling became tougher each year, the explosiveness of the Jet Sweep began to diminish. After watching Georgia Tech play, we decided to take their Rocket Toss concept and put it into the gun. We installed it in the Spring of that year and it became one of our base plays ever since.

Our number one reason for running the Rocket is that it gets our fastest athlete the ball in the perimeter. With the pitch being received outside the tackle box, the tackles block doesn’t have to be a perfect hook to have a successful play. With the success of this play, we were able to utilize the motion to open up every aspect of our offense. The influence it puts on defense will help the run game, passing game, and screen game.

Rocket Sweep Basics

The Rocket Sweep is nothing but a receiver toss play. The slot receive will “orbit motion” and the quarterback will reverse out and pitch it to the moving receiver. The receiver now becomes a running back, and now, one of your best athletes is carrying the football.

Slide1

The most important thing is to make sure your quarterback and wide receiver are on the same page with timing. We have a Rocket period that is 5 minutes every day in practice where we devote to getting the timing down. Here are a couple of key points for the wide receiver and quarterback.

Wide Receiver

Start with a flat motion toward the quarterback.

When you are about 3-5 yards outside of the tackle (depending on the speed of the receiver) orbit 1 yard behind the quarterback.

After you pass the quarterback, flatten out the motion and be ready for the pitch.

Quarterback

Set the receiver in motion.

When the wide receiver disappears from your peripheral vision, snap the football.

Open your foot about 60 degrees and pitch the football to the receiver.

Blocking Scheme

Our basic blocking scheme for the Rocket Sweep is an Outside Zone concept. The difference is being that do not worry about combos. The simple rules are as follows:

Play Side Tackle: Bucket step and hook the end man on the line of scrimmage.

Read More

The Gorilla Goal Line Defensive System

lewisvilleBy William Mitchell,

Head Coach,

Lewisville High School (SC)

As we all know, the game changes drastically as the offense approaches the goal line.  Nearly every offensive coordinator I know changes the way their offense use formations and call plays due to both the proximity of the goal and the decreased vertical space that they have to work with.  Conversely, experiences have shown me that defensive coordinators are mush less apt to change in this area of the field.  Sure most of us have a goal line package that may switch to man coverage or add a defensive lineman, but most coaches still stick with their base stuff.  This presents a variety of issues that can prove costly in the most important moments of the game.

It is for that reason that we have shifted the focus of our goal line defense from being a defensive adjustment to becoming a special team.  Here are a few reasons for that change:

  1. No one is off-limits to this unit personnel-wise. If I need the starting tailback at a corner and I need the starting quarterback coming off of the edge, then I get them. Most of our normal defensive package is based on speed, quickness, & multiplicity, but we are different in goal line. By making our goal line unit a completely separate group, I can add the size that we would sometimes like to get in there in short yardage and I can add other athletes whose skill sets fit what we want to accomplish.
  2. We can create a separate mindset specifically for that unit. We really push being great on the goal line as being a key to our program. We attach a great deal of pride to getting on this unit, and players on both sides of the ball want to play on this unit.
  3. If we are in goal line, it usually means that things have not gone so great defensively. By running a separate unit onto the field (even if 7 or 8 of the players are on 1st Defense anyway), it creates a little bit of a “fresh start” mentality and gives us a confidence boost.

As is the case with many special teams concepts, simplicity and flexibility is key.  Since we are subbing in players who may not be on defense full time and who may not be expecting to enter the game at that moment. If we have a turnover inside our own 10 and I need to call goal line defense unexpectedly, our scheme is simple enough that the players know what to do even if they are surprised. We also think that this approach, if executed correctly of course, builds the players confidence in the scheme. By keeping simple and flexible, the players always know exactly where to be regardless of the formation thus allowing them to play faster and more confidently.

Gorilla Personnel Types

Our scheme is a mix of several things the coaching staff has encountered, but a large base of the scheme comes from Bellevue High School in Washington. They are the team that broke De La Salle’s winning streak. These are the positions and what we look for to fill them:

  • Two NOSE GUARDS – Quickness is a top priority. Wrestlers, running backs, Strong Safeties.
  • Two ENDS – Preferably our two best defensive linemen…..size & strength needs to be a little more of a factor here.
  • Two EDGES – The two best athletes on the team. Option quarterback, point guard on basketball team, change of direction ability is huge. Speed is important, size is not.
  • Two LINEBACKERS – the best two linebackers, at least one must be able to cover man to man.
  • Three DEFENSIVE BACKS – must be able to lock up man coverage for at least 2 seconds.

We call our goal line package GORILLA (as in 800lb Gorilla). Since we went to this package three seasons ago, we have made 15 successful stands in 28 opportunities. These are our alignments in GORILLA:

Read More

Blitz Checks Case 1: Introduction and Protocols

By Mike Kuchar

Senior Research Manager

X&O Labs


Editor’s Note: We should be clear that this report focuses solely on a pressure check system, meeting blitzes that are NOT called from the sideline, but instead are CHECKED from the sideline based on various offensive variables such as offensive formation, down and distance, offensive personnel and field position.


Case1:  Introduction and Protocols:

marshallPlain and simple, this special report is centered on pressure- where to bring it, how to bring it and when to bring it.   When creatively designed and accurately called, a pressure system cannot only be detrimental to offenses it can be downright degrading.  While offensive coaches spend hours watching game film on how to attack defenses, defenses are finding new ways to counter what offenses present and they are doing so by pressuring tendencies on a down to down occurrence.  What if you were able to put your players in the best possible situation to be successful each and every play?  You’d be foolish not to.  A pressure check system allows you that opportunity. 

Why Use a Pressure Check System

There are plenty of reasons as to why coaches use a pressure checks system, all of which will be explained thoroughly in this report.  The fact is 49.7 percent of coaches have been using a pressure check system for over five seasons now.    Of these coaches, 28.1 percent will teach a check on roughly 50-74% of every called pressure down.  What this means is that coaches will want pressure and communicate they will pressure, but where they pressure depends on various variables.   We were inundated with responses from coaches at all levels preaching the advantages of using a pressure check system.  The most common benefits are below: 

  • It complements no-huddle offensive systems- With offenses rushing to get on the ball and get it snapped, checking pressure eliminates any further verbiage from the sideline.  In fact, coaches like Brown University’s defensive coordinator Mike Kelleher will use one word to denote the front, coverage and pressure.  “We have about 10 calls where we will use against these up-tempo teams,” Kelleher told us.
  • Takes advantage of offensive tendencies- This response was particularly common among high school coaches where tendencies are a little more prevalent.  Once your game plan is in, create your pressures based off offensive formations. 
  • Eliminates bad play call capabilities- Why stay in a poor blitz call if you don’t have to?  Using a pressure check system based on offensive tendency always gives your defensive the opportunity to check out of a poor call.  
  • Combats offensive pre-snap movement- Once offenses get on the ball they can get in a situation where pre-snap movement can pull you out of a pressure.  Instead of running the pressure- or checking out of it- you can adjust the pressure to attack its vulnerability.
  • Attacks Protections- We have found coaches will design their pressure check system against various protection variables such as back placement, Center movement, offensive line oversets and weak spots.  Pressures can be tagged to attack each of those situations. 
  • “Opposite” Calls- What this means is that if a pressure gets detected and an offense can adjust, having a pressure check system allows you call the pressure opposite the detection, thus still getting home.  Now, this part of it takes a tremendous deal of coaching, but still an advantage. 
  • Harnesses Unpredictability- Blitz checks can be made instantaneously at the line of scrimmage which makes it nearly impossible for offenses to determine where the blitz is coming from.
  • Can be a Game Changer- If checked at the right time against the right tendency, a pressure can not only disrupt the play but also impact the entire course of the game.
  • Defends Read option teams- Depending on the placement of the back, pressure checks can be designed to attack certain zone reads and power read scenarios. 
  • Fun for your players- Once you set up your pressure check system, it gives players accountability when making the checks.  They have fun doing it. 
  • Helps smaller players play fast- Blitzing has always been a great equalizer on defense.  It is even a better option for teams that lack the beef up in the box. 
  • Develops football IQ– This was one of the more intelligent responses we received from coaches.  In order to develop a pressure check system, you need to teach your players how to identify formations, protections and personnel groupings just to get the right pressure.  Again, it makes them accountable for their decisions, which means they have to be continual learners. 


Read More

Blitz Checks Case 2: Formation and Personnel Pressure Checks

By Mike Kuchar

Senior Research Manager

X&O Labs


Introduction

vtfbIn this case, we will present our research on the most common pressure checks against various offensive formations and personnel groupings.  According to our research, 74 percent of coaches choose to pressure certain formations and personnel groupings, more so than any other variable.  While this may be true, we found it necessary for coaches to be efficient with teaching their players formation structures before installing their check system.  Many of the coaches we spoke with when conducting our research said that they will install all of their various types of pressures- field, boundary, tight side, open side, etc. before getting into specifics about formations.   

Pressure Checks to Closed and Open Surface

When we started to conduct our research on attacking formations/personnel groupings we’ve found coaches have two separate philosophies on identifying and pressuring formations:

  • Formation classifications– This means identifying specific formations:  pro/slot, pro/trips, doubles, trey, empty, etc.  This is all relative to what your program calls these formations.  Coaches that subscribe to this method, spend a good deal of time teaching their players the proper nomenclature for these formations.  Pressure checks designed to attack specific formations are heavily based on tendency. 
  • Surface classifications– This is relative to coaches identifying formations by surface.  For example, a two-man surface will usually consist of a Guard and Tackle without a Tight End whereas a three-man surface will consist of a Guard, Tackle and Tight End.  Coaches will have different pressures to attack these surfaces. 

Chris Ash, the defensive coordinator at Ohio State University, subscribes to the latter method of blitzing surfaces.  “A lot of what we do is based off formation- Tight End, open side and back,” said Ash.  “If we can gain an advantage by blitzing the formation than we will do it.   If there isn’t an advantage we can find then we won’t.” In Ash’s system, he’ll use a code work like Yankee (Y) to blitz the Tight End and an “Oscar” call to blitz the open side, which would be an entirely different blitz.  He will also have a bird check which means blitz the back.  “The question is how much can they manage?” asks Ash.  “If they are the same blitzes each week, you can scheme more.  But if you’re starting to scheme new blitzes each week, I think that’s when you get yourself into trouble. “

Wallie Kuchinski, the defensive coordinator at the University of St. Thomas, a perennial division three powerhouse, teaches his players to attack two types of surfaces:  a Tight End surface or a two-back surface. Kuchinski told us that 35 percent of his pressures are checked at the line of scrimmage, but at least 70 percent of snaps he will have his players run some type of pressure based on what the offense presents structurally.  “I call blitzing attacking protections but our base package in run downs we send five (out of St. Thomas’s odd front) so I guess that can be called a pressure as well,” said Kuchinski.   When he teaches his players formation structure, Kuchinski classifies formations into the following groupings:

  • Empty structure- This means that five players that can get into five underneath zones with a very high level of five vertical threats with a possibility of 8 gaps with a running QB. 
  • 2×2 (balanced)- All wide receivers or Tight End/Flanker or any combination of thereof.  This could be a double wing set or triple option type teams.  This is a balanced set.  According to Kuchinski how he pressures will be based on who number two is.  “Is he a fast receiver where we play a two-read principle,” said Kuchinski.  “Is he a Tight End or wing where we can play a Quarters concept so the Safety can get down into the run game?”
  • Unbalanced Set- Here the End Man on the line of scrimmage (EMLOS) could be a Tackle and the Tight End is eligible backside.  It’s different either one back or two backs. 
  • Half Balanced or 3×1 formations- Here Kuchinski decides to shift with coverage, particularly rolling to cover three.

Tom Mason, the defensive coordinator at Southern Methodist University, sees upwards of 68 formations per game so he talks more about triangles rather than surfaces.  Mason will pressure about 70 percent of the time and will check his pressure 20 percent of the time.  He uses four blitz checks out of his 3-4 front.  “The hardest thing for a coordinator is getting caught in a blitz against a formation that you don’t want to be in,” said Mason.  “So most of the blitzes will be dictated based on Tight End or running back.  We talk in terms of three triangles:  We are going to blitz from the strong triangle (Diagram 1), the weak triangle (Diagram 2) or the middle triangle (Diagram 3).  It gives you a chance to get you in something that you will have success.”  Mason made a point to say because SMU’s head coach June Jones spread offense doesn’t revolve around a Tight End, so he works more on pressuring those three-man surfaces instead of defending them.   “I have enough confidence in our cover down rules that I’m going to bring pressure the way I want it,” said Mason.  “I’m not going to let an offense dictate what we do.”

Read More

Blitz Checks Case 3: Using Pressure Checks to Attacking Protections and Personnel

By Mike Kuchar

Senior Research Manager

X&O Labs

Introduction

smuWhen conducting our research, it becomes tremendously apparent that coaches are spending ample amounts of time dissecting offensive pass protections to get an advantage in their pressures.  In fact, there were a good deal of coaches in our survey talked about using a pressure check system solely in third and long or passing downs when they can beat a protection. Once a coordinator has a “tell” on where the protection is being set, the possibilities become endless in attacking those protections.  How this ties into a check system is simple:  coordinators are devising their 3-4 most productive pressures to attack certain protections and letting their players make the adjustments.  Our intent in this case is to present some of those pressure concepts so that you can have an idea of what to bring and how to bring it to attack protections. 

Types of Protection Explanations

Editors Note:  In this case, we will only study base 6-7 man protection schemes.  As mentioned previously, Empty (or five man protection) stands on its own.  Since most coaches have up to 3-5 adjustments against empty, we will provide a more in-depth study on this topic at a later date. 

While there are a myriad amount of protections that an offense can employ, the following four protections seem to generate more chances of drawing a pressure check system.  Having said that, there are four base protections schemes that we will examine in this case:  They are as follows:

Full-Slide Protection (Diagram 70A)- Full slide protection simply means the offensive line will slide all in one direction and put its back away from the slide.  Here, the offensive line could slide in many directions- to the field, to the boundary, to the QB’s backside, etc.  It’s important to get a tendency on where they are sliding most often based which could be based on down and distance and personnel.    

Slide70a

Insert Protection (Diagram 70B)Insert protection means that the line will slide in one particular direction (to the right, to the left, to the field or to the boundary) while the back inserts into a opposite, unblocked gap.   

Slide70b

Man or Big On Big (BOB) Protections (Diagram 70C) This is more of a man protection concept where the back is dual reading- from inside to outside second level player. Slide70c

Sprint Out/Roll Out Protection (Diagram 70D) This protection scheme is designed to get the quarterback on the perimeter.  In these protection schemes, the back will usually account for a perimeter defender so the QB can have a run/pass option.  

Slide70d

Breaking Down Protections/Game Planning

Once you understand the various types of protection an offense can employ, it’s important to devise those pressures that attack those protections.  This, of course, comes in the film room during the days leading up to game day.  Middle Tennessee State University defensive coordinator Tyrone Nix gave us insight into how he breaks down protections during the week.  Nix takes every game he has available- which could be close to ten by the end of the season when MTSU played in a bowl game.   “We start with protection and where they are sliding their front,” said Nix.  “You tally each time they slide a certain way. You count right or left, field or boundary, strong or weak, Y (TE) or away from Y (TE).  Every time they throw the ball, you chart where the Center blocks.  All of those things play a part.  Whatever adds up the most, you blitz opposite.  When you design a pressure, you’re just trying to bring four on three that’s all it is.  When the offense sees it and they slide it, then you can come from the other side or you don’t come at all.”

Read More

22 Tags in the Four Vertical Concept

By Mike Kuchar
Senior Research Manager
X&O Labs
Twitter: @MikekKuchar

Introduction:

16437303-mmmain
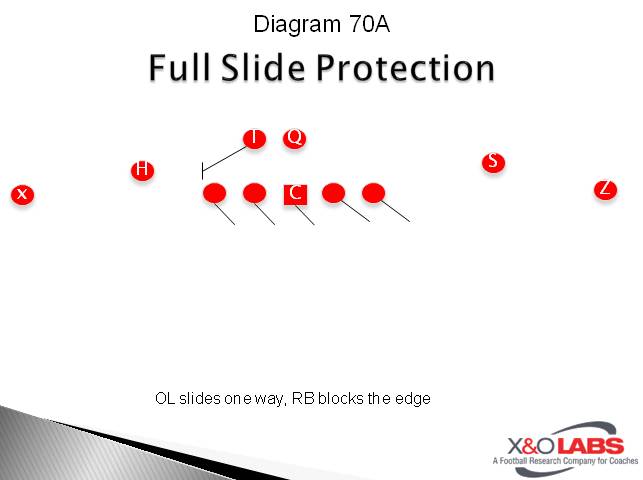
It’s no secret that the four vertical concept is the most popular pass scheme in football today, at least not to the thousands of coaches that completed our survey on spread pass concepts last month.

In fact, 38 percent of these coaches said it was their most utilized pass concept last season, over ten percentage points higher than Snag, Shallow or Mesh concept. It seems the proficiency of the concept was increased as well. 47 percent of coaches, the majority, said this concept netted between 11-15 yards per completion. We all know it can be a homerun ball if executed correctly, but the execution of this concept is what we wanted to uncovered. We found the concept is easy to install but harder to master.

Before we divulge our data, it’s important to note that we already conducted a two-part research study on the four vertical concept some time ago, which could be accessed below:

Four Verticals Study – Part 1
Four Verticals Study – Part 2

While these reports relied mainly on the quarterback progressions and route structure of the purely linear four vertical concept, this report is centered on the various tags coaches are now using in the concept as it relates to the outside receivers, inside receivers and the back. While the four vertical concept can be utilized with a multitude of formations, we did find that 84 percent of coaches are still utilizing the scheme out of 3×1 open and 2×2 open spread formations. So, much of our research and diagrams will be focused on those structures.

Case 1: Running Back Tags

We wanted to start our research on discovering what four vertical teams are doing with their back if he’s not tied to protection. Seven on seven tournaments are filled with coaches who decide to match the back on a linebacker, but we’ve found this route often goes unnoticed on Fridays and Saturdays in the Fall. So, we reached out to a select group of coaches who do utilize the back in the concept and practice what they preach.

Stay Route Tag

Jeff Russell at Wethersfield High School (CT) uses a stay route with his back in his four vertical game. He can either start from the backfield or motion to line up behind one of the outside receivers to execute it. If the flat defender rushes out too quickly to defend it, the bender route on the inside opens up (Diagram 1). If the corner or deep third defender comes up to defend the stay route behind the line of scrimmage, the outside release vertical route is hit in the hole before the safety.

Slide1

“If teams adjust by bringing players over, we’ll either get a great one on one matchup backside or we’ll motion a fourth receiver to that side and get three vertical routes with two benders and one perimeter on the same side as the stay route and we’ll take advantage of the most displaced defender,” Russell told us.

Cross Route Tag

Scott Anderson, the offensive coordinator at Pearl River Community College (MS) will use both a cross and angle concept for his back based on the action of the middle hole player. It becomes more of an option route for the back.
“Our cross route is a drag back across field to window over ball,”said Anderson. “We run the route to go under (but towards) the bender. However, against Tampa two coverage, we try to break at a 45 degree angle.”

Slide2Slide3Slide4Slide5

Kim Nelson, at Roosevelt High School, will also use motion to free up the back in four vertical concepts. “We usually run him in motion to create a trips formation from 2×2 formation,” said Nelson. “If not, we have him work outside release on the outside LB, (or whoever is re-routing him) lean hard to the inside and out run the defender (Diagram 6). Motion works best if he can’t avoid the re-route.”

Read More